
Following are instructions to assist in the entering of information for the license and redemption process.
Only users with access to the Administration menu will be able to perform these tasks.
This section contains terminology that varies significantly depending on geographical area and local settings. For clarity and consistency, the terms License, Jurisdiction and Agency will be used in the document below.
Definitions:
Reclaim - aka Redeem in the US and parts of Canada, this refers to the act of an individual laying claim to an impounded animal and resuming custody of the animal.
Agency - a contracted agency. This might be variously labelled (e.g. Council, Local Authority) depending on local settings. this refers to the name of the local government that maintains animal control for specific geographical areas, specifically, one that impounds animals. Agencies are also used for other representative bodies, e.g. your organisation may have an entry here, particularly if you handle Dispatch jobs.
License - aka Registration in Australia, this refers to the act of legally issuing some form of local government required identification.
Jurisdiction - aka Warrant Area, Local Authority or Shire, this refers to geographical areas governed by the same local government.
A Jurisdiction and an Agency can be the same.
Navigate to Administration then locate and click on Reclaim Administration to see the following menu options:
Microchip Fees
This section sets a default fee for microchips issued at the time of Reclaim. It will also cause an option to appear on the reclaim page that enables users to flag the microchip as one that is to be registered, and offers an option to either charge the fee or not as desired.
Flagging the microchip to be registered will cause it to appear on reports dedicated to microchips and, if an automatic link is enabled with a partner company such as Home Again or HomeSafe ID, it will include these chips in the push to these partner companies.
To enable:
- click the Microchip Fees link
- on the resulting page, click the box next to a Physical Location
- Enter a fee amount in the text box on the right of that Physical Location
- Repeat until all required Physical Locations have been enabled with fees.
- Click Update Fees to save your changes.
Additional Reclaimed Fee Accounts
This section allows you to default for specific fee types associated with a Reclaim.
- click the Reclaimed Additional Fee Accounts link
- Select a Physical Location from the drop-down at the top to load options for the following:
- Microchip Fees
- General Vaccination Fees
- Consultation Fees
- Medical Fees
- Rabies Coupon Fees
- Administrative Fees
- NOTE: These fees only apply if set up via Reclaim Administration. They are separate from the Products and Services module.
- Select the required account codes from the drop-down beside the desired option.
- Click Update to save your changes.
Agency Release Fees
For sites that contract to an agency, this section allows you to set specific reclaim fees according to that contract agency's regulations that are different from normal shelter reclaims.
- Click the Agency Release Fees link
- Select the required Agency / Agency from the drop-down - NB: only agencies loaded in the Go to Agency drop down will appear here.
- Any fees already set up will load.
- Click Add Fee to add a new one
- A pop-up will open;
- Animal Type: Select an animal type the fee applies to from the drop-down. NOTE: baby and adult types (e.g. Puppy and Dog) must be set up individually.
- Fee Description: enter the name of this fee - ensure it is something that will make sense and identify the fee to users ongoing.
- Fee: enter the amount
- Registration: if the release fee is to link to registration, either select “none” for no registration fee, "year" for an annual registration or "lifetime" for lifetime registration.
- Note: if "Years" are selected, you will need to enter the number of years the registration is valid for. If you select "Lifetime" or "None", this will not be required. This field defaults to "None" and may not be applicable to all sites.
- Click Save to save your changes and close the pop-up
- Your fee will now display in a row beneath the Agency dropdown.
- Click Add Account against your newly added fee to auto-link it to an account code.
- Select the account from the drop-down that the fee is to be allocated to.
- If required, select the Physical Location from the drop-down this auto-allocation is to apply to.
- Repeat as required for all other desired Physical Locations
- If the fee and the account code is the same for all your Physical Locations, leave this drop-down at the default setting of "All".
- Click Save to save your changes.
- Alternately, you can select to copy fees from another Physical Location by selecting the destination location from the top drop-down, and then select the source location from the drop-down at the bottom marked Use Fees From:
- Once you have selected the desired source location from the drop-down, click Set Fees and all settings from the source location will be copied over for this location in this section.
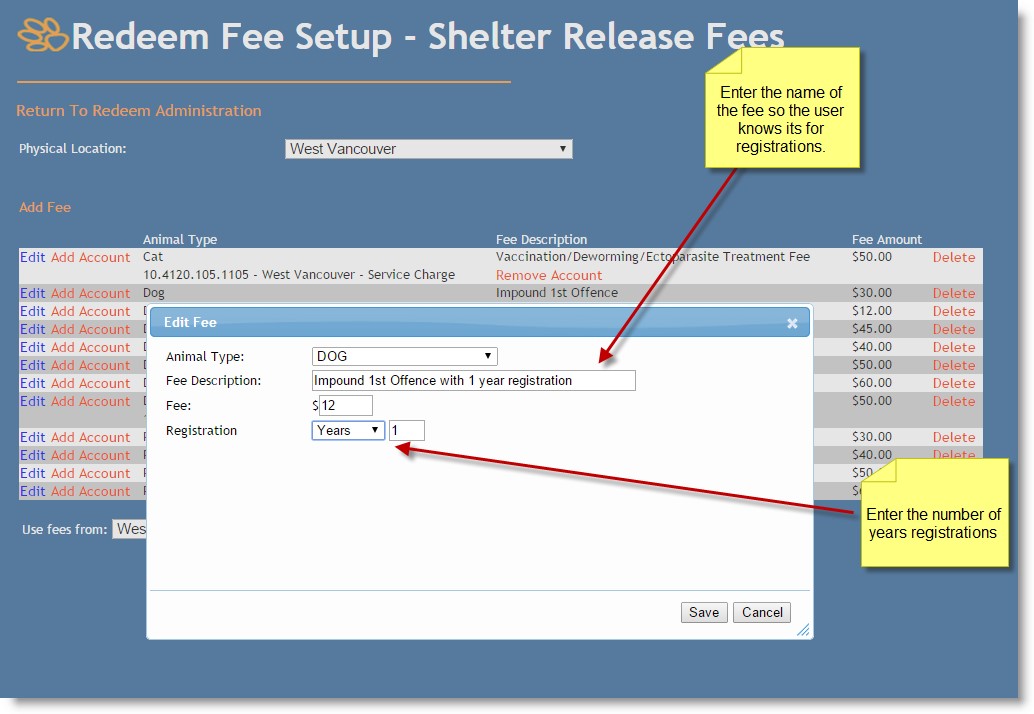
Shelter Release Fees
This section allows you to set standard reclaim fees to apply for non-contracted agency reclaims. These are fees set entirely by your organisation.
- Click the link Shelter Release Fees
- Select a Physical Location from the drop-down at the top of the page.
- Any fees already set up for that physical location will load. If no fees are currently set up, the page will look like this:
- Click Add Fee to add a new fee
- In the pop-up that appears:
- Animal Type: select the relevant Animal Type from the drop-down. NOTE: baby and adult types must be set up individually. (e.g. puppy and dog)
- Fee Description: enter a heading that will describe this fee for users ongoing
- Fee: enter the fee amount
- Registration: if enabled for your site, an option will be here to assign a registration of "None", "Year" for one year, or "Lifetime". If you select "Year" you will be required to enter the number of years the registration is valid for.
- Click Save to save your changes
- The pop-up box will close.
- Your fee will now display in a row beneath the Physical Location drop-down.
- Click Add Account against your newly added fee to auto-link it to an account code.
- Select the account from the drop-down that the fee is to be allocated to.
- If required, select the Physical Location from the drop-down this auto-allocation is to apply to.
- Repeat as required for all other desired Physical Locations
- If the fee and the account code is the same for all your Physical Locations, leave this drop-down at the default setting of "All".
- Click Save to save your changes.
- Alternately, you can select to copy fees from another Physical Location by selecting the destination location from the top drop-down, and then select the source location from the drop-down at the bottom marked Use Fees From:
- Once you have selected the desired source location from the drop-down, click Set Fees and all settings from the source location will be copied over for this location in this section.
Boarding Days Setup
This allows you to set up whether the initial day and day of exit should be included when calculating boarding fees. Days are calculated based on the Date in Shelter. This can be set up by Jurisdiction / Shire / Agency.
- Click the link Boarding Days Setup
- A list will display all the items in your Jurisdiction list (not just those in the Go to Agency drop-down, but ALL Jurisdictions / Shires / Councils / Agencies)
- If the Jurisdiction is not relevant for normal reclaims, leave blank and skip to #6
- On the right are columns to Include First Day and Include Last Day
- Click the boxes to select if the days in question are to be included in the boarding fees or leave blank to omit them.
- These settings will apply to any animals reclaimed to persons with this Jurisdiction listed on their Person Details Page.
- Click the Update button to save your changes
- Beneath the Jurisdiction / Shire list is a list of all Physical Locations under the heading Shelter
- On the right are columns to Include First Day and Include Last Day
- Click the boxes to select if the days in question are to be included in the boarding fees or leave blank to omit them.
- These settings will apply to any animal reclaimed from that Physical Location, regardless of where they reside.
- Click the Update button to save your changes.
Agency Boarding Fees
This allows you to set different fees for boarding days that an animal was in care, e.g. Weekend rates vs Weekday rates, or initial loading fees vs subsequent days. These fees will apply only to animals reclaimed to persons residing within that agency area, as per the address on their Person Details page.
- Click the link Agency Boarding Fees
- On the resulting page, select the Agency required from the drop-down.
- Any fees already set up will load.
- Click Add Fee to add a new one
- A pop-up will open;
- Animal Type: Select an animal type the fee applies to from the drop-down. NOTE: baby and adult types (e.g. Puppy and Dog) must be set up individually.
- Fee Description: enter the name of this fee - ensure it is something that will make sense and identify the fee to users ongoing.
- Fee: enter the amount
- Click the Save button to save your changes.
- Your fee will now display in a row beneath the Council / Agency dropdown.
- Click Add Account against your newly added fee to auto-link it to an account code.
- Select the account from the drop-down that the fee is to be allocated to.
- If required, select the Physical Location from the drop-down this auto-allocation is to apply to.
- Repeat as required for all other desired Physical Locations
- If the fee and the account code is the same for all your Physical Locations, leave this drop-down at the default setting of "All".
- Click Save to save your changes.
- Alternately, you can select to copy fees from another Physical Location by selecting the destination location from the top drop-down, and then select the source location from the drop-down at the bottom marked Use Fees From:
- Once you have selected the desired source location from the drop-down, click Set Fees and all settings from the source location will be copied over for this location in this section.
Shelter Boarding Fees
This works exactly the same way as Agency Boarding Fees except that it assigns fees by Physical Location only, regardless of where the person resides.
- Click the link Shelter Boarding Fees
- On the resulting page, select the Physical Location required from the drop-down.
- Any fees already set up will load.
- Click Add Fee to add a new one
- A pop-up will open;
- Animal Type: Select an animal type the fee applies to from the drop-down. NOTE: baby and adult types (e.g. Puppy and Dog) must be set up individually.
- Fee Description: enter the name of this fee - ensure it is something that will make sense and identify the fee to users ongoing.
- Fee: enter the amount
- Click the Save button to save your changes.
- Your fee will now display in a row beneath the Physical Location drop-down.
- Click Add Account against your newly added fee to auto-link it to an account code.
- Select the account from the drop-down that the fee is to be allocated to.
- If required, select the Physical Location from the drop-down this auto-allocation is to apply to.
- Repeat as required for all other desired Physical Locations
- If the fee and the account code is the same for all your Physical Locations, leave this drop-down at the default setting of "All".
- Click Save to save your changes.
- Alternately, you can select to copy fees from another Physical Location by selecting the destination location from the top drop-down, and then select the source location from the drop-down at the bottom marked Use Fees From:
- Once you have selected the desired source location from the drop-down, click Set Fees and all settings from the source location will be copied over for this location in this section.
Agency Release Fees for Animals with/without ID
If your organisation withholds different amounts from the fees due to contracted agencies for animals that are have the circumstance of "Stray with ID" or "Stray without ID", this feature allows you to set either a $ amount or percentage of the release fee that is not returned to the contracted agency for animals of that classification. It works in conjunction with report 248 Released Animals
- Click the link Agency Release Fees for Animals with/without ID
- In the resulting popup, select the required contracted Council / Agency from the drop-down
- Select the required Animal Type from the drop-down
- Complete the following:
- Enter the amount or percentage of release fee which is not returned to the contract Council or Agency for animals with the circumstance "Stray with ID" into the relevant text box (one only, not both)
- Enter the amount or percentage of release fee which is not returned to the contract Council or Agency for animals with the circumstance "Stray without ID" into the relevant text box (one only, not both)
- Click the Save button to save your changes
- Click Close Window to close the pop-up when finished and return to the Reclaimed Administration Menu.
Undo Reclaimed
This "undo" feature is also available from the incomplete receipt page during the reclaim process.
For more information on this process, see the Zendesk article "Admin - Undo a Reclaim/Redemption".
Undo Relinquish
For more information on this process, see the Zendesk article "Admin - Undo Relinquish"
Incomplete Reclaim/Redemption
For more information on this process, see the Zendesk article "Incomplete Reclaim/Redemption"
Comments