

This procedure applies to any animal that has given birth while in shelter care, excluding Foster Offsping (See article Foster Animal Offspring Procedure for more information). The newborns need to be entered into the system as offspring under the same Person Category as the mother. This procedure assumes that the mother animal is in the Shelter Buddy system.
- From the Welcome / Search page, search for the mother animal's file using the drop down options or the Animal ID number.
- When the Animal Details page loads, use the Go to Person link to navigate to the person's file that originally brought the animal into care.
- On the Edit Personal Details page, click on the Scroll To Bottom link in the upper left hand section of the screen and click on the link in the Personal Categories that matches to mother animal's source (e.g. Stray, Surrender)
- On the resulting menu page click on the Add New (____*) Offspring
- * represents whichever Person category was used, for example Add New Stray Offspring or Add New Surrender Offspring etc
- Complete the following (All Yellow fields are mandatory and may or may not be listed below):
- Status: if this does not default, click on the down arrow and select a status as relevant.
- DOB: click on the Calendar Icon to select the date the animal was born.
- Class: The selection from this list will determine the Type DOMESTIC will default and should be used for puppies, kittens and birds. For small pets, such as mice, change this to Pocket Pet / Small Animal (as per local settings). For unusual pets, such as snakes, change this to Exotic. For farm animals, such as goats, change this to Livestock.
- Type: The Type list is driven by what is selected in the Class Click on the down arrow to select the type of animal this is. EX: puppy, kitten, guinea pig etc.
- If kitten is selected the Feral field will become mandatory.
- Breed/Species: The Breed/Species list is driven by what animal Type is selected. Type in three letters of the animal’s primary breed and select from the auto-complete options presented. If the animal is a mixed breed, select the breed the animal primarily looks like. If the breeds suggested in the auto-complete are not what you are looking for try again. If the breed/species was spelled incorrectly or does not exist in the list, a link will appear beside the breed box that you can click to open a pop up that will allow you to browse the breed list for options.
- Gender: Click the down arrow to select the animal’s gender if known.
- Primary Colour: The Colour list is driven by what animal Type is selected. Click on the down arrow to select the animal’s primary colour.
- Secondary Colour: The Colour list is driven by what animal Type is selected. Click on the down arrow to select the animal’s secondary colour.
- Distinguishing Features: This field is VERY important! Record any patterns on the animal, missing appendages, etc that will help you tell which file belongs to which infant. This field makes the animal an individual, and may prove useful if the some of them have misadventures.
- Date In/Found: Today’s date will default. Click on the Calendar Icon to select the date if this is incorrect. This should be the date the animal was born.
- Jurisdiction: click on the down arrow to select the jurisdiction the animal was born in.
- Shelter Location: click on the down arrow to select.
- Date In Shelter: This is the date the animal actually arrived in the shelter - the date it was born. Today’s date will default. Click on the Calendar Icon to select the date if this is incorrect.
- Click Update Details.
- This will take you to the Receipt Type
- If there is a litter, click on the Enter Multiple Animals
- Enter Animal Quantity: enter the number of animals, minus or not including the one that has just been entered.
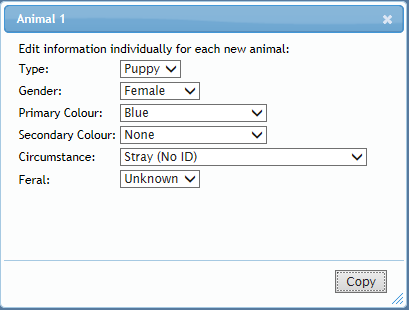
- Type: based on the animal information entered in the Edit Animal Details page, the type will default. You will be able to change from Adult to Baby or vice versa (e.g. Dog to Puppy) but not to other species.
- Gender: will default to the same gender as the initial animal. Amend for the next animal if required.
- Primary Colour: will default to the same as the initial animal. Amend for the next animal if required.
- Secondary Colour: will default to the same as the initial animal. Amend for the next animal if required.
- Circumstance: will default to the same as the initial animal. Amend for the next animal if required.
- Feral: will default to the same as the initial animal. Amend for the next animal if required.
- Copy the above information to all new animals check box: if only one other baby was born and it's details were updated above (i.e. 2 in the litter), or if every baby in the litter is identical, leave this box ticked to copy the information to all subsequent animals. However, if each animal in the litter is different, untick this box to update each one.
- Click Multiply Animals.
- If the Copy the above information to all new animals check box was ticked, this will open a pop up window.
- If it was NOT ticked, it will open a mini-screen that notifies you of which animal you care currently updating, and allow you to change all of the above fields for each subsequent animal in turn until all are completed.
- Click Copy to move to the next animal with or without making changes.
- Once all animals have been updated, the above screen will disappear and a pop up will open.
- Popup Window: You will see a mini window pop up and the main page behind it will say Loading… Once the page is loaded the main window will then go back to the original Edit Animal Details
- This function automatically assigns each animal with an Animal ID. The mini pop up window is the link for you to use to go in to each animal record and add all of the specific details for each individual animal, e.g. Distinguishing features or notes. It can be minimized to the desktop tool bar at the bottom on your screen until you are ready to complete the details updates of the remaining animals. To view the mini window: locate it in your bottom tool bar and click on it or toggle to it (hold the ALT key down and press TAB).
- Once you have updated all of the animal records you can access the kennel cards for each by clicking on the Kennel Card Link on the popup window, if required.
- Print Kennel Card: click on the link to print all applicable kennel cards.
- Save Kennel Card: click on the link to save each kennel card to the applicable animal records.
- Bring the mini popup window up and click on the link to (______*) Receipt. *Represents the source of the animal.
- Complete the receipt as normal and print if required
- Alternately, if you would like to link the babies to the mother's receipt, make a note of the Animal ID number for each of the offspring, then click on the Close Window link, then click Ok.
- To link the babies to the mother's receipt:
- Go to the mother animal's file and make a note of the receipt number.
- Navigate to the Administration link in the orange left hand menu
- Click on the link Receipt Administration
- From the resulting menu, click on the link Link Animal to a Receipt
- Enter the first baby's Animal ID number in the box provided
- Enter the Receipt ID number
- Click Search
- The search result will show you a brief summary of the animal's details. If this is the correct file, click the button Link Animal to Receipt
- Repeat until all babies in the litter are linked.
Don’t forget to:
- Add any applicable notes to the General Animal Notes link in the Animal Menu on the right side of the Edit Animal Details page for each animal.
- Use the Create Litter link to link the babies and mother as a litter. See article Create Litter for more information.
- Take and upload a new photo of the animal, if required / available.
- Enter vaccinations, tests and treatments that have been administered.
- Print out a new Kennel Card to be placed on the kennel where the animal is placed.
- Assign a kennel number to the animal once they have been placed, if it has not already been done.
Comments