
The Boarding module helps manage owned animals in a commercial boarding facility. These records are handled as information only and do not count statistically towards intake/outcome statistics.
If your site has the Boarding module turned on (this is a custom option), the following steps will help you manage your boarding bookings.
Add a Booking via the Boarding link in the left menu:
- Use the Boarding link on the left-hand menu to bring up the boarding screen.
- Use the Check Boarding Availability to check for vacancies.
- Enter a date from and a date to
- Select a physical location and at least one shelter location
- Click the Find Vacancies button.
- Vacancy numbers will be listed.
- To add a booking now, click the Add Boarding Booking link.
- Search for a person. If no results are found add a new person, otherwise click the Add Booking link to select the client.
- The Boarding Booking page will load, with a status preset to Booked
- Select Boarding From Date, Boarding To Date, optionally add any further details or belongings, shelter notes and discount. Leave status as Booked. Click Add Booking button. The page will refresh with new options.
- To Add a new Animal:
- Click Add New Animal link in Boarding menu.
- Fill in animal details as normal.
- To Board an existing Animal:
- Note: there is a counter next to the Board Existing Animal link to indicate how many animal files are linked to the person.
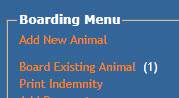
- Click Board Existing Animal link in Boarding menu.
- You will see a list of animals linked to the client.
- Click the Enroll link for the desired animal.
- Update animal details as necessary.
- Note: there is a counter next to the Board Existing Animal link to indicate how many animal files are linked to the person.
- Once an animal has been added (new or existing) the following steps will occur:
- Fill in the Vet Details form as needed:
- Vet: Boarding Client Vets can be added via Admin > Boarding Admin > Boarding Client Vet / Add and then selected from the drop-down, or simply typed into the free text "Other" field.
- Notes: This field can be used to record miscellaneous information - e.g. if the vet is recorded as "Other" then this might be used to record contact information.
- Activities: These can be added via Admin > Boarding Admin > Boarding Activities / Add. Click to select all that apply.
- Fill in Animal Details section as needed: options can be added to this section via Admin > Boarding Admin > Boarding Animal Details / Add and then selected from the drop-down in this section.
- Fill in the Vet Details form as needed:
- Complete the Boarding Details:
- If the client has other animals boarding already, you can board this animal with another boarded animal by selecting the animal ID from the Board with drop down.
- OR boarding can be automatically allocated by selected a physical location and a shelter location (use Check Availability to ensure vacancies and ensure the page updates correctly). Kennel will be automatically allocated with first free kennel found in selected shelter locations.
- Select a preferred shelter and kennel if any by selected Physical Location, Shelter Location and Kennel. If this is selected and the kennel is free then the boarding will be booked for that kennel.
- Click Continue
- Boarding Reservations Page:
- Boarding reservation page will be displayed with current boarder highlighted in yellow (see the key in the ?Help button top right of the screen for what other colours indicate).
- Boarding details can be changed by dragging animal id cell to the desired kennel. (IE users drag animal id, firefox users drag cell, not animal id).
- Click Continue when done.
- Special Needs / Medications – This can be used to record information such as particular medical requirements, allergies etc. Add special needs as required.
- Type: click the down arrow to select Special Needs options. Options can be added to this section via Admin > Edit Drop Down Lists > Edit Boarding Special Needs Type. This is a quick entry area: simply type into the text box and hit your enter key to save.
- Description: Detailed instructions for the Special Needs requirements can be added here.
- Click Add to save the Special Needs item and repeat the above until all special needs are added.
- Click the Add Medication link to add medications. For further information on adding medications, click to see our help doc here.
- When all medications and special needs have been added, click Next. If the pet has no special needs or medications, you can click Next immediately to skip this page.
- Products / Services – Add any items as needed then click Next.
- The page will return to the main booking page.
- To set up fees click the View link under the fees column in the Animal Details section.
- Select a boarding fee per day. You can change the number of days to the right of this field if need be. To set the fee click the View link beside the displayed price under the heading Fees.
- Select and fill in any other fees as needed in the same way as above.
- Vet Treatment and product/service fees will be loaded if any of these have been added.
- Hit Update when done.
- Use the boarding menu to:
- Print Indemnity
- Add Payment
- Pay Remainder
- Add Refund
- Print Kennel Cards
- Add Dispatch Request (for pickup and delivery)
- Fee Summary (Can be used for invoicing)
- Receipts will become visible beneath the boarding menu once payments have been added.
To add a Booking directly from the Person Details page:
- Look up the Person ID number from the search page
- Scroll to the bottom of their page
- Click the Boarding link at the bottom of the person page.
- Select Create new booking
- The Boarding Booking page will load, with a status preset to Booked
- Select Boarding From Date, Boarding To Date, optionally add any further details or belongings, shelter notes and discount. Leave status as Booked. Click Add Booking button. The page will refresh with new options.
- To Add a new Animal:
- Click Add New Animal link in Boarding menu.
- Fill in animal details as normal.
- To Board an existing Animal:
- Note: there is a counter next to the Board Existing Animal link to indicate how many animal files are linked to the person.
- Click Board Existing Animal link in Boarding menu.
- Fill in animal details as normal.
- Click the Enroll link for the desired animal.
- Update animal details as necessary.
- Once an animal has been added (new or existing) the following steps will occur:
- Fill in the Vet Details form as needed:
- Vet: Boarding Client Vets can be added via Admin > Boarding Admin > Boarding Client Vet / Add and then selected from the drop-down, or simply typed into the free text "Other" field.
- Notes: This field can be used to record miscellaneous information - e.g. if the vet is recorded as "Other" then this might be used to record contact information.
- Activities: These can be added via Admin > Boarding Admin > Boarding Activities / Add. Click to select all that apply.
- Fill in Animal Details section as needed: options can be added to this section via Admin > Boarding Admin > Boarding Animal Details / Add and then selected from the drop-down in this section.
- Fill in the Vet Details form as needed:
- Complete the Boarding Details:
- If the client has other animals boarding already, you can board this animal with another boarded animal by selecting the animal ID from the Board with drop down.
- OR boarding can be automatically allocated by selected a physical location and a shelter location (use Check Availability to ensure vacancies and ensure the page updates correctly). Kennel will be automatically allocated with first free kennel found in selected shelter locations.
- Select a preferred shelter and kennel if any by selected Physical Location, Shelter Location and Kennel. If this is selected and the kennel is free then the boarding will be booked for that kennel.
- Click Continue
- Boarding Reservations Page:
- Boarding reservation page will be displayed with current boarder highlighted in yellow (see the key in the ?Help button top right of the screen for what other colours indicate).
- Boarding details can be changed by dragging animal id cell to the desired kennel. (IE users drag animal id, firefox users drag cell, not animal id).
- Click Continue when done.
- Special Needs / Medications – This can be used to record information such as particular medical requirements, allergies etc. Add special needs as required.
- Type: click the down arrow to select Special Needs options. Options can be added to this section via Admin > Edit Drop Down Lists > Edit Boarding Special Needs Type. This is a quick entry area: simply type into the text box and hit your enter key to save.
- Description: Detailed instructions for the Special Needs requirements can be added here.
- Click Add to save the Special Needs item and repeat the above until all special needs are added.
- Click the Add Medication link to add medications. For further information on adding medications, click to see our help doc here.
- When all medications and special needs have been added, click Next. If the pet has no special needs or medications, you can click Next immediately to skip this page.
- Products / Services – Add any items as needed then click Next.
- The page will return to the main booking page.
- To set up fees click the View link under the fees column in the Animal Details section.
- Select a boarding fee per day. You can change the number of days to the right of this field if need be. To set the fee click the View link beside the displayed price under the heading Fees.
- Select and fill in any other fees as needed in the same way as above.
- Vet Treatment and product/service fees will be loaded if any of these have been added.
- Hit Update when done.
- Use the boarding menu to:
- Print Indemnity
- Add Payment
- Pay Remainder
- Add Refund
- Print Kennel Cards
- Add Dispatch Request (for pickup and delivery)
- Fee Summary (Can be used for invoicing)
- Receipts will become visible beneath the boarding menu once payments have been added.
Edit / View Reservations
- Use the Boarding link on the left-hand menu to bring up the boarding screen.
- Click the Edit / View Reservations link.
- Enter a date from and date to.
- Select a physical location and at least one shelter location.
- Click Get Plan.
- Drag and drop bookings as mentioned above in step 10
Cancel a booking or Release Boarding Animals aftercare
To cancel a booking:
- Use either the boarding menu or the Boarding Person Category in the Person file to locate the booking in question
- Locate the Boarding Status drop down
- Change the status to Cancelled
- Click Update Booking
The booking will show on the booking plan as Cancelled, and you will be able to re-book the kennel.
To release an animal from boarding once the boarding time is complete and the client has picked them up:
- Use either the boarding menu or the Boarding Person Category in the Person file to locate the booking in question
- Locate the Boarding Status drop down
- Change the status to Departed
- Click Update Booking
- These animals are not in care but Information Only, so there is nothing that needs to be done with the Animal file specifically, however, if you prefer you can create a sub-status to track if the animal is currently boarding or released.
See our help doc on Sub-Statuses for more information.
Boarding Reports
Boarding Reports can be found in Reports -> Boarding.
Comments