
All animals which are involved in a dispatch request need to be entered, even those not brought into the shelter. For example; an animal which is seized but redeemed by the owner on the spot needs to be entered as a seized animal and then redeemed using the Redemption (offsite) status. Even animals only involved in citations will be entered with a status of Information.
This process is to attach animals that have existing files to a current Dispatch Job.
- Obtain the Animal ID.
- Search for the Dispatch job:
- In the orange menu on the left hand side of the page, find and click on the Dispatch Search link.
- If known, enter the Dispatch Job Number into the relevant search box and click Search.
- If the job number is not known, use one of the other search fields to locate the relevant job.
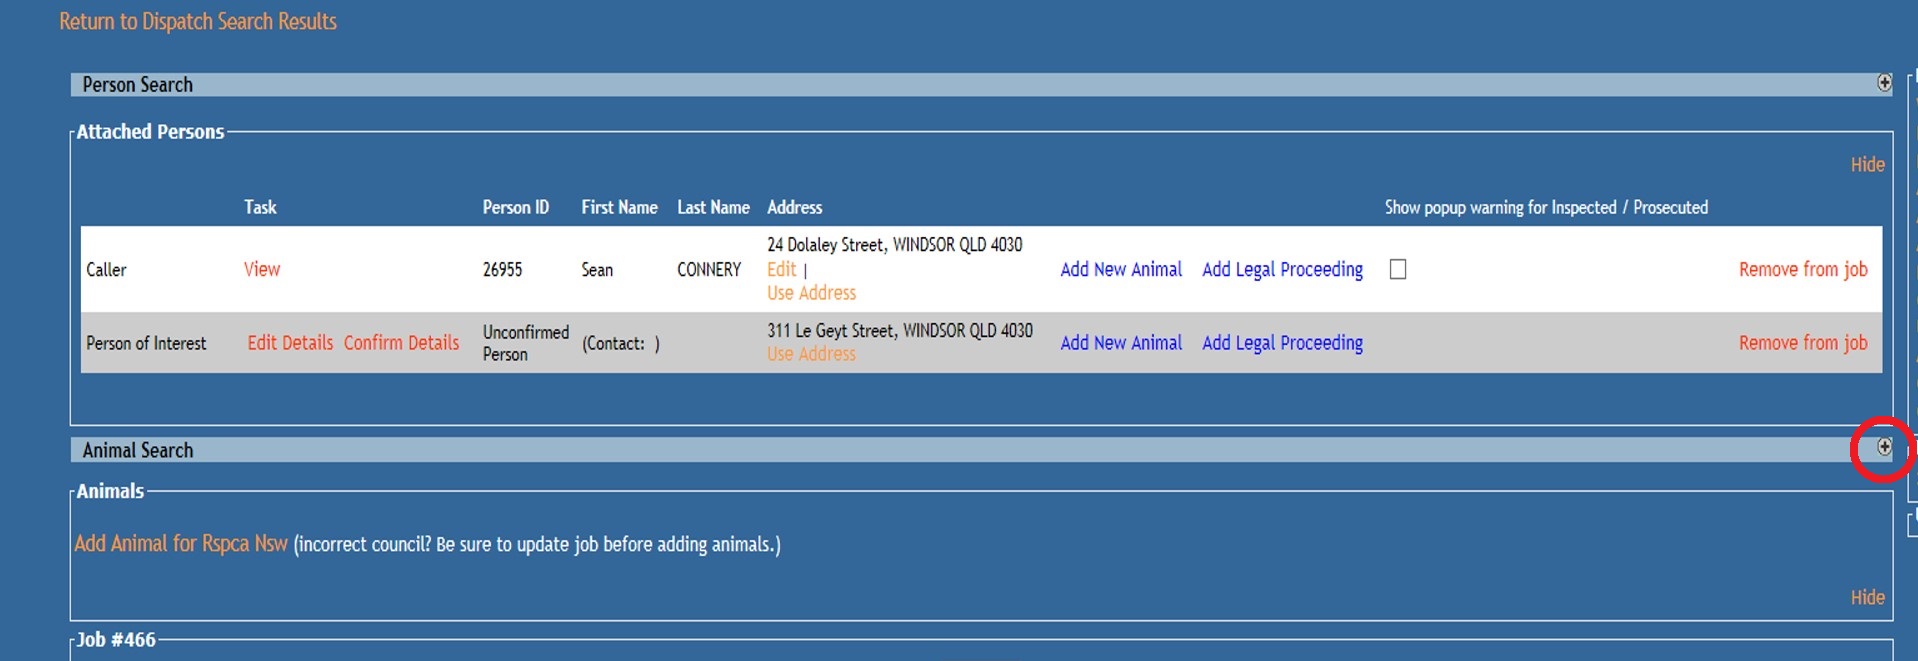
- Once the Edit Job # page opens, locate the Animal Search bar beneath the person information area, and click the (+) symbol at the end of the bar to open it.
- Enter the Animal ID Number in the Go to Animal search box. Alternatively, you can search by a variety of other identification fields, such as microchip or license/registration numbers. Click Search to find the animal’s record.
- A single line entry will appear with a summary of information about the animal. Click the Animal ID link to view the animal’s details in a pop up. If this is the correct animal, click the Add link on the left.
- A new section will appear offering two drop down options:
- Add Animal(s) as: this drop down offers you a choice to add the animal as one that has been taken into care (Animal Impounded / Removed / Surrendered), or as information only.
- Attached to: This drop down offers you a choice of linking the animal to either the Agency responsible for the job, or one of the persons linked to the job.
- Click Add Animal once you are sure the options displayed in the drop downs are correct to proceed to the Animal Details page.
- A pop up will deploy. For now, minimize it and focus on the Animal Details page that will open behind it.
- If the animal is already in care (e.g. it entered care as a stray, but ended up as a dispatch case), then all you need to do is update the Animal Details page to finish. This will link the animal to the job without changing the source so no false incoming statistics are created. If you would like to change the source, you may do so in Administration > Maintain Source History for an Animal.
- If the animal is NOT currently in care, complete the following on the Animal Details page:
- The source can be used to differentiate between animals that were surrenders, wildlife, seized animals, DOA animals, and euthanasia requests just by selecting the appropriate source from the drop down.
- If you opted for an information only animal, the source will default to Dispatch Information. This is the only option for information animals.
- If you opted for an information only animal, the status will default to Information. This is the only option for information only animals.
- If the animal has any Identification on it should be filled in at this time if possible.
- There is an area for the confirmation of Microchip numbers as to their existence in the animal or not under Identification Confirmation details. This is the light blue area just under the Identification area on the system.
- If the animal is DOA and to be treated as a stray or held for further investigation, Awaiting Final Disposition is a recommended status. This allows the animal to be tracked in-care for the time it needs to be held and allows users to exit the animal either through an outgoing status like DOA later or return the remains to the owner using DOA Returned to Owner. For cases where the animal does not need to be held, DOA can be applied immediately.
- If relevant, sub-statuses may be available. Update as applicable to your normal processes.
- Source: click on the down arrow to select the appropriate source.
- The source will default to the most relevant/common setting e.g. Humane Officer Seized.
- Status: click on the down arrow to select the appropriate status for the animal.
- Shelter Tag / Band Number: enter the internal shelter ID number if required.
- Animal Description: Enter all the animal information known; e.g. name, type, breed(s), gender, colour(s), age etc.
- Circumstance: Select the appropriate option from the drop down.
- Distinguishing Features: This field is VERY important! Record any patterns on the animal, missing appendages, any scars, tattoos, pregnant, on heat, any injuries, shaved patches etc. Having no distinguishing features is a feature in itself so indicate this if that is the case. This can be particularly important for mass seizes.
- Council / Jurisdiction: click on the down arrow to select the appropriate council / jurisdiction.
- Shelter Location: the Physical Location field normally defaults to the user’s login location, but the Shelter Location will need to be updated manually.
- Add any further relevant details to describe the animal and its location in the shelter.
- Click Update Details.
- You will be offered options to create a receipt for the animal or proceed with no receipt, which will take you directly back to the Dispatch Job page.
- Kennel Cards can be printed directly from the Dispatch Job page.
If you would like to add an animal to a dispatch job that was in care, but has now been given an outcome, follow this process:
- Obtain the Animal ID.
- Search for the Dispatch job:
- Once the Edit Job # page opens, locate the Animal Search bar beneath the person information area, and click the (+) symbol at the end of the bar to open it.
- Enter the Animal ID Number in the Go to Animal search box. Alternatively, you can search by a variety of other identification fields, such as microchip or license/registration numbers. Click Search to find the animal’s record.
- A single line entry will appear with a summary of information about the animal. Click the Animal ID link to view the animal’s details in a pop-up. If this is the correct animal, click the Add link on the left.
- A new section will appear offering two drop down options:
- Add Animal(s) as: Select as applicable - information or seized/surrendered/impounded.*
- *NB: the latter option will add a new intake, which you don't want, but this is handled later in this process. The important thing is to link the animal as it should be linked.
- Attached to: This drop-down offers you a choice of linking the animal to either the Agency responsible for the job or one of the persons linked to the job.
- Click Add Animal once you are sure the options displayed in the drop-downs are correct to proceed to the Animal Details page.
- Add Animal(s) as: Select as applicable - information or seized/surrendered/impounded.*
- A pop up will deploy. For now, minimize it and focus on the Animal Details page that will open behind it.
- Complete the following on the Animal Details page:
- Select a source
- Select a status
- If the animal has any additional Identification not already recorded, it should be filled in at this time if possible.
- There is an area for the confirmation of Microchip numbers as to their existence in the animal or not under Identification Confirmation details. This is the light blue area just under the Identification area on the system.
- If relevant, sub-statuses may be available. Update as applicable to your normal processes.
- Add any further relevant details to describe the animal.
- Click Update Details.
- You will be offered options to create a receipt for the animal or proceed with no receipt, which will take you directly back to the Dispatch Job page.
- From here, you have two options:
- Leave as-is (i.e. information only)
- Use Administration > Maintain Source/Status History for an Animal to remove the information Source and Staus. This will remove any intake history if "add animal as seized/surrendered/impounded" was used.
- For more information on these processes, see our help docs here:
- Maintain Source History for an Animal
- Maintain Status History for an Animal
Comments