

The "easiest" way to add a discount varies, depending on the fee you'd like to discount and how you would like that discount to appear on reports.
Examples:
Discount GL Code
Create a discount GL Code by clicking the "Discount" box when creating the account code via Administration > Edit Drop Down Lists > Accounts/Add: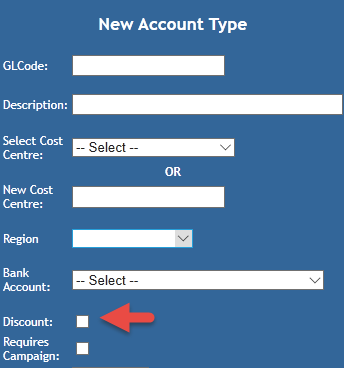
Any amount assigned to this GL Code will be deducted from the total of any receipt it is assigned to.
NOTE: you will likely need to set up a discount GL Code to make most of the following methods work.
In reporting, anything that tracks a GL Code will pick this discount up.
Discount Campaign
This is a similar process to the above, but it is easier for users who aren't comfortable manually assigning GL Codes to a receipt.
Create a new campaign by following the steps outlined in this document HERE.
Make sure the name acknowledges that it is to be used for discounts.
Whenever this campaign is assigned to a receipt, it will deduct the amount assigned to it from the amount of the total receipt.
In reporting, anything that tracks Campaigns or GL Codes will pick this up.
Products & Services: Discount Price Level
For any item whose fees are managed via Products & Services (e.g. Animal Additional Products/Services, Person Additional Products/Services, Medication, Vet Treatments etc), you can set a discount price level.
To create a Price Level:
- Go into Administration > Products & Services > Price Levels / Add
- Assign a name to the price level, something that will help users understand what it does/what it is for (e.g. 5% discount)
- Select an option from the "Work off Level". You can select any existing price level, but if none have been set up yet, you will only see Cost Price. This selection will set the price the discount is applied to. (e.g. "cost + 5%", "retail - 20%" etc.)
- Select if the Price Level is an Increase to the level selected or a Decrease. Obviously, for a discount, it would be a Decrease.
- Set the percentage of the discount as a whole number (e.g. 10 for 10%)
OR
Set a dollar value (e.g. 10 for $10) - Click Add Price Level
This price level can now be selected whenever fees are set that are either visible before they are added or are visible from the "Sell Product/Service" link in the Animal or Person menu. Essentially, if you can see the price level drop-down, you can amend it.
In reporting, this will only show as a difference in fees. If you need to track this more precisely, please contact support@shelterbuddy.com
Setting a discount for a process such as Owner Surrender, Euthanasia Request, Emergency Boarding, DOA, etc.
There are a few ways to accomplish this, but for these particular processes, probably the best way would be to set up a fee with an equivalent negative amount so, in situations where the fee is waived, you can add this fee (along with the usual fee) to the receipt.
That will zero out the amount on the receipt, but still record the fee and the discount for reporting purposes.
To add a fee with a zero amount for an Owner Surrender, Euthanasia Request, or other Fee handled via Products & Services :
- go into Administration > Products & Services > Add Fee
- make sure it is assigned to the relevant category e.g. "Surrender"
- add the price with a "minus" as a prefix like this: "-40" (for example).
- assign a discount GL Code
A similar method can be used for Reclaim fees:
- go into Administration > Reclaim > Shelter Release Fees or Agency Release Fees or Shelter Boarding Fees or Agency Boarding Fees
- create a duplicate for the existing fee you want to discount (make sure it is marked as a discount)
- add the price with a "minus" as a prefix like this: "-40" (for example).
- assign a discount GL Code
Again, both the full fee and the discount fee will need to be applied in order to zero out costs and be reported correctly.
We recommend using a unique GL Code for the discount fee, otherwise, the regular fee and the discount will be grouped together and on reports, you'll only see a 0 amount allocated, instead of $40 to the surrender account and -$40 to nullify the fee.
There are other ways to do it but for ease of tracking, this would be the easiest.
Any report that tracks GL Codes will show discounts set up in this manner.
Setting up a discount for Adoptions:
There are two methods of doing this for adoptions. If you need to track exactly how much has been discounted from adoption fees, follow this process:
- Go into Administration > Adoption Administration > Adoption Fees
- Set the Physical Location and Animal Type the discount applies to from the drop-downs
- If there are existing fee groups, skip to step #6
- If there are none yet present, click Add Fee Group > enter the Fee Description and any other relevant information, then click the Save button.
- Click Add Fee
- enter the full amount of the normal adoption
- assign a relevant GL Code
- click save.
- Click Add Fee once more.
- enter the amount of the discount as a whole number (e.g. if the adoption fee is $100 and the discount is 50% enter $50)
- assign the GL Code - this should be different from the Adoption fee but NOT a discount code.
- click save
- The discount will be recorded on Adoption receipts accordingly.
Comments