
This walks you through how to schedule an in care animal.
Set Up:
See Scheduling - Managing Appointment Types for full instructions on setting up appointment types. Below is a short walk-through only.
- From the Welcome/Home Page, click the link Administration, then from that menu find and click on Scheduling Administration.
- Click on the option "Appointment Types".
- To Edit an existing Appointment, click on the name of the Appointment Type
OR- Click Add Appointment Type to create a new appointment.
- Click the option Only create appointments via in-care animals - this is the option that allows you to schedule animals that are currently in your custody.
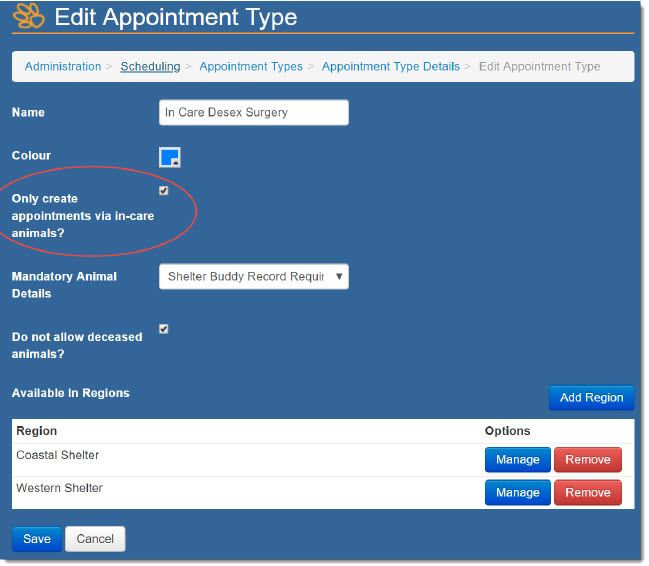
- Ensure the Mandatory Animal Details drop-down is set to the option "Shelter Buddy Record Required".
- We recommend adding a name that indicates the appointment type is for In Care animals only, so it stands out among other appointments on the Scheduling Dashboard.
- Complete the remainder of fields as required (see the above link for more information on how to do this).
- Click Save, Save And Add Another, or Save And Add Regions as required.
- Click the Add Region button on the far right
- A list of all available regions will display in a pop-up. Click each region the appointment type will be offered at and click Add to finish.
- You should now see a list of region options displayed. Click Manage
- Click Add Service: the duration of an appointment is defined by this field. These can be added in Admin > Products & Services.
- Type the first three letters of a product or service linked to the region into the text box provided and select from the options offered.
- Enter the length of time the appointment is expected to take.
- Click Save to complete.
- NOTE: Make sure the Product/Service is linked to the same process as the Location (e.g. Clinic, Add Additional Animal Products/Services, etc.)
- Click Add Location to define whereabouts in the Region (Physical Location) the appointments are held (e.g. Vet Clinic, Intake Office etc). Type the first three letters of the location into the text box and select from the options offered. Only locations linked to the region specified for this appointment type will be offered. Click Save to complete.
- Your appointment is now set up.
- Use the breadcrumb links at the top of the page to navigate back to the Scheduling Menu
Scheduling an Appointment:
Scheduling an in-care appointment is much like scheduling any other appointment, save for some important differences:
First of all, you must navigate to your "new appointment" screen. As with any scheduled appointment, you may get there by clicking +Add Appointment or +Add Walk-in buttons from the Dashboard page, or by navigating to the calendar view of the internal location, or by searching for available appointments using the Search Available Time feature.
- Select the in-care appointment Type to begin.
- If not automatically selected, choose the relevant Location for this appointment.
- You will notice that instead of Person details, you now have two options:
- Automatically schedule appointment at next available time (selected by default)
- Manually select time and date
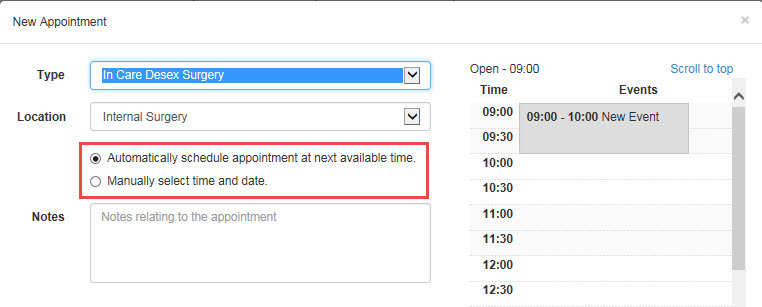
NOTE: Person details are not required for this process.
- If the appointment is for an in care animal that can be presented for the appointment at any time, the first option is the most appropriate. It will find and automatically set the first available time slot for this appointment type.
- If the animal is in foster care or must be coordinated for some other reason (e.g. booking in anticipation of it being released for rehoming), select the "Manually select time and date" option and a date picker with attendant time picker will appear. You can select an appropriate date/time here. NB: you will still only be able to select times within the locations opening hours.
- The Note field here may be particularly useful to add any additional information, cautions or requests relevant to this animal's appointment.
- Select a valid Product/Service
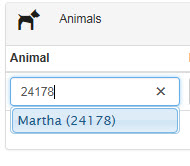
- Search for the Animal ID number of the animal in question and click to select and link the Animal.
- Links will appear beneath the animal you can use to view the animal record or unlink the record.
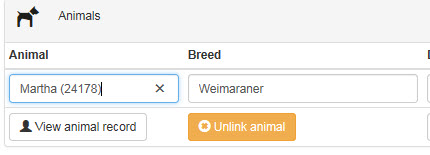
- Links will appear beneath the animal you can use to view the animal record or unlink the record.
- Once all fields are completed, click Save Appointment.
- Your appointment will appear on the calendar like any other appointment, but with a few differences:
- When you hover over the appointment, instead of the Person's information showing, you will see:
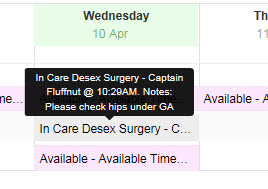
- the Animal's Name or Animal ID number,
- the time of the appointment,
- any notes for the appointment
- When you hover over the appointment, instead of the Person's information showing, you will see:
- You can still edit, cancel and reschedule as for any other appointment, but sending reminder emails will not be available because there is no person and therefore no email linked to these appointments.
For more information on scheduling an appointment, see our help doc Scheduling - Overview
Comments