
This is a situation that happens frequently when accepting animals in groups: mixed animal types (Dogs, Cats, Puppies, Kittens, other animal types), but this can be somewhat challenging to adjust the types as you go.
This process takes you through how to process multiple animal types on one intake so they all appear on the same receipt.
It assumes you already know how to enter a Person and an Animal file. For more information on how to do this, please see our help docs here:
For our example, we are using an Agency Incoming process, but these steps will work for any multiple intake process.
- From the Welcome/Search page, locate your Person file
- If a person file does not exist, please create one now.
- Click the Scroll to Bottom link, and then select the relevant Personal Category option by clicking the relevant link.
- Click the link Add New [...] Animal - in this case, Add new Incoming Agency Animal.
- Enter the first animal as per normal.
- IMPORTANT: if your group includes baby and adult types (e.g. kittens and cats), make sure the first animal is the ADULT type (i.e. Cat/Dog). This will make the changes easier later.
- Once the first animal's details have been entered, click Update Details and arrive at the Receipt Type page.
- Select the option Receipt for Multiple Animals.
- You will see a page similar to this one:
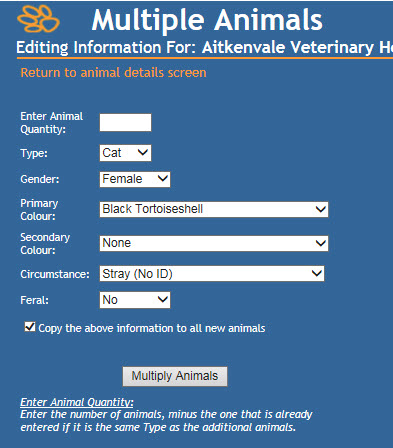
- Remembering you have already entered one animal, enter the remaining quantity of animal files to be created (e.g. if you have 5 animals coming in, you would enter "4" in the Enter Animal Quantity box)
- Leave the Type as it is unless all other animals being entered are of the same type (e.g. if the first animal was the mother Cat, and all the remaining animals are Kittens then you could amend this now)
- Unless there is a commonality in the remaining fields for all remaining files, (e.g. all remaining animals are the same gender or colour), then you can leave the rest of the fields as is, as probably you will need to alter these significantly as you go.
- There is an option "Copy the above information to all new animals" - if all the animals are of the same species (e.g. a mother Cat and her Kittens) then you can untick this box and update each file easily here using the pop-up provided that allows you to update the basic information of each pet in turn until completed. They MUST be the same species to use this option. If they are of different species (e.g. Dog and Cat), leave it ticked and click update to get the Multiple Entry Pop-up.
- The pop-up will list each Animal ID you have created in order. Each will be an exact duplicate of the first file created.
- Click a link for an Animal ID for a file you would like to update - the main page will load this information.
- Enter any Identification information unique to this particular animal:
- Make note of any tags, microchips or tattoos
- Enter the Animal Name, if known
- Enter the animal Age, if known, or estimate if possible
- When you get to the animal Type, Breed/Species and colour, click the link Change that appears next to the Type field:
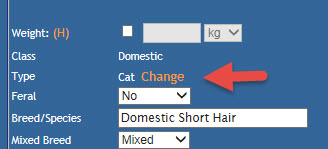
- Select the New Class "Domestic" to load the most common Animal Types (Cat, Dog, Kitten, Puppy, Bird), or a different class as applicable to the animal you are entering
- Select the New Type from the Drop Down
- IMPORTANT: if you start with a baby type (Kitten or Puppy) and change this to an adult type (Cat or Dog), the source and status history will not be updated. This means this pet will continue to report as a Kitten or Puppy for any report used in history. This is why starting with an Adult type is recommended: doing so ensures all changes will be saved, regardless.
- Once the Type has been selected, choose a breed from the New Primary Breed auto-select field.
- Click Save
- You will see a warning that indicates if the Source and Status histories will be updated.
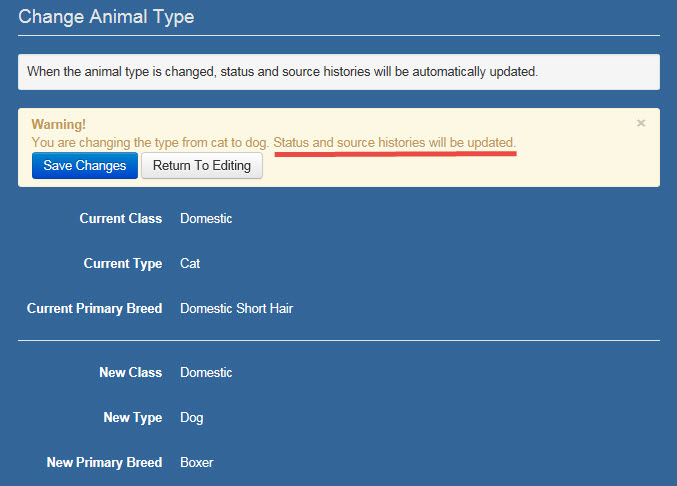 For a new incoming animal, you always need this to be updated. Click Save Changes to continue.
 - If you have changed species, the colour field will now be blank: click the down arrow to select an appropriate colour from the drop-down.
- Make any other changes required and click Update Details.
- Return to the multiple entry Pop Up and click the next Animal ID link.
- Repeat the above steps to change the Animal Type and description on the next animal, and so on until all animals in the pop-up except the first one have been amended and updated.
- Once the final animal has been updated, you should see a link to the Receipt in the multiple entry pop-up. Click the link to proceed to the Receipt Processing page.
- Complete the Add Receipt page by entering a Payment Method, Payment Amount, GL Code and make sure all unallocated amounts are allocated a code. Add any notes required and click Update+Print.
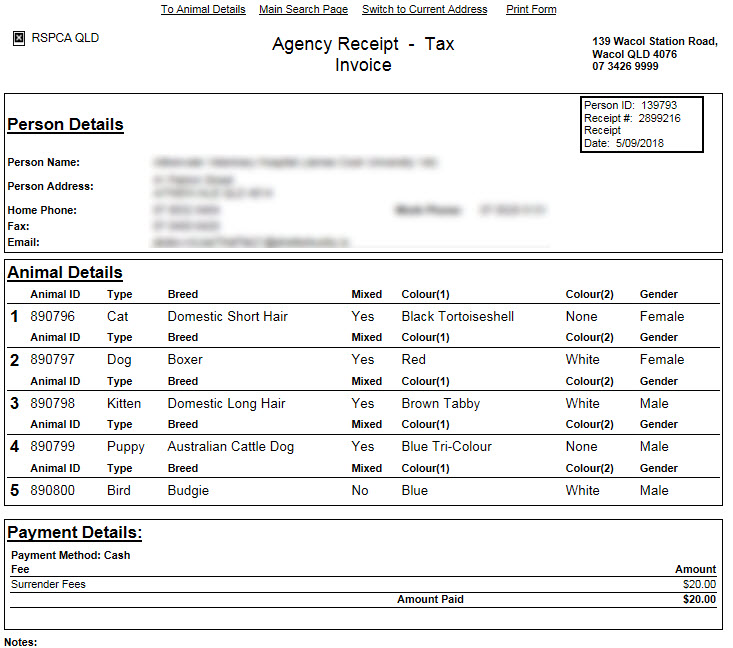
- The end result will show you a list of each different type of animal entered thus:
Comments