
This procedure applies to persons coming into the shelter to adopt an animal that does not require a spay/neuter deposit. The animal’s record will already be in the system but the potential new owner may not be.
- Obtain the Animal ID.
- Search for adopting person.
- If found, skip to step #3.
- If not found, click on the Create a New Entry link or click on the New Record link in the orange menu to the left of the screen (if available).
- Fill in the relevant blanks on the Add New Person Mandatory fields: first name, last name, residential address, mailing address if different than residential, telephone number, and gender. Depending on your organisation you may be required to confirm identification and include Date of Birth.
- Click Update Details.
- On the Edit Person Details page, click on the Scroll To Bottom link in the upper left-hand section of the screen and click on the Adoption link in the Personal Categories
- On the Adoption screen, click on the Adopt an Existing Animal
- On the Animal Search page enter the Animal ID in the Go To Animal ID Click View.
- If required, click on the Adopt link next to the record if the record displayed is correct. Depending on local settings you may go directly to the Animal Details page.
- If adopting multiple animals, click on the Adopt Multiple Existing Animals link
- On the Adopt Multiple Animals page enter the number of animals that are going to be adopted in the Number of Animals Click Get Animal IDs.
- Enter each animal ID in the Animal ID fields that display. Click Next Page.
- On the Adoption Details page, you can click Print Adoption Contract so the client can view the contract details either in a pop-up or you can print a hardcopy before completing the adoption if this has been set up for your site.
- Complete the following:
- Make sure the Issuing Authority is correct
- License/Registration Tag number: Enter the license/registration tag number here
- License/ Registration Type: Select the type of license/registration type from the drop-down to set the fees.
- Animal Location Details: This is where the animal resides. If the same as the person adopting, click an option to copy the address from the Person Details Page or manually enter the details if required.
- Rabies information*: This will only appear if your site is set for this to be a requirement for licensing / registration. If it is required for your site, check the animal's current rabies vaccination information has been entered, or update it using the Add Rabies Vaccination link provided.
- Microchip information*: If you auto-upload microchip information to a third party site; you can select here if the customer is to be charged individually for the registration of that chip or if they can have it for free.
- Click Add Details to close pop up and continue.
- Product/Service: Enter the first few letters of the item description then click find. This will generate a popup window. Click on the item that you want to add. This will close the popup window.
- Qty: Enter the amount to be purchased.
- Click Add Product. The item will display in white. Repeat if an additional item is to be purchased.
- Click Save Changes. Click
- Course: Click on the down arrow to select the course the animal will be enrolled in.
- Location: Click on the down arrow to select the location where the course will be held.
- Start Date: Click on the Calendar Icon to select the start date of the course.
- Month: Click on the down arrow to select the month the animal will go through the course.
- Day: Click on the down arrow to select the day of the week the animal will attend.
- Time: Click on the down arrow to select the time the class will start.
- Click Update Details. The popup window will disappear.
- Click on the Print Form link in the upper right-hand corner of the popup window to print.
- Click on the Close Window link in the upper left-hand window of the popup window.
- Ask the client what their answer is to the question recorded and click the “yes” or “no” box as appropriate.
- Click on the Update button at the bottom of the screen to complete and close the window so you can proceed
- This may be a static field if the fee was entered on the Animal Details page.
- Alternate Contact Details: Enter the name and contact number for an alternate representative if none are showing in this section. This is for microchip registration requirements.
- Name: To change the animal's name and to have the animals new name display on the printable forms you must change the name on the animal details page.
- Click on the free text box for the animal’s name to enter a name.
- NOTE: ensure correct casing is used as there is no auto-case
- If the animal has no name yet, then enter something that indicates this such as “unnamed” or “undecided”. This looks better on paperwork than a random character.
- License / Registration: (* This may or may not display in your system. If it does not skip to the next item.) This will add a new license/registration record to the database. Click the link in the menu indicated here to get the pop-up and enter the details:
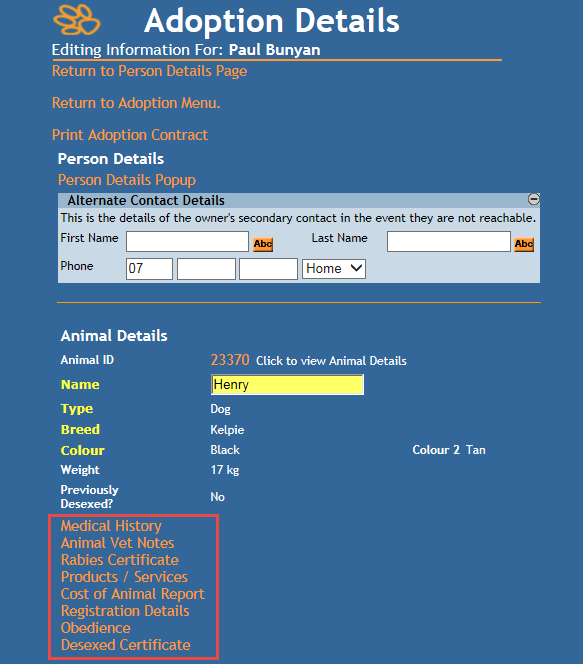
You will receive a pop-up asking if you wish to add a new license/registration record. Click OK to continue. A pop-up will deploy. - Products/Services: (* This may or may not display in your system. If it does not skip to the next item.) Click on the link if the client wants to purchase merchandise or medication. This will generate a popup window.
- Obedience: (* This may or may not display in your system. If it does not skip to the next item.) Click on the link if required. This will generate a popup window.
- Spayed/Neutered Certificate: (* This may or may not display in your system. If it does not skip to the next item.) Click on the link if required. This will generate a popup window.
- Sponsorship Questions: (* This may or may not display in your system. If it does not skip to the next item.) Click on the link if required. This will generate a popup window.
- Adoption Counsellor: Click on the down arrow on the "Select adoption counsellors" box to open it, then click on as many counsellors as is required.
- Adoption Fees: If the adoption fee was selected from the drop-down list and it is incorrect, click on the down arrow to select the correct fee.
- Status: click on the down arrow and select Adopted- Awaiting Pickup status.
- Sub-Status: select a sub-status if relevant
- Desexed Due Date: If required, you can mark a date the pet is expected to be spayed or neutered by.
- Age: make sure an age and DOB has been entered.
- Microchip Details: ensure all microchip details are entered, complete and correct. Rescanning the animal at the time of adoption to double check is recommended.
- Ensure all required fields are populated with the accurate information.
- Repeat for any subsequent animals if the Adopt Multiple Existing Animals option was used.
- Click Finalize Adoption.
- Process through any opt-in options available (e.g. insurance, animal training, third-party partner offers)
- Confirm Products & Services: if you do not want these products included on your adoption receipt, make sure they are all unticked now.
- Click Continue to Receipt
- The Add Receipt page will display.
- Payment Method: Click on the down arrow to select the method of payment. EX: credit card, check, cash, etc.
- Complete applicable fields based on the payment method.
- Ensure the allocations are correct.
- If your site is enabled for digital signatures, have the client sign now, or apply the Sign Later or Sign this receipt offline options.
- Click Update or Update + Print.
- If your site is not enabled for digital signatures, print at least two copies of the receipt, and have the adopter sign your copy.
- If your site is enabled to email receipts, you will be able to email the receipt directly from the Animal Details page one the PDF has generated.
- On the Animal Details page, the status will look like this:
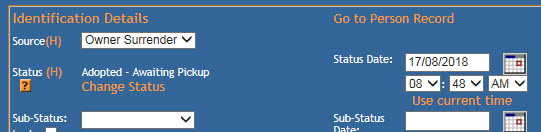
NOTE: Animals with this status are still classified as In Care and as such will appear on reports such as the In Care Inventory so they are easy to track.
To Finalise Once the animal has been collected:
- From the Welcome/Search page, search for the animal's AID number.
- Click the Change Status link beneath the status Adopted - Awaiting Pickup status.
- On the resulting page, amend the status to the relevant Adopted status:
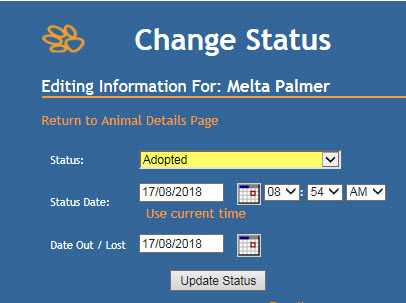
- NB: only "Adopted" status are available in this drop-down. If the client changes their mind, you would need to process an Undo Adoption to return the animal to a different in-care status.
- Status Date: Will default to today. To amend the status date and time, click Use current time or click the calendar icon to manually amend the date, then click the down arrow to manually amend the time.
- Date Out/Lost: Will default to today. To amend the date, click the calendar icon and select the required date.
- Click Update Status to save and finalise the adoption.
Comments