
Shelter Buddy now has the option for users to be emailed with changes to a particular animal's status, selected messages in the General Animal Notes and if it is transferred to another location.
This option can only be applied to individual animals, not for general changes to status or location for any animal.
Set Up - Administration:
This sets up email groups so targeted people can be notified, and adds wording for the notification email templates. Templates must be set up before the system can send emails.
You will need access to the Administration menu to perform these tasks.
From the Welcome / Search Page navigate to the orange left-hand menu and click on Administration, then locate and click on the option Opt in for Animal Updates
Email Groups:
This option allows you to register members to receive updates for specific types of changes regarding specific animals:
- From the Opt In for Animal Updates menu, click the option Email Groups.
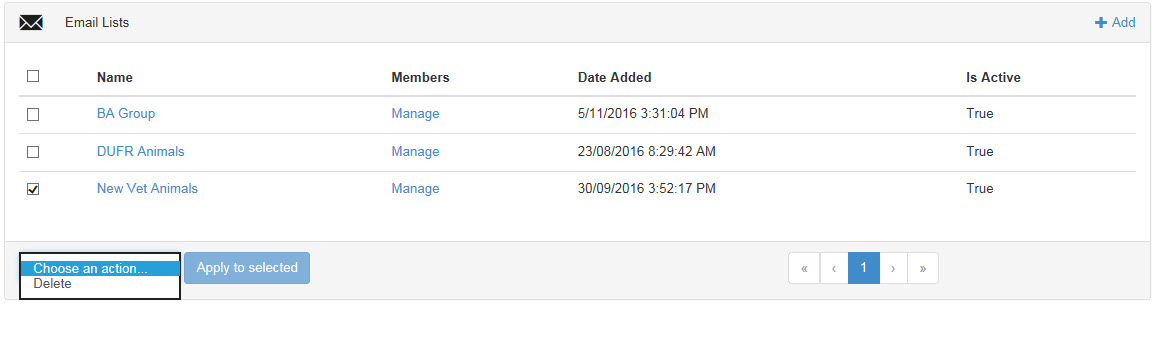
- Click +Add in the top right of the Email Lists heading bar to open the Edit Email List page.

- Enter the Name of the group in the text box - for example, "BA Group" for notifications of animals made Awaiting Behaviour Assessment. NB there is no auto-case here: ensure the correct case is used.
- Is Active checkbox will default to being marked, denoting the group is currently active. Do not untick at this stage.
- Click Save to save your new group.
- The page will return to the Email Lists menu. Your new group will be present, arranged alphabetically. Each group will display a Members column, the Date Added, and whether or not it is Active adjacent to its Name.
- Change the Name of the group by typing in the text box
- Make the group inactive (to preserve history) by unticking the Is Active checkbox.
- Inactive groups can be reactivated at any time using the Edit Email List page.
- Click Save to keep your changes
- Click Cancel to return to the list without saving.
- Click on the box to the left of its Name to place a tick there
- Click the down arrow on the drop-down box at the bottom and select the option to Delete
- Click the Apply to selected button.
- This will remove the group entirely and permanently.
- The Opt in for email list [Name of Group] will load. Click the +Add link in top right of the Opted in heading bar.
- Add a valid email address into the Email box and click Save OR click Cancel to return without saving.
- You will return to the Opt in for email list [Name of Group] page and your changes, if any, will display beneath the Opted In heading bar.
- You can amend changes by clicking on the email address in question to open the edit page.
- To Delete people from the list, click to place a tick in the box to the left of the email address to be removed and click the down arrow on the drop-down at the bottom of the list to select the option to Delete and click the Apply to selected button.
- When finished, click the Animal Update Email breadcrumb at the top of the page to return to the previous menu.
- You will notice that your subscribed members now appear beneath the Manage link for that group.
- When subscribed to a list, members will be sent a confirmation email.
- To Edit an existing Group, click on the Name of the group to return to the Edit Email List Page.
- To Delete an existing Group:
- To Add Members click the Manage link in the Members column alongside the group you wish to add members to.
- Once your groups are set up, click the Menu breadcrumb at the top of the page to return to the Opt-In for Animal Updates menu.

Email Templates:
This option allows you to create templates for the verbiage you would like included in the emails sent to your group members to notify them of changes.
- Click +Add in the top right of the Email Templates heading bar to open the Create Email Template page.
- Category - Click the down arrow to choose one of the three categories; Notes Added, Shelter Transfer or Status Change, (Note: you can only have one of these three options active at a time, so you shouldn't have more than three active templates in your list)
- Subject - Use the Insert options to include relevant information in the subject line, such as the Animal ID number or Animal Name. These models will automatically insert the relevant information from the animal's file wherever they appear. Alternately, you can simply type static information.
- Body - Use the Insert options to include relevant information in the body of text for this template, such as the Animal ID number or Animal Name. These models will automatically insert the relevant information from the animal's file wherever they appear. Alternately, you can simply type static information.
- Note: for both Body and Subject there is an option to include Notes. This is only a valid option if the Category selected is Notes. If you attempt to apply this for other types, it will not allow you to save your changes.
- Is Active checkbox will default to being marked, denoting the template is currently active. Do not untick at this stage.
- Click Save to create your template, or Cancel to return to the Animal Update Templates menu without saving.
- All Category Names will display in alphabetical order, with the Date Added and Is Active status listed alongside.
- To Edit an existing Category:
- Click on the Category Name to open the Edit Email Template page.
- Make changes as you need to, then click Save to keep your changes or Cancel to return without changing.
- You can make a template inactive here by unticking the Is Active checkbox.
- You can also make a template inactive by placing a tick in the tick box beside that Category Name and clicking the down arrow to select Delete from the box at the bottom and click Apply to selected. NB, in this case, this merely deactivates the category: it does not delete it entirely.
- Templates must be set up BEFORE emails will actively be sent.
Opting in for Email Notification:
- Navigate to the Animal Details page for the animal you are interested in.
- In the Animal Menu on the right, location the menu item Email Updates
- To subscribe one or more groups, click the checkbox alongside the relevant group names, then find the Subscribe option in the drop down below them, make sure it is selected and click Apply to Selected. The Is List Subscribed option will update from False to True.
- To subscribe an individual, click the +Add option in the Individual Email List header. Enter a valid email address into the text box that will be offered and click Save to keep your changes or Cancel to return to the list.
- Newly subscribed groups and individuals will receive an email when an animal's status changes or they are transferred to another location, or a note is added and flagged to email*.
- To remove someone from the email notifications, simply place a mark in the checkbox beside their email or the group name, locate the option Unsubscribe in the drop down and click Apply to Selected. The Is List Subscribed option will revert to False.
Alternately: use the Bulk Update Menu
- From the Welcome/Search page, click the option Bulk Updating Menu in the Search Menu
- Click on the option Bulk Subscribe to Animal Updates
- A bulk upload page will display:
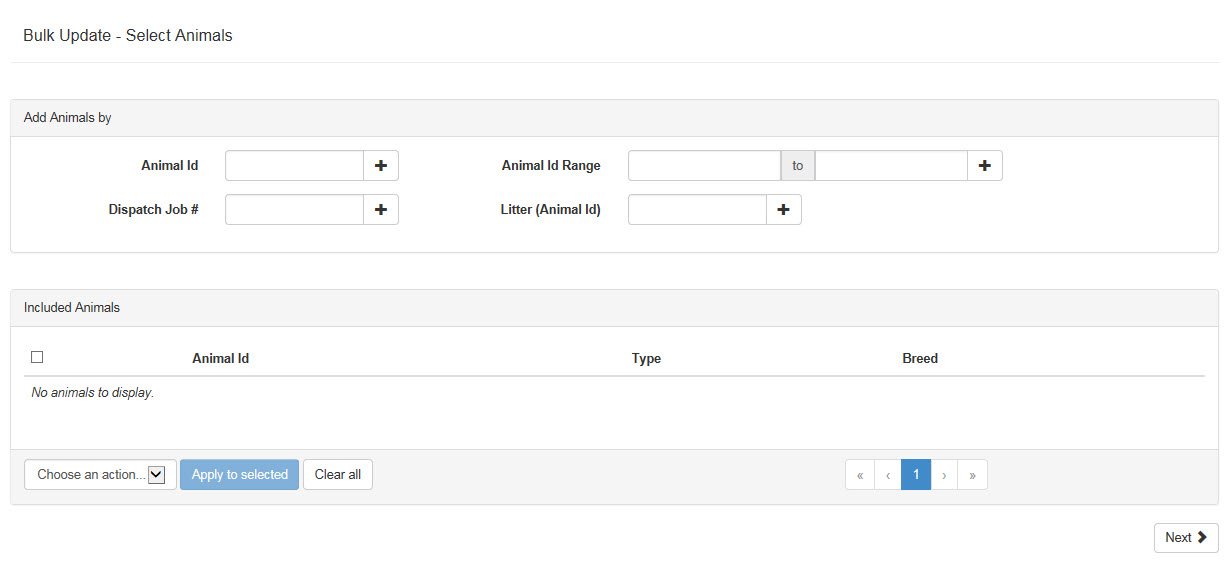
- Enter animals that need to be tracked either by individual Animal Id, or by Animal Id Range to include all animals within that range of numbers (e.g. for a group that were entered sequentially or by bulk), by Litter (they must be linked as a litter) or by Dispatch Job # to include all animals linked to that job. Simply enter the relevant information into the box of your choice and either click the + symbol or press your Enter key.
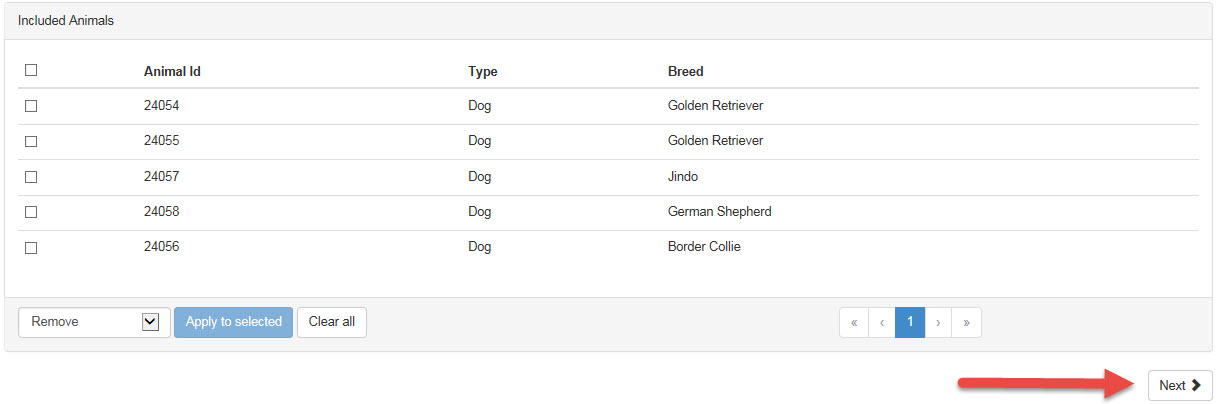
- Animals added will display at the bottom of the screen under the heading Included Animals.
- You may remove animals from the list by ticking the box against them and selecting the Remove option in the drop-down at the bottom of the page:
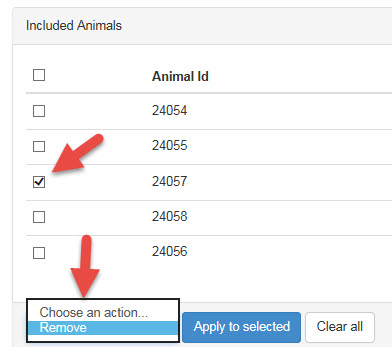
- Click the button Apply to selected to confirm and remove this/these animals from the list or Clear all to remove the check marks from all boxes.
- Once you are satisfied with your list, click the Next button:
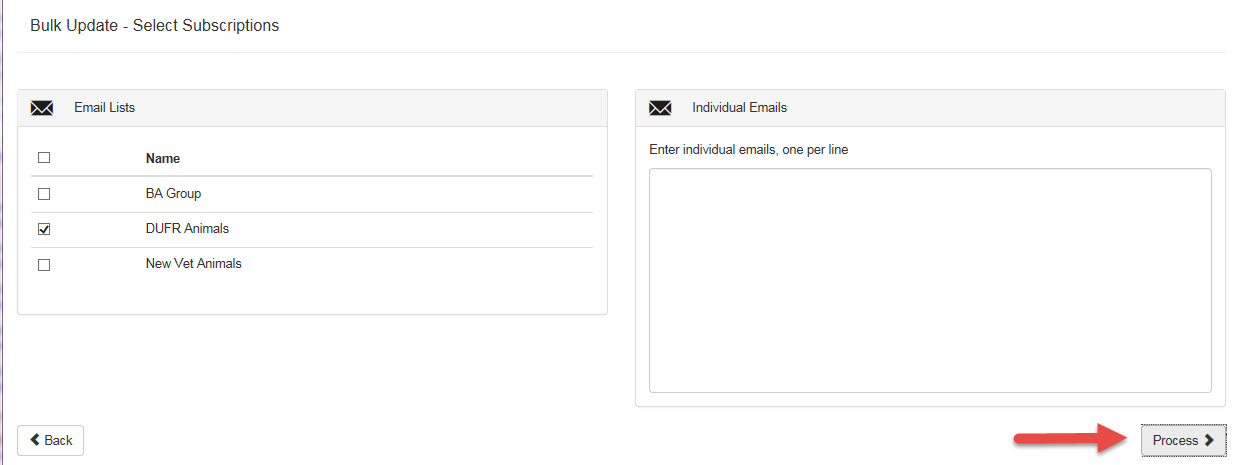
- On the resulting page, either select the groups who would like to be notified of changes for these animals, or add Individual Email addresses as usual.
- When you are satisfied with the list, click Process
- You will see a result page that notes that all animals were successfully updated, or will highlight an animal in red and give you an issue message if something went wrong.
- You have now successfully subscribed!
*NB: Subscribers will only be notified of Notes added to an animal file when the Notify users who are following this animal checkbox is applied: 
Comments