
This process explains how to use all the fields on the Add Receipt and Edit Receipt page. These fields are common to all types of receipts.
- Follow whichever process desired to arrive at a receipt page, including but not limited to:
- Adoption process
- Reclaim process
- All intake processes
- External Transfer in or out
- Sell Products / Service
- Add Receipt directly to person's record
- At the top of the page, under the header and the notification of who's file the receipt is attached to, you will see a Receipt ID number. This is auto-generated by the system and unique to the receipt you are looking at.
- Date Created marks the time and date the receipt was first created. It does not reflect the date of the receipt itself (this may be backdated for example).
- Batch ID is an auto-generated number that groups receipts by user, login region and date of creation. Beneath the Batch ID, you can see the Batch Description, which shows detail for this information. This helps users track batches as required.
- To change the batch information, click the link Change Batch. The resulting pop-up will show you the current batch information and then fields you can use to select a different batch.
- Click the down arrow to select a User from the drop down
- This will load the next drop down. Select an open batch from the drop down (only open batches will load)
- Click Change Batch to close and save
- Date: This will default to Today. Click the calendar box to change if you would like it to reflect a different date.
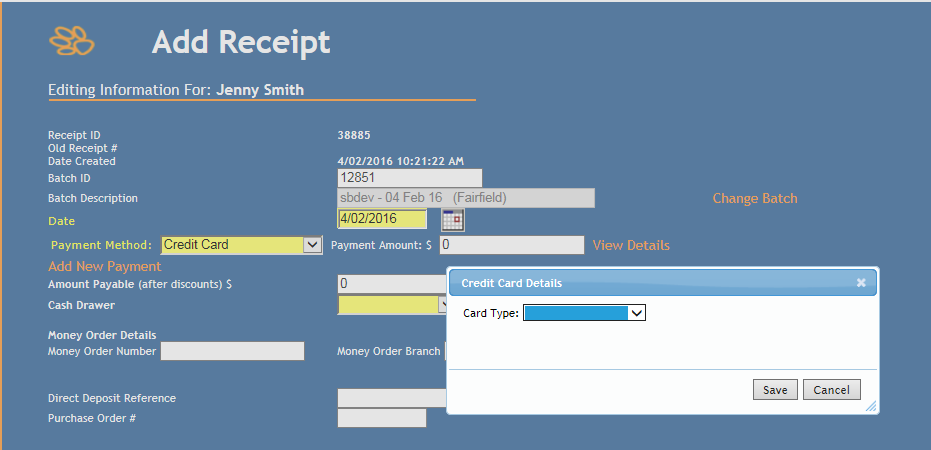
- Payment Method: Click the down arrow to select an appropriate payment method. This field is usually mandatory, even for receipts that have a $0 amount. In this case, select the option "Free of charge".
- If the Payment Method is Credit Card, an option will deploy to enter details of the Card Types. Click the down arrow to select.
- If the Payment Method is a Cheque, an option will deploy to enter the cheque number, BSB and Account Number. These are free text fields so complete with the details from the cheque and mark that ID has been verified by clicking the box.

- Click Save to continue, or Cancel to return to the Add Receipt page and make another selection. This must be completed before continuing.
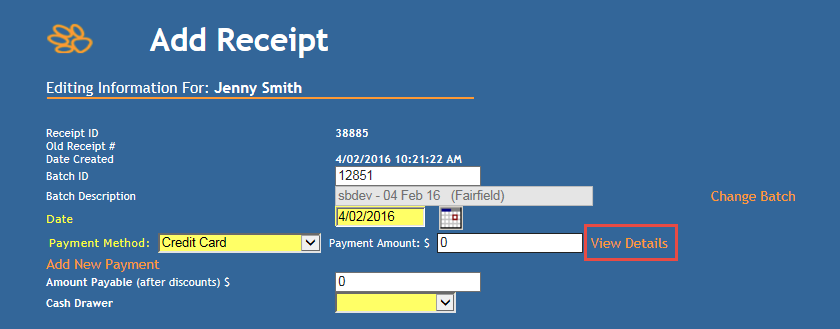
- Once details have been selected, a link View Details will appear on the right of the Payment Amount. Click the link to change the details if required.
- Payment Amount: if the receipt is linked to a process where fees have been set up (e.g. Adoption) then this field will automatically display the amount due. Otherwise, an amount can be entered, or changed, by placing your cursor in the field and typing in the desired amount.
- If the customer is paying using part payments, you can enter the primary amount as above and then click the link Add New Payment found directly below the Payment Method to add a new line for a different payment type and allocate additional fees here.
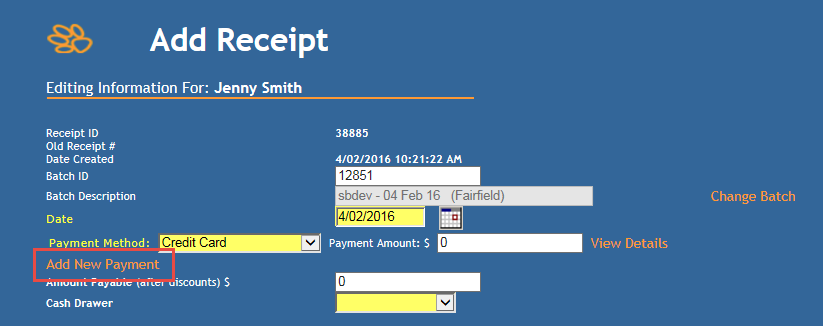
- Repeat as required until all payment amounts are accounted for.
- Amount Payable (after discounts) will auto-update as the fields above are completed.
- Cash Drawer: click the down arrow to select a Cash Drawer.
- Money Order Details: These fields will be mandatory if the option "Money Order" is selected from the Payment Method drop-down.
- Direct Deposit Reference: enter details into this free text field as required.
- Purchase Order #: enter details into this free text field as required.
- Unallocated Amount: This will reflect the $ value still to be allocated to a GL Code before the receipt can be finalised. It must read $0 before an Update button is used.
- Allocation Row: This row allows you to see fees and allocations that have already been applied (e.g. in the case of auto-allocations) or allows you to select/change options.

- Campaign: this is not mandatory, and can be left blank. However, if you would like to allocate specific amounts to particular campaigns, click the down arrow to select the campaign from the drop-down that the amount for the current row is to be assigned to.
- $: Enter the $ amount for this allocation
- GST: leave blank - this will auto-update depending on auto-allocation settings, GL Code settings or the GST Type drop-down on the right end of the row. NOTE: This may not show for some sites or may be labelled differently depending on local settings.
- Account: If the items added to the receipt have been linked to a GL Code, this will be auto-populated. However, if no GL Code is present, you can add one manually using the auto-complete field. This field works in the same way as the breed/species fields do on the Animal Details page. Place your cursor in the field and type at least the first three letters of the description of the accounts (e.g. "don" for "donation"). The drop down will offer you suggestions, with those linked to your region at the top. You can further refine by typing more letters. Select as required by clicking the option. NB: you don't need to know the code numbers, just the description!

- Alternately you can click on the Search icon at the end of the allocation box to search in a more traditional manner:

- Click the Search icon and a search will open that allows you to filter by Cost Centre or Physical Location:
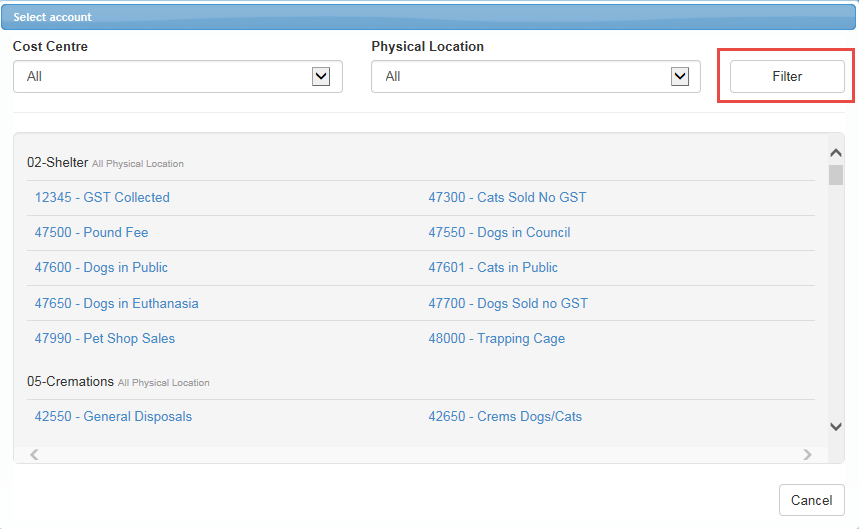
- Select the Cost Centre or Physical Location from the drop down and click the Filter button indicated above to refine your search
- Simply click on the account you want to populate the account box with those details
- Click Cancel to close the box without making a selection.
- GST Type: Will default according to settings from auto allocations or from setting applied to the GL Code. To manually select, click the down arrow to change the option - it will automatically recalculate the amount and apply it to the appropriate areas. To remove, simply change it back. NOTE: This may not appear for some sites or be labelled differently depending on local settings.
- As soon as you click out of the allocation field, you will notice a new row appears below the first. This is so you can allocate another amount if required. For every completed row, a new blank one will always appear automatically when the last is completed. Previously, blank allocation rows would block users from updating a receipt, but this is no longer the case. You can complete the receipt with the blank row there: it has no impact on accounting or reporting for the receipt. However, if you would like to remove it, click the red (X) at the end of the row and it will disappear.

- If you accidentally remove all the allocation rows, a green (+) will appear beneath the Unallocated Amount. Click this icon for a new allocation row.

- Notes: Enter notes into this free text box as required.
- Notes to Print: any notes relevant to the receipt that you would like to appear on the Print version, enter into this box. NOTE: the customer will see these notes on their receipt.
- Insert Templated Notes link allows you to add frequently repeated information into the Notes to Print field. Click the link and select the template from the pop-up.
- Appeal Category: This is linked to Campaign. A Campaign with a linked appeal must be assigned to the first row of allocations to populate the drop down. Click the down arrow to select.
- Receipt Type: For donation or campaign receipts, select the type of receipt you would like to issue this supporter from the drop down.
- To Be Reviewed: can be used to mark receipts that require supervisory sign-off, but not mandatory. This may not be required or available to all sites.
- Amount Payable: Will default based on data entered above.
- Total Receipt: Will default based on data entered above.
- Signature: If the digital signature module is enabled, there will be a section towards the bottom of the screen prompting you to have your customer sign the pad. Have your customer sign as required. For more information on signing digitally, see this help document: Digital Signatures - Signing from a Tablet
- Return to your Receipt and click Update + Print.
- The receipt is now complete; you can print copies if required.
Comments