
Following are instructions to assist in the entering of information for the license and redemption process.
Only users with access to the Administration menu will be able to perform these tasks.
This section contains terminology that varies significantly depending on geographical area and local settings. For clarity and consistency, the terms License, Jurisdiction and Agency will be used in the document below.
Definitions:
Reclaim - aka Redeem in the US and parts of Canada, this refers to the act of an individual laying claim to an impounded animal and resuming custody of the animal.
License - aka Registration in Australia, this refers to the act of legally issuing some form of local government required identification.
Jurisdiction - aka Warrant Area or Shire, this refers to geographical areas governed by the same local government.
Group - in this context, a Jurisdiction group. When multiple areas share the same licence/registration fees etc, e.g. if several jurisdictions merged into one, or if there is one governing jurisdiction that oversees multiple sub-jurisdictions.
Agency - aka Council, this refers to the name of the local government that maintains animal control for a geographical area, specifically, one that impounds animals. Agencies are also used for other representative bodies, e.g. your organisation may have an entry here, particularly if you handle Dispatch jobs.
A Jurisdiction, Jurisdiction Group and an Agency can be the same.
Most Jurisdictions and Agencies are loaded into the site when it is first set up. If, however, some new ones need to be added as time progresses there is a function that allows you to add and manage them.
Add / Edit / Delete a Jurisdiction / Agency
This function is found in Administration Menu -> Edit Drop Down Lists -> Jurisdiction / Agency* -> Maintain.
*Remember, this will be labelled with your local settings so look for those in your Edit Drop Down List.
To add a new Agency / Jurisdiction, enter the name of the Agency or Jurisdiction into the text box under the heading New Agency / Contract Agency, or to edit an existing one select from the Agency /Contract Agency to Edit or Delete drop-down box and select if you wish to edit or delete by clicking the appropriate button. NOTE: The Delete function does not delete the entire record; just it's presence in the Go to Agency, Issuing Authority or Jurisdiction drop-down options. If a person file exists, it will remain, and history relating to it being included in the list is retained.
The Functionality drop-down box determines what you are adding to the system: an agency, a jurisdiction or both (Contract Agency and Jurisdiction).
The Group allows you to have the record use fees common to a number of Jurisdictions/Agencies, or keep them unique. Group is mandatory, so if it is to be unique then re-enter the name of the Jurisdiction/Agency into this field. NB: If you have multiple jurisdictions assigned to a Group, only the Group will show in the Licensing functions described below.
- If it is a jurisdiction you are adding and this jurisdiction has no Contract Agency associated with it, then the Jurisdiction Only option would be selected. This adds the Jurisdiction to the jurisdiction drop downs, and also the Issuing Authority (a license issuer). This will require license fees to be entered for it (see later in the document). It does NOT add it to the Go To Agency drop-down list on the Welcome / Search page or on the Dispatch job page. For this option, a name/title and functionality is all that is required.
- If it is simply a Contract Agency with no Jurisdiction related to it whatsoever, then the Contract Agency Only option should be selected. This will add the Agency to the Go To Agency list on both the Welcome and Dispatch pages and will require redemption fees to be entered for it (see later in the document). This option expands to give you options to enter other information, including address, contact phone numbers, email address and if applicable/known, basic reclaim information.
- If you are entering a Jurisdiction with a related Contract Agency, you would select the Jurisdiction and Contract Agency option. This will include the entry in the Issuing Authority, Jurisdiction and also the Go To Agency drop-down boxes. This entry will require both license and redemption fees and allows for additional information such as address and contact phone numbers to be recorded.
Regardless of which option was selected, click Save to proceed.
Add an Agency from an Existing Record
You will need to know the Person ID number of the file you wish to set as an Agency before you begin this process.
- Go to the Administration Menu -> Add Existing Person to Agency Drop Down List.
- On the resulting search page, enter the Person ID number of the record you want to set as an Agency.
- From the resulting options, click Create Agency
- A free text field will display: enter the name you want to be displayed in the Go to Agency, Issuing Authority and Contract Agency drop-down menus.
- Click Create Agency to finish. NOTE: this will add it to the list of Contract Agencies only - if you wish to set this record as a Jurisdiction and Contract Agency, you will need to edit using the Edit Function via Edit Drop Down Lists as described above.
License Administration
This administration section is found under Administration Menu -> License Administration.
Reminder: if you have multiple jurisdictions assigned to a Group, only the Group will show as the "Issuing Authority" in all of the following functions.
Drop Down Menus
- License Exception Reasons: These are reasons for License exemption and will be available on the license/redemption page for when an animal needs to be exempt from Licensing.
- License Cancellation Reasons: When a license is cancelled, a reason is mandatory. Use this to add, update and delete reasons for a license cancellation.
- Rabies Exemption Reasons: Use this to add, update and delete reasons for an animal being exempt from a rabies vaccination at the time of licensing (if rabies vaccination is mandatory).
- License Tag Types: Use this to add, update and delete license tag types issued when licensing. NOTE: if set as a secondary tag type, license numbers assigned to this tag type will not transfer from the License processing page to the Animal Details page.
- External License Issuers: if you are authorised to issue licenses for a non-contracted agency, you can add them to the Issuing Authority list here. This will add them to this list and this list only, but it will enable you to set up licensing fees for that Authority.
Registration Page Display Criteria
This administration function helps set up when the license details will be included in another process (adoption, reclaim and agency outgoing). This requires that existing person records have a current jurisdiction selected as their address to function correctly.
Once this administration function is selected a popup will appear.
- Available are 2 dropdowns, Jurisdiction (or Group) and Animal Type.
- Selecting a jurisdiction will apply this setting to adoptions or redemptions by any person with that jurisdiction current on their Person Details page (which is why it is so important that Person records be updated before using the reclaim or adoption Person Categories [PCs]).
- Select an animal type.
- Adoption, Reclaimed and Agency Outgoing checkboxes can be used to specify which PCs the licensing process should be included in. For example, if all dogs in Jurisdiction/Group A should be licensed upon reclaim, then I would select Jurisdiction/Group A, Dog and then check the Reclaimed checkbox. If a person in Jurisdiction A reclaims a dog now, along with the reclaim details being filled in, the licensing detail will also be available. Remember to repeat the process for adult and baby Types (e.g. Dog and Puppy) if applicable.
- NB: if you only have fees for the Adult Type (Cat, Dog) set in License Fee Setup, these will apply to the Baby Type (Kitten, Puppy) also if flagged here.
- All combinations of Jurisdiction, Animal Type and a PC left unchecked will result in the licensing process not being available for that particular combination.
License ID Setup
This administration item determines how the License ID field is used. It is set as Inactive by default which means this field on the License form will be unavailable and not used (so if the License ID field is not relevant to your shelter, then select this option from the drop-down, or simply don’t select an option).
If Default to Animal ID is selected, the License ID field will be used and will default to the animal’s ID. It can, however, be edited if need be.
If Use defined Number Range is selected, then a valid number range must be entered, and the numbers within this range will be automatically allocated to each license in numerical order. Again, if this option is selected, the field is able to be edited on the License form.
License Issues Date
This administration item lets you set the default issue dates for each Issuing Authority.
On this page you must select the Issuing Authority and then one of the following from the Issue Date drop-down:
- Default to Current Date: The issue date of the license issued will be the current day.
- Set to Specific Date: When this option is selected a day and month field become available. The issue date of the license issued will default to the date that is selected here.
- Default to Rabies Vaccination Date: If this option is selected the issue date of the license issued will be the same as the last rabies vaccination date.
License Fee Setup
This administration lets you specify all the different license fees for each animal type in each issuing authority.
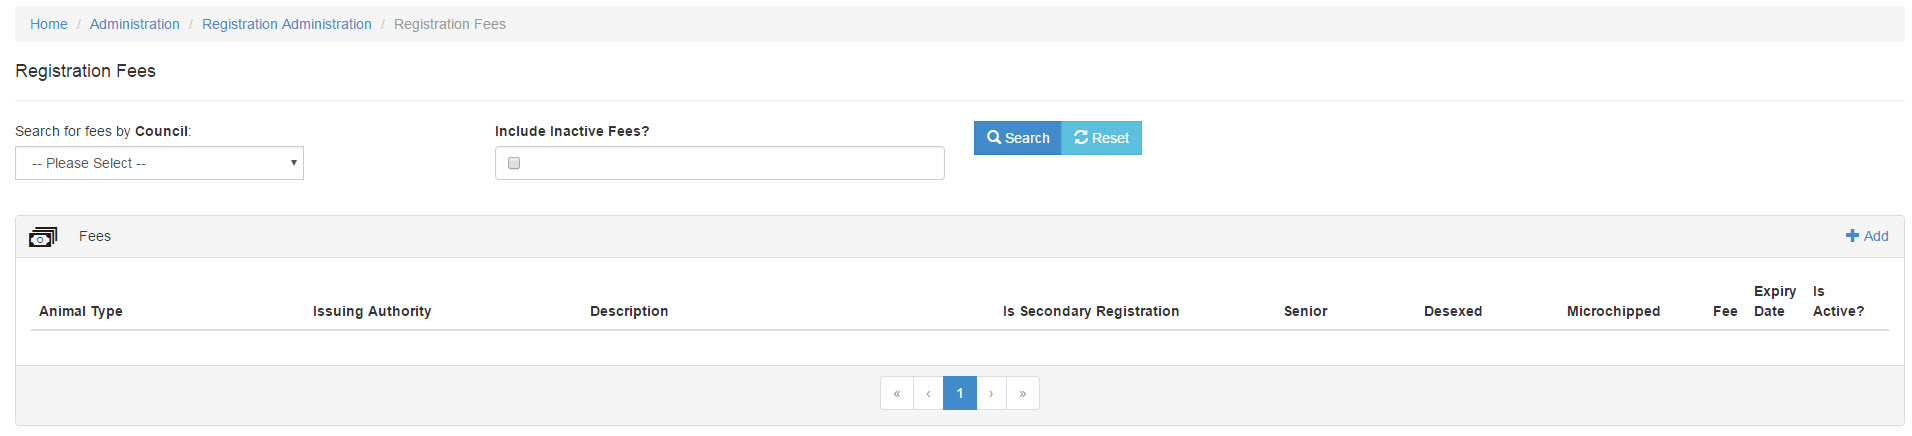
- Click the option for +Add

- On the resulting page, enter the details as follows:
- Manually Entered: If the expiry date is manually entered, no additional options will appear
- Issue Date +: If the license always expires a set amount of time after the issue date, select how many months after the issue date it is to expire in the second option.
- Specific Day Each Year: If the license always expires on a certain date regardless of when it was issued, select any number of date and month here. You should also set a "cut-off date", so if licenses are added after that date they will be valid until the following year rather than be short-dated; e.g. if the license was issued just a few days before the usual expiry date.
- Note: the expiry date can always be manually changed on the license form.
- Lifetime: This indicates the license is for the lifetime of the animal and has no expiry date option.
- Tip: Click on the question mark icon for help on what this item does:

- Description: enter the name of the Fee so it can be identified from a drop-down later.
- Issuing Authority: Click the down arrow to select the issuing authority from the list.
- Animal Type: select an Animal Type from the drop-down. Each animal type can have multiple fees for the license issuer to choose from so the same animal type can be used more than once. If you set it only for the Adult Type (Cat, Dog) then this fee will also apply to the Baby Type (Kitten, Puppy).
- Senior Fee: If the fee is for Seniors only, select Yes, or if it excludes Seniors, select no. If no selection is made (N/A) the license will be available regardless of age. This option filters via the DOB recorded on the Person Details page.
- Desexed: This option filters via the spayed/neutered status drop down on the Animal Details page. If the animal must be spayed/neutered for the fee to apply, select yes. If the animal must be entire/unaltered for the fee to apply, select no. If the fee may apply regardless of the animal's spay/neuter status, make no selection (N/A)
- Microchipped: This option checks the Microchip number field on the Animal Details page. If the fee only applies if the animal is chipped, select yes. If the fee only applies if the animal has no chip, select no. If the fee applies regardless, make no selection (N/A).
- Fee: Enter the fee amount as applicable, e.g. $0.00
- Expiration: Select an option from the drop-down and depending on your choices, additional options may appear:
- Secondary Registration: Nominate if this is a Secondary License. NOTE: secondary license numbers are not recorded in the license number box on the Animal Details page. This might be used for lesser licenses, e.g. for a registered yard dog.
- Next Fee: Set the Next Fee by selecting an option from the drop-down (this will only populate if at least one other license has already been entered.) Once the current license expires, this nominates which fee should be included in the renewal letter. Leave blank if the system should determine based on animal status (microchipped etc.).
- Dangerous Animal Categories: Click the down arrow to select from the list.
- Is Active: Will default to being ticked. To deactivate (hide) a licence/registration, untick this box.
- Click Save to add this license type. OR
- Click Save Then Set Accounts to add this license type and immediately assign account codes. OR
- Click Save And Add Another to add this license and relaunch the new fee page to add a different license. OR
- Click Save and List This Issuers Fees if you wish to save your changes and then view a list of only those items associated with the Issuing Authority selected for this license. OR
- Click Cancel to disregard your changes and return to the Registration Fees page.

Once the fee has been added, it will display as a line entry beneath the Heading filters. 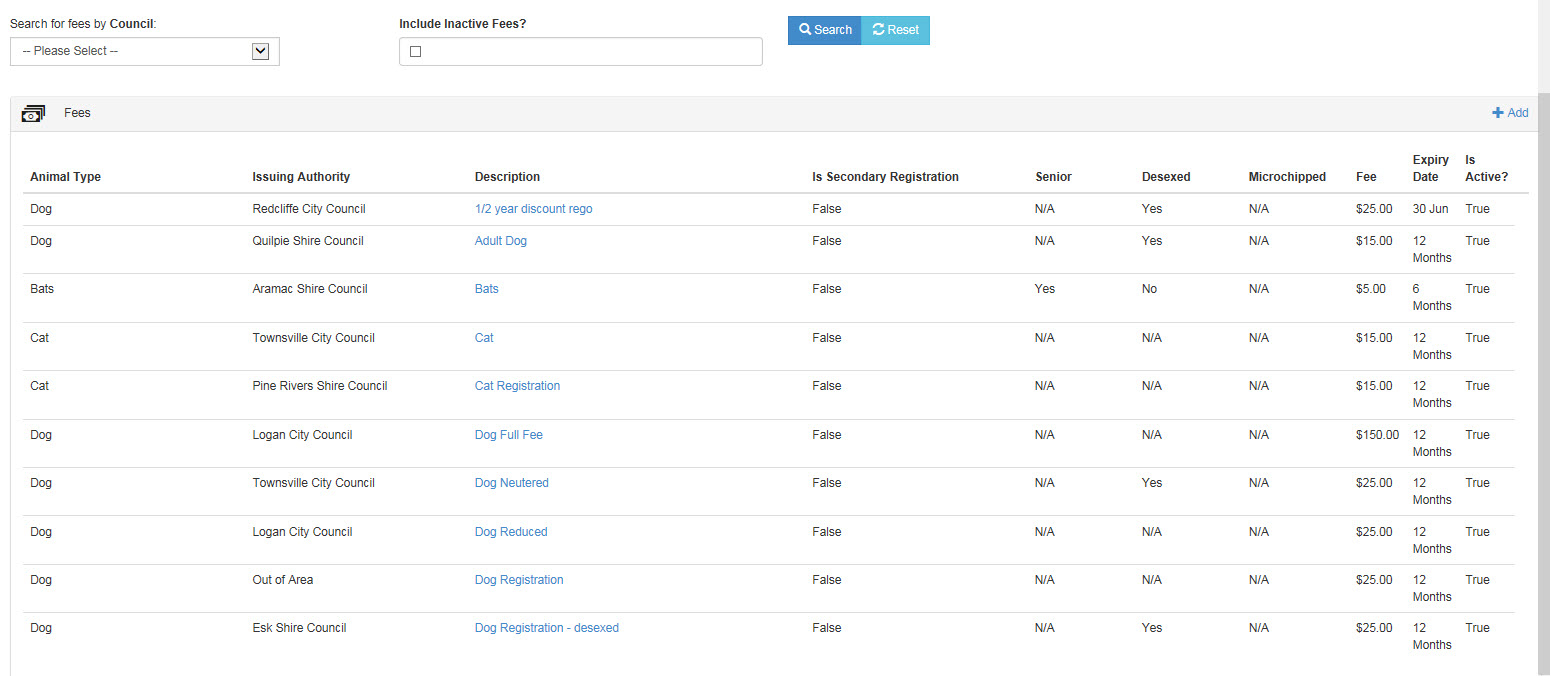
You can filter the list using the Search for Fees by Council drop down in the top right of the page, then click the Search button:

You can use the Reset button to return to the full list at any point. You may also use the Include Inactive Fees? option to include fees that have been de-activated.
To Edit an existing fee, click on the fee Description, and when the page displays, click the blue Edit button. From here you can change any of the existing settings, add or remove accounts.
- To Add an account, click the +Add button
- Enter at least one character in the box marked Account and the system will auto-find matching accounts. Select the account you would like.
- Click the drop-down arrow to associate the account code with a specific Region.
- Click the Add button to save and close.
- Click Remove to remove the account selection at any time.
- Click Save or Save And List This Issuers Fees to save your changes.
Additional License Fees
This administration item lets you specify which additional fees and regulations for issuing a license apply for any given issuing authority.
- Select the Issuing Authority from the drop-down.
- Select the animal type you wish to set additional fees or regulations for.
- Nominate by checking the appropriate box if that animal type is microchipped or vaccinated for rabies as part of the licensing process and therefore fees for these should be charged. Fees for these items are set separately, in either Vet Treatments (via Products & Services if applicable) or Microchip Fees (see below).
- NB: if you apply this option, the microchipping details will appear on the licensing page so you can nominate whether or not they should be pushed through to a partner microchipping company such as Home Again or Home Safe.
- Nominate if fees apply for late license renewal by entering the penalty amount in the box.
- Nominate any fees that apply to the replacement of a license tag.
- Click Save to update and close.
The rabies details only show if the rabies option is set for the issuing authority via:
Admin > License Admin > Additional License fees
Additional License Fee Accounts
This administration item allows you to set default accounts for any of the above items (Microchips, Rabies Vaccinations, Late Fees, Replacement Tags).
- Select the Physical Location (Region) OR select the Jurisdiction from the relevant drop-down list (Note: you can't select both)
- Against any item, you wish to set a default account for, select the appropriate GL Code from the drop-down list provided.
- Click Update to save your changes.
Microchip Fees
This option is available in both License Administration and Reclaim Administration, but both do the same thing and changes to one will reflect in the other.
This item offers a list of all active regions. If a microchip fee is to be charged, enter the fee in the text box provided. This will automatically mark the Include Microchip Fee on Reclaim Page checkbox once the page is updated.
License Application Issuing Authorities
This link offers multiple select options to bulk-update existing Jurisdictions to set them as Issuing Authorities.
Select the Jurisdiction(s) to be set as Issuing Authorities from the box on the left of the screen by clicking on them. To select more than one, hold down the Ctrl key while you click.
Once they are selected, use the arrow keys to transfer them into the box on the right.
A single arrow (>) will transfer one item at a time. If you selected multiple items, each time you click this arrow one of the selected items will transfer to the opposite box.
A double arrow (>>) will transfer ALL items to the opposite box simultaneously.
License Pop Up Message
This item offers an opportunity to enter a free-text message that will appear as a pop-up on all new licenses entered after it's creation. This can be used to remind your users of an important procedural point that is frequently overlooked, or to prompt them to up-sell a promotional item or event.
Expire Licenses
This item allows you to expire licenses either in bulk or one at a time, as required. This is done manually, so you can be sure you have run all your notifications first, and because some sites send reminders after the expiry date, allowing the owner to renew after that date has passed.
Delete Licenses Flagged for Deletion
Any licenses flagged to delete will display here as a line item containing basic information.
Use the View link to see the license information in a pop-up - you won't be able to change this information, it is for reference only. The Animal ID link can be used to view the animal page, and the Person ID link can be used to view the owner's information, again both in pop-ups.
Use the Delete link to remove the license completely and permanently from your system.
Flag Licenses as Sent
If your location sends out reminder notices with first, second and final notice options, you will need to track which records have which notices sent. This option allows you to flag that specific notices have been sent via License Application Reminder Letter Report.
- Select the Date Range for the expiry date of the licenses you wish to target.
- Select the Issuing Authority from the drop-down
- Select from the drop-down if you wish to flag the first notice, second notice or final notice.
- OR If you wish to flag a specific license, enter the license number here.
- Click Get Licenses to Flag
- The page will return a list of all licenses that have had first notices sent.
- You can use active links to View the license, the animal's page via the Animal ID number or Person ID will give you a pop up for the person's page.
- At the end of each row is a checkbox marked Flag as Sent. Individually click on each checkbox you wish to flag or select the Check All Licenses button to mark all of them simultaneously.
- Click Flag Selected Licenses to finish. This will automatically exclude these licenses for having a reminder letter sent for licenses that expired during the date bracket selected.
External Issuer Groups
This item lets you set up groups your External Issuers may belong to (e.g. Vet Clinics, Pet Shops, etc).
For details on how to use this item, click here.
If there are any questions with any of the above, please feel free to contact us at support@shelterbuddy.com
Comments