
This will step through the different procedures and functions available to Volunteer Managers / Administrators.
- Navigate to Administration
- Navigate to Volunteer Administration
- This page is the main volunteer menu page.
- Select your function as required.
- Job Descriptions manages the description of the volunteer jobs themselves. It has three sub-categories:
- Manage Job Descriptions defines the role so all users who have access to this area understand what is required for it. This is useful if the roles are recruited and co-managed by different departments or in different locations.
- Click New Add Job Description
- Name the job to be described (e.g. Hydrobath Attendant) then navigate back to Manage Job Descriptions via the link provided.
- A bar will appear across the page that has the job title you have just added, followed by areas for Job Section, Job Role and Tasks.
- In the Tasks list, click on the required link to add information
- Job Section includes qualities such as Job Title, Department, Classification, Job Relationships and Position Summary. Once added to this bar, further information can be added via a text box that becomes available through an edit link that appears at the end of the job section listing.
- Job Role assigns the description to the relevant job roles found in Job Roles.
- Tasks allows you to add Sections, Roles, edit the summary itself and preview how it will appear on the public site if/when advertised.
- Manage Sections: This allows you to Create New Sections or Delete Existing Sections as required.
- Edit Job Description Templates: This allows you to add additional standard text to all Job Descriptions in a header or footer format.
- Role Administration allows you add Roles to a Role Group, Edit existing Roles or Delete superfluous or expired Roles:
- Add New Role
- Select the Role Group the new Role is to belong to
- Name your Role Group
- If the Role Group doesn't have standard hours; click the option I'm a flexi role! This will enable volunteers to roster themselves on at any time within the general hours set up.
- Select a Location the Role Group is active for. If it applies to all your volunteer locations, use the Select All option.
- Assign your Role Group a relevant Icon from the Icon list by clicking Select
- Edit exiting roles
- Click the link Edit beside an existing role
- The role will appear in the Add New Role box at the top of the page.
- Adjust the role name or icon as required
- Delete existing roles
- Click the check box beside the undesired role/s
- Scroll to the bottom of the page and click the Delete Selected button. This will delete that role permanently from ALL regions.
- Rostering allows you to configure your volunteer roles and roster volunteers onto shifts
- Click on [x] roles configured
- Ensure that all roles required for your region have been marked with a check mark. If some have not, or new roles have been entered, check these roles then click Update
- Click the Shift Times link beside a role you wish to configure times for
- Add shift availability by clicking into a box next to the appropriate shift time and adding the maximum number of volunteers possible for that shift (e.g. 2)
- Repeat for each day of the week
- If no volunteers are required for that day, leave the box blank. This will default to 0 shifts available and will block anyone from rostering a volunteer into that day/timeslot.
- Click Update to save
- Use links provided to navigate back to Rostering main page.
- Click on [x] shifts this week
- Select the role you wish to roster from the drop down list
- Select the week you wish to roster for
- Click Show Roster
- If shifts have not been configured for that role, you will get a message that reads “No configured shift times were found for the role [selected] in the region [selected].” It will also have a link to create a pop-up box where roles can be configured.
- If shifts have been configured, you will get a roster page
- The roster page will show all possible time slots, but most will read 0 vacant
- Only time slots reading [x] vacant will allow you to add volunteers to the roster
- To roster a volunteer onto the shift, click the shift that reads [x] vacant to create a pop-up window.
- The pop up will display only volunteers who have received training in that role and are available on the day/time selected
- Click the box next to a volunteer’s name to select them
- If the role is a recurring one, choose if the role will repeat weekly/fortnightly, and for what length of time (i.e. the number of weeks/months) from the drop down boxes at the bottom of the pop up
- Click Save
- If successful, the Person ID will appear towards the top of the page (it will highlight briefly when done) with the date of roster against it.
- If unsuccessful, a message will appear across the pop-up in Orange
- Once finished, close the pop-up and refresh the page
- The number of shifts vacant will amend itself to reflect the newly rostered shifts and the volunteer’s name and PID number will appear beneath that shift.
- Hover your mouse cursor over the person to see their contact information
- Shift Times allows you to set up timeframes for any given shift, for any given role in any given region:
- To create a new shift;
- Type the name of the shift into the text box
- Allocate the start time via the drop down boxes provided
- Allocate the end time via the drop down boxes provided
- Click Create to save
- N.B. make sure that no similar shift time already exists as once created, this shift will appear on ALL roles, for ALL regions and can make the process of rostering difficult if it is allowed to get cluttered.
- To delete a shift;
- Ensure no one is rostered onto that shift
- Click the check box next to the unwanted shift
- Click the Delete button to save
- N.B. this will delete that shift for ALL roles and ALL regions, so be sure that no one using the volunteering module requires that shift before deleting them.
- Shift History allows you to see who was rostered on in the past. This might be used to confirm a specific volunteer was working on a particular day that might be too long ago to remember ordinarily.
- Can be filtered by Date Range, Region, User and IP (for shelters that have more than one server monitoring their data).
- Cancel Shift allows you to cancel a rostered shift in the case the volunteer has contacted you in advance to let you know that s/he will not be able to attend. Two options are available:
- Cancel by Region/Role – to be used in the case that a role will be temporarily unavailable for a certain period of time (e.g. contagion outbreak) or is to be made permanently unavailable but there might be/are volunteers rostered onto shifts during that period
- Select the Region from the drop down box
- Select the Role from the drop down box
- Select the week required for cancellation
- Click Show Shifts
- The Shifts will show in a table
- Reduce the shift (e.g. from 3 to 1) or remove all availability for the shift by setting it to 0
- Click Update to save
- Cancel by Person ID – to be used if the person says they cannot make rostered shifts in a given week or if they have been exited but still have shifts rostered on:
- Enter the person’s PID number into the text box
- Select the week to cancel
- Click Delete Shifts
- This area is due for upgrade so it will be possible to cancel a single shift from a week rather than the whole week’s worth.
- Volunteer No Shows indicates which volunteers didn't show up for rostered shifts. NB: Volunteer No Show systems are available via Advanced Volunteer Module only. In order for the system to recognise that the volunteer did indeed work the shift, they must either log in via the Volunteer log in system and log their hours as they go, or the Volunteer administrator must add their hours to the shift manually. Any volunteer who works but has not logged their hours against their volunteer profile will be counted as a No Show. This page searches by date brackets, location, volunteer names and active/inactive status. It can be used to track which volunteers are routinely not showing up, or to check if everything is okay with volunteers who are normally reliable. When searched, the return will display the volunteers information, the shift they are rostered for, and the first three of any skipped shifts as well as a count of how many shifts in total have been missed.
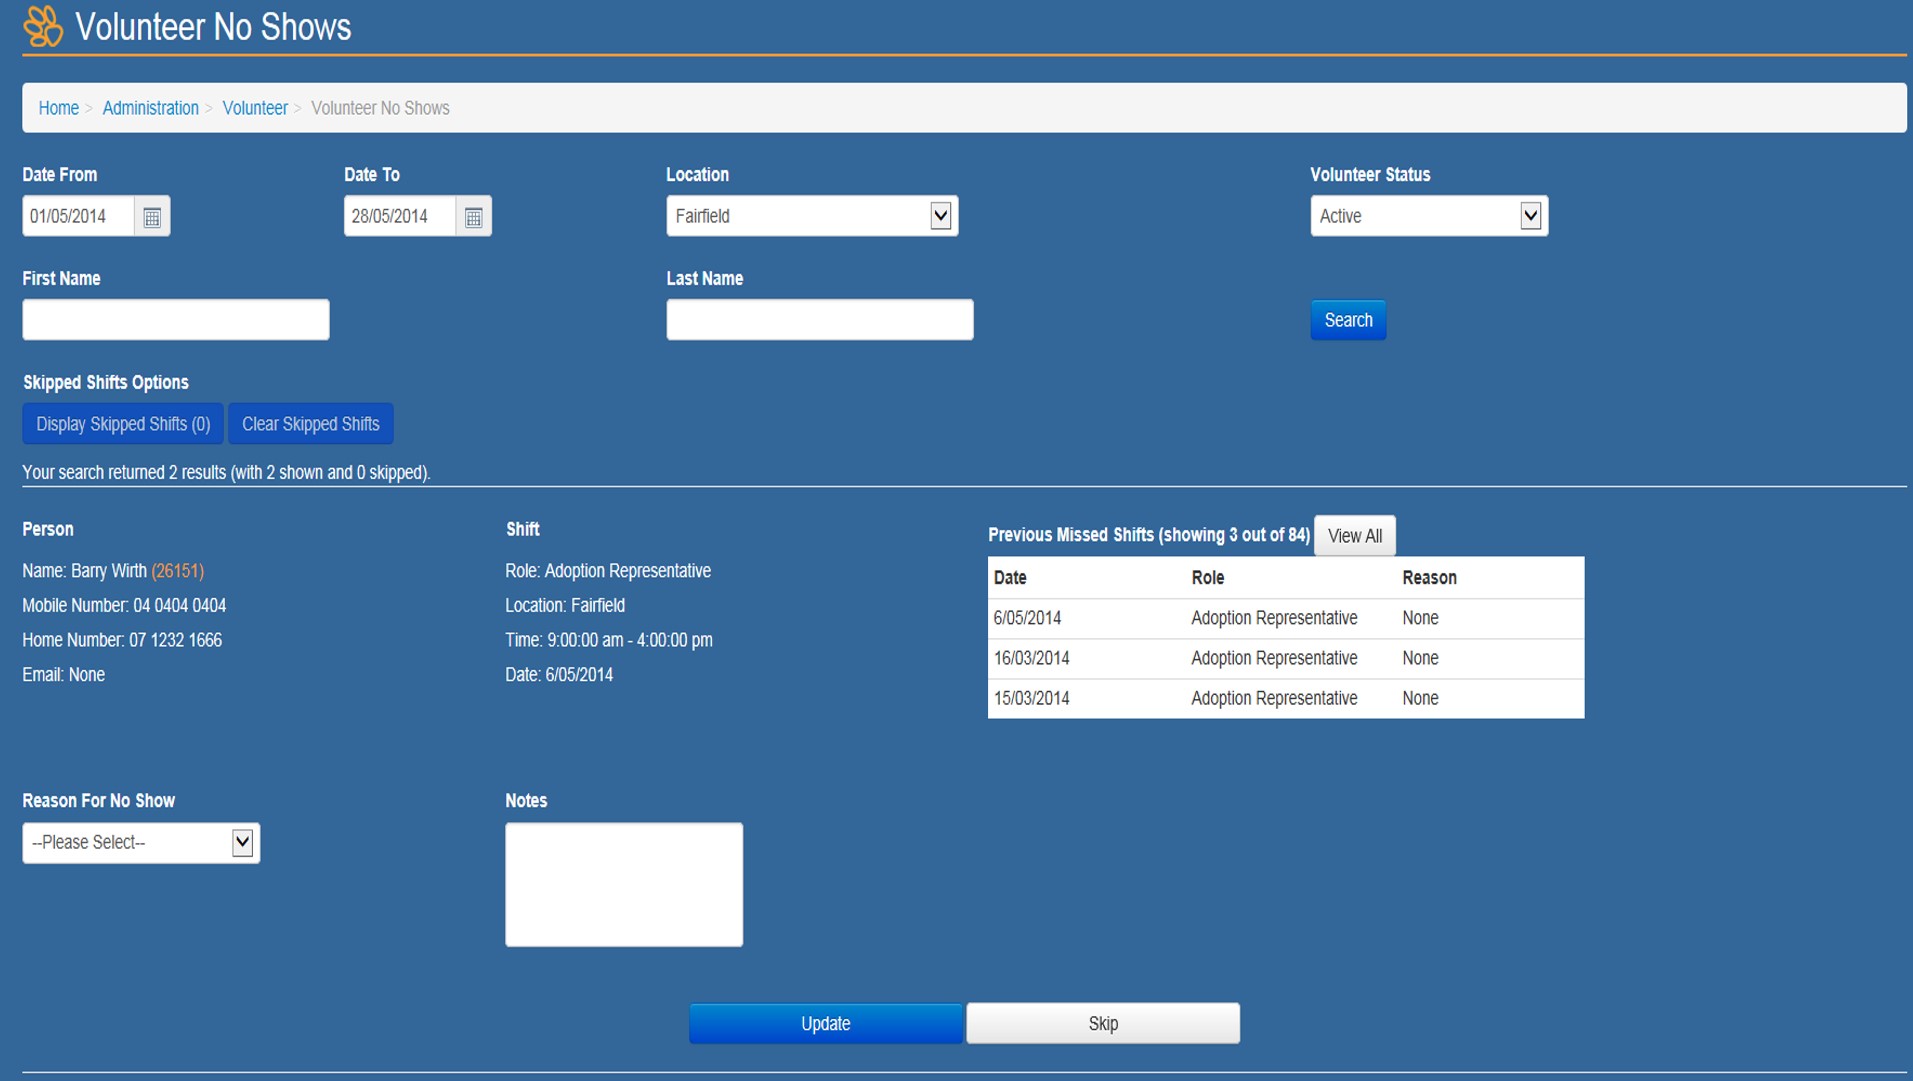 Users have the option to record a reason the volunteer did not attend their rostered shift and adding any notes about it. This information is recorded on the Volunteer Details page for that volunteer. "Skipping" an entry hides it to make the total list shorter. A shift is counted as a no show if:
 - The volunteer does not log on for the rostered shift
- no hours are manually logged against a rostered shift
- Volunteer No Show Reasons is an admin feature that allows you to enter standardised reasons why a volunteer did not show up for a shift and whether or not that reason is considered "Acceptable" (e.g. being ill may be considered acceptable, while forgetting to show up might not be)
- Click the Create New Reason button to add a new reason
- Click the checkbox to indicate if the reason is considered acceptable
- Click the Save and Add Another button if you want to add another reason immediately
- Click the Save button to return to the Volunteer No Show Reason menu.
- Volunteer No show Icons show against a volunteers name on the Roster to indicate the reliability of that volunteer. Use this link to set up new icons to indicate the number of consecutive missed shifts that volunteer has had.
- Click the Create New Icon button to add a new entry
- Indicate in the text box how many consecutive missed shifts the icon is to represent
- Use the document upload feature to find and select an image to represent the number of missed shifts. *Note: beneath this box is information regarding what image formats the feature will accept, and the size of the image that can be uploaded (limited to 1MB)
- Click the Save and Add Another button if you want to add another reason immediately
- Click the Save button to return to the Volunteer No Show Icons menu.
- Role Groups adds an overall grouping to individual roles so they can be defined by department. This can be useful if the same or similar roles are used by different departments: e.g. at Fairfield, Adoption volunteers would be part of Customer Service but in the Regional Shelters, they would be part of Shelter therefore should belong to a different Role Group
- Click Add to create and name a Role Group as required
- Click Edit to rename or amend an existing Role Group
- Click Delete to delete an existing Role Group
- Individual roles can be added to a Role Group via Role Administration
Comments