

This feature is designed to generate letters/forms directly from a dispatch job. It is designed to have multiple forms available to notify people of different violations.
To set up this feature, you must have access to the Administration menu. To use the forms, you must have access to the Dispatch Job Details page.
To setup:
- From the Welcome/Search page, click the Administration link in the left-hand menu
- Find the link Templated Documents Administration and click on this
- In the menu, click on the link Dispatch Forms
- The Templated Documents dashboard will display.
- Click the +Create button on the right-hand end of the Templates header bar
- A new canvas will display. It will default to the Physical Location you are currently logged in for. You may change it by selecting a different location from the drop-down.
- Add a Description that will help you identify its purpose when selecting from a drop-down list.
- The Type will default
- From the Category drop-down, you will need to select whom the form is addressed to:
- The Owner - this is the person currently linked to the animal on the Dispatch Job. They may also be the Person of Interest but not necessarily. An Animal must be linked to the Dispatch job for forms assigned this option to display.
- The Person of Interest - this may be labelled differently on your site depending on local site settings (e.g. Offender). The job must have at least one person added using this descriptor for these forms to show.
- None selected - forms must have one or the other selected or they will not display properly on the print page.
- Add the text you require to the body canvas. For the most part, this feature works in a similar fashion to a Word Processing program, although it doesn't have the same versatility or flexibility.
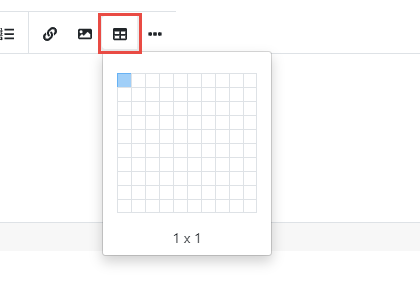
- At the top of the canvas, you will see the standard formatting bar:

- The Table option, when applied, allows you to select a table up to 10 x 10 by running your mouse over the area representing the size of the table you would like to use:
- Once you add a table, additional menu items will appear:

- Use these menu items to help format your document.
- In addition to text, you can use Placeholders to pull data from your site into the document to customise it for each person. Placeholders are found at the bottom of the canvas. Click to expand and see the options:

- The first group of options operate independently:
- The job number
- The date reported
- The date reported with time
- The date the form is generated
- The date and time the form is generated
- Create a page break to force content to a new page.
- Following these are a series of groups that contain different types of information that will help you put the form together:
- Person - the person. This relates to general information to the Person linked to the job. It will complete depending on which option is selected from Category.
- Original Address - The original Address. This includes the original address information for persons linked to the dispatch job. If a person moves after a job is started, this field maintains the original place the incident occurred, even if the Person Details page is updated.
- Site - the Shelter/Sanctuary/Society/Etc. Allows you to auto-add your organisation's name, abbreviation and phone number, knowing they will automatically update should any changes occur.
- Job Address - The dispatch job address. Contains various elements of the Dispatch Job Address field so you can arrange them in a format that works for your form.
- The following two options offer Collections. Collections allow you to pull information to the form for the animals linked to it, regardless of whether there are just one or many animals. A collection can be added within a table cell or simply as part of the text, however, in the case of the latter, if the information contained within the collection is to be used in context within a sentence, we recommend adding the entire sentence/paragraph within the collection field, then add the placeholders as they are needed within it, like this:

-
- The animals attached to the job for the person [Add Collection]. This offers various descriptive elements for animals that have been linked to the dispatch job (i.e. they have their own Shelter Buddy record). They include elements such as breed, colour, type, gender, microchip, and license/registration information, and more.
NOTE: this option does not allow you to include the number of animals linked to the job. - The details of animals reported for the job [Add Collection]. This option offers more basic information taken from the Animal Details field at the bottom of the dispatch page. This will allow you to add numbers of animals.
- The animals attached to the job for the person [Add Collection]. This offers various descriptive elements for animals that have been linked to the dispatch job (i.e. they have their own Shelter Buddy record). They include elements such as breed, colour, type, gender, microchip, and license/registration information, and more.
-
- Use these tools to put together the document as you require, but be aware some features may not be available and may need to be added via the Code Editor. There is an option for this just above the Save button.
- When the document is complete, click SAVE and you will return to the Templated Documents Dashboard.
To Print the Form:
- From the Welcome/Search page, click the Dispatch Search in the left-hand menu.
- Use the search features to search for the dispatch job in question.
- At the top of the Dispatch Menu on the right-hand side of the page, you will see a link Print Forms at the top corner of the menu.
- Click the link to load the list of forms available for the job you are viewing. Click the name of the form to load it.
- Click Print to print the form, or Dispatch Request to return to the citation.
If there is anything you can't find or aren't sure about, please contact support@shelterbuddy.com.
Comments