
From time to time, you may find that your area has expanded and you need to add additional cities/suburbs or postcodes/zip codes/postal codes to your lists. This process takes you through how to add them to your system.
You require access to the Administration menu to utilise these options.
For the sake of simplicity and consistency of terminology, we will use the following terms in this document:
City/Suburb/Town will be referred to as Suburb
Postcode/Zip Code/Postal Code will be referred to as Zip Code
Shire/Jurisdiction/Local Authority/Warrant Area/County will be referred to as Jurisdiction
- Click on the Administration link in the orange left-hand menu
- Find and click on the Edit Drop Down Lists link
- Scroll down and find the option for City or Suburb or Town (variously labelled depending on your local settings)
- To Add a new suburb:
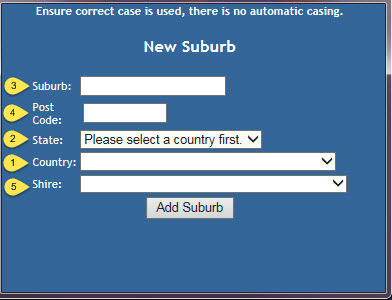
- Click on the Add link
- Select the Country from the drop down. It is important that you do this step first because this resets the other fields and information entered prior to this selection will be reset to blank!
- Once the Country has been selected, your default State will load. Make sure you amend this as required.
- Enter the name of the Suburb into the top text field. NOTE: THERE IS NO AUTO-CASING HERE. MAKE SURE CORRECT CASE IS USED.
- Enter the Zip Code beneath this.
- Finally, select a Jurisdiction from the drop-down at the bottom of the pop-up. This will ensure that this Jurisdiction will auto-populate for any address this Suburb/City is selected for.
- Click Add Suburb to save and close.
- Note: if the Suburb already exists on your system, you will now get a pop-up notification of this and the changes will not be saved.
- The new item will now appear in your list of suburbs.
- To Edit an existing suburb:
- Click on the Edit link
- Enter the name or partial name of the suburb into the text box and click Find Suburb
- This will return a list of possible options in a new pop-up. Click on the relevant entry to load it into the text box.
- Click Edit Suburb
- The suburb's details will load
- Make any changes required and click Update Suburb to save and close.
- To Delete an erroneous suburb:
- Click on the Delete link
- Enter the name or partial name of the suburb into the text box and click Find Suburb
- This will return a list of possible options in a new pop-up. Click on the relevant entry to load it into the text box.
- Click Delete Suburb
- A validation message will appear to confirm you mean to delete the suburb. Click ok to continue.
- The suburb has been deleted. Deletion is permanent, however, any files that had this item previously assigned to it will maintain the information in history.
- NB: you cannot search for files with deleted suburbs using the suburb search fields once the item has been deleted.
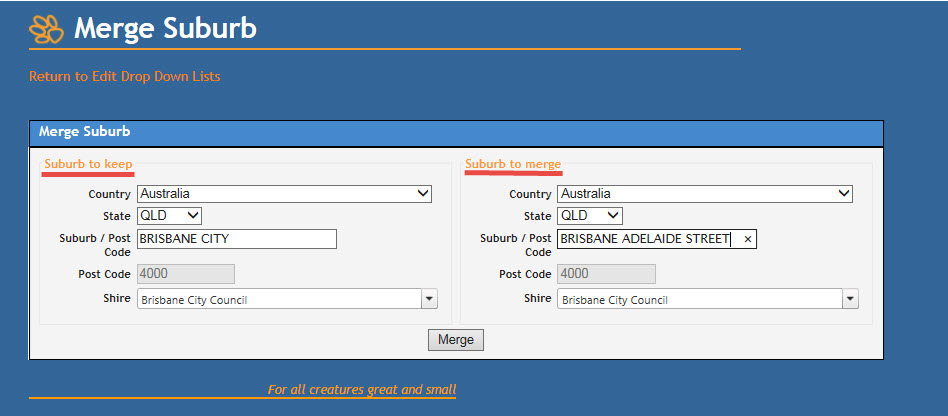
- To Merge two suburbs:
This is useful in the instance that two areas have amalgamated to become one area, or a place has erroneously been entered twice under two slightly different spellings. The process not only merges the item in the suburb lists but automatically updates any files associated with the unused item. - To merge, click on the Merge link.
- The default Country and State will default. Amend if/as required.
- Suburb / Zip Code: this is an auto-find field. Enter either the first three letters of the suburb OR the zip code and choose from the options offered.
- The Jurisdiction, if present, will load with the suburb.
- Enter the details for the suburb TO KEEP on the left.
- Enter the details for the suburb TO MERGE / REMOVE on the right.
- Once you are certain the correct detail have been entered into the correct areas, click Merge.
- The page will reload to give you fresh, empty fields and a small "success" notification will appear at the top of the page.
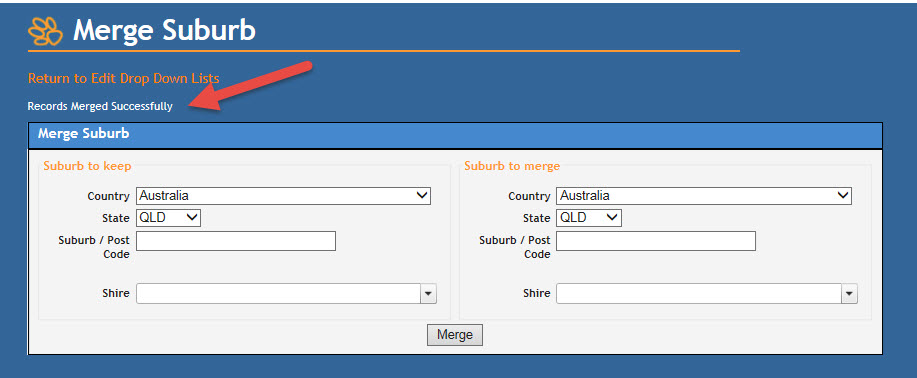
- IMPORTANT: MERGING IS PERMANENT AND CANNOT BE UNDONE.
Comments