
This procedure allows a customer to pay off an account for goods or services and allows for the ability to track those payments
- Search for the person. If no person exists, create a new one as required.
- Process the Shelter Buddy transaction as normal. In our example, we will be looking at an adoption, but Pay Later applies to any function that ends in a receipt page.
- When you arrive at the Receipt page, select the payment option Pay Later from the drop-down box. You don’t need to change anything else, just update the receipt as per normal.
- The resulting receipt page will display a message that payment has not been received:

- The transaction is complete for this stage.
To Make a Payment:
- The Animal Details page will now display a new link next to the Adoption receipt/contract: Pay Receipt:
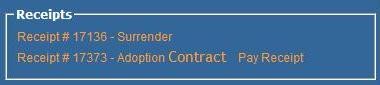
- Click the link to arrive at a new receipt page. This page will be identified by a blue band at the very top that is marked Pay Later on the far left-hand side.
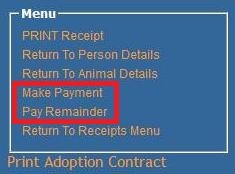
- In the menu in the top left of the receipt page there are two new links; Make Payment and Pay Remainder.
- To Make a Payment:
- Click the Pay Receipt link on the Animal Details page to arrive at the Pay Later receipt page.
- Select the Make a Payment link to arrive at a new receipt page.
- Add the payment type (e.g. cash), the amount being paid and allocate to a GL code as required and finalize the receipt.
- A generic receipt will be created.
- The receipt menu on the Animal Details Page will update to indicate the advanced status and balance of the payments:

- To Pay Remainder:
- Click the Pay Receipt link on the Animal Details page to arrive at the Pay Later receipt page.
- Select Pay Remainder from the receipt menu.
- The receipt will default to the balance amount in the payment amount box. Enter the payment type and allocate the funds to finalize the receipt.
- A generic receipt will be generated.
- The receipt menu on the Animal Details Page will update to indicate a $0 amount is outstanding:

Setting Accounts for Pay Later:
This process sets the account that payments to Pay Later receipts are assigned to. Users will need access to the Administration menu to perform this task.
- From the Welcome/Search page, go into the Administration menu and click on the option for Receipt Administration.
- In the menu, locate and click on the option Set Default Account for Pay Later
- The drop-down at the top of the page labelled "This account is a default for:" will default to Pay Later. Do not change this.
- In the text box marked Account, type the first three characters of a GL Code, (digits or letters, whichever is more familiar to you) and the box will auto-suggest options. Click on one to select.
- Once the option is visible in the box, click Save
- The page will remain visible, so click on a breadcrumb visible at the top of the page to navigate away (e.g. Home / Administration / Receipt Administration)
Additional: if you would like to Delete the set account for this feature, simply follow the same path as above, but click the Delete button instead. You don't need to remove the GL Code, clicking the button will do that for you. This will clear the field so the user must manually select a GL Code for these payments.
Tracking Outstanding Pay Later:
Report 280 Outstanding Pay Later Balances
Comments