
This process is to regulate the areas a user is able to gain access to. For best results, assign all users to Groups to make maintenance easier.
You require access to the Administration menu to utilise these options.
- Click on the Administration link in the Orange Menu on the left-hand side of the screen.
- Click on the Edit User Access link.
- Select the required link to proceed.
The following functions are listed and discussed in the order they appear in the Edit User Access menu.
Manage Pages: Manage Pages allows you to add and manage specific pages so user access can be controlled. Once added, each page will default to NO ACCESS. Access to the page can be granted by group or as individuals with settings of:
- All – gives full access to the page
- Read only – allows the user this is allocated to the ability to see the page, but not to make any changes. NOTE: this setting does not apply to LINKS. Links remain active. Only No Access or All access applies.
- None – this denies all access to that page and will block it from view.
New Page: This link allows you to add new pages to manage access level control. To add a new page, follow these steps:
- Click on the New Page link
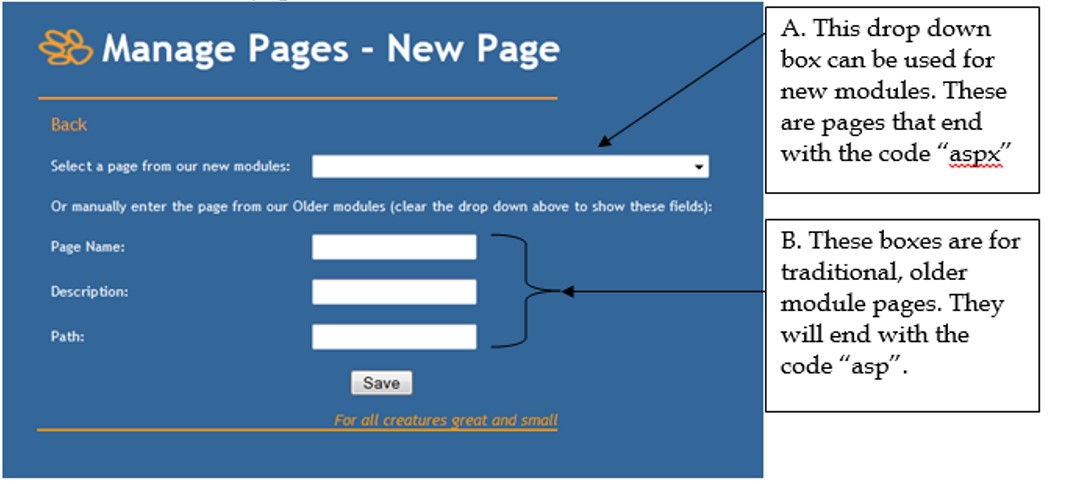
- You will arrive at this page:
- To determine which applies to the page you wish to add, look in the address bar in the browser at the top of your screen:
 The part of the address circled here is the series you need to take note of for managing pages.
 - If the page ends in “aspx” it is a newer module page and will appear in the drop-down box at the top of the Manage Pages – New Page screen (as indicated at A.). Find and select the page you require and click Save to add it.
- If the page ends in “asp” as in the example above, it will need to be added manually as per the boxes indicated by B. above.
- Page Name: enter the actual name of the page here. The name usually appears at the top of the screen.
- Description: enter a description of the function of the page here. This will help you determine later if you have found the page you were looking for among those with restricted access.
- Path: This tells Shelter Buddy how to find the page you intend to restrict. This will always be the text that follows the site address in the address bar pictured above. It will always start with a forward slash (/) and end with .asp but there may be more or less in between, depending on the page.
- Once you have entered the information for the page you need, click the Save button to continue.
- If Shelter Buddy will not accept the page, it may be the wrong format (e.g. a new module page being entered manually via the old module boxes) or it could be a page or section that is better handled via a different link.
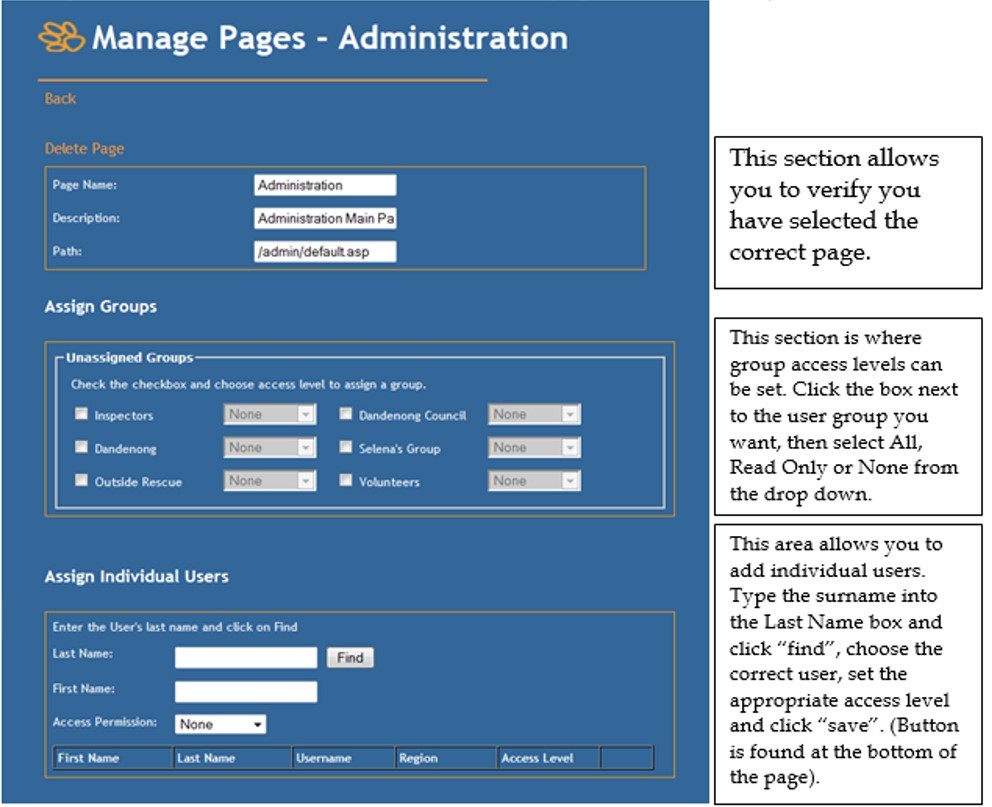
- Once added you will need to set the access levels. The page will initially look like this:
- The hierarchy of access goes as follows:
-
Where no groups are assigned, and no individual access is assigned, the user would not have access.
-
Where an individual is assigned, and multiple groups are assigned, the individual setting is the one that rules.
-
Where one group is assigned but other groups are not, the user would have access to this feature
-
Where two or more groups are assigned and there is no individual assignment, the group with the highest access setting will rule.
-
- The hierarchy of access goes as follows:
- Once you have allocated users and groups as per the desired access levels, the page will display sub-categories of Unassigned Groups and Assigned Groups, and any users that have been assigned individually will display at the bottom of the page along with their access level setting as illustrated here:
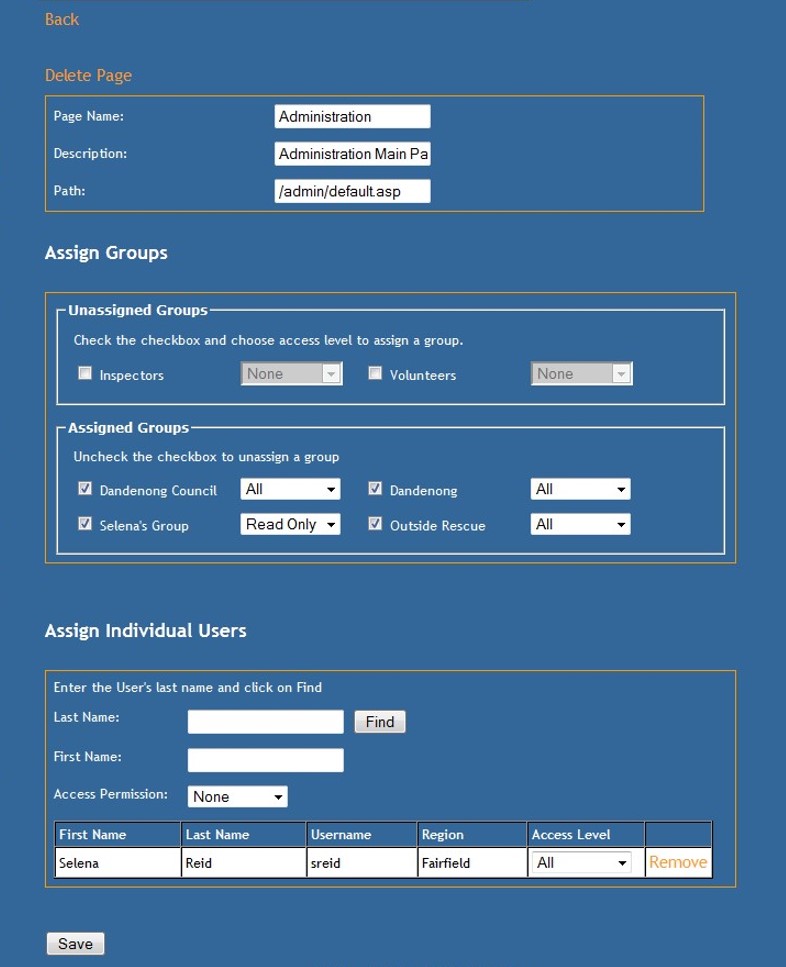
- To “unassign” a group, just un-check the corresponding box and click Save and it will revert to the access setting “none” and return to the Unassigned Groups section.
- To amend the access setting for either a group or individual user, simply select the correct setting from the drop down and click “save”
- To remove an individual user’s access completely, click the Remove link that appears at the end of their entry. This will delete that entry from the page and reinstate no access, regardless of what the previous setting was.
Find Page: This link allows you to locate pages previously added to Manage Pages. This is especially useful if there are many pages set up here.
- Click Find Page
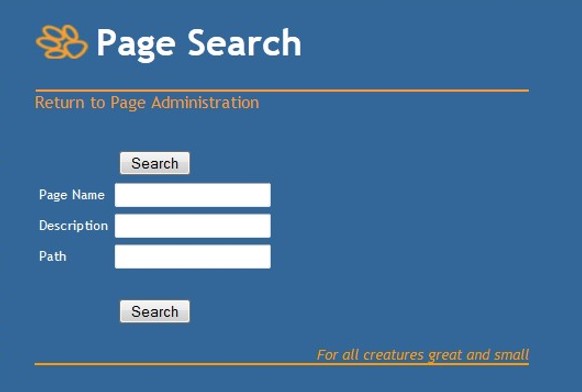
- From the search page, enter any information you have on the page you wish to find:
- Click Search to run the page search.
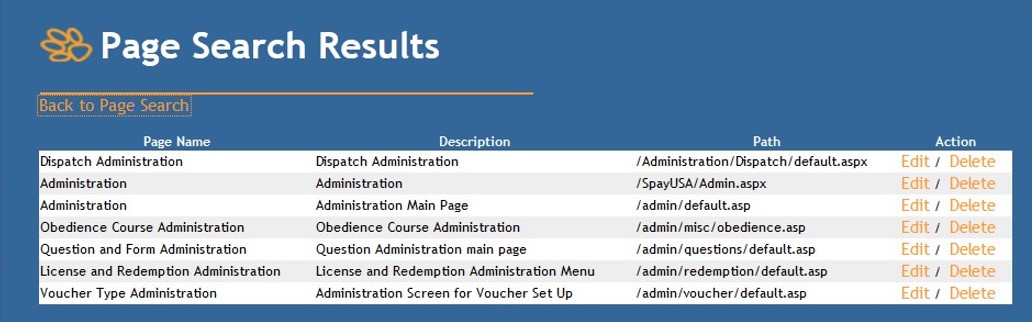
- If you don’t find the page you are looking for the first time, try a partial search: just enter part of the name you are looking for rather than the entire thing. E.g. if you were trying to find the Administration Main Page, you could enter just “Admin” and click “Search” for maximum results. Search returns will display like this:
NOTE: You cannot delete a page until all users and groups have had access removed so there are no Assigned Groups and no Assigned Users displaying.
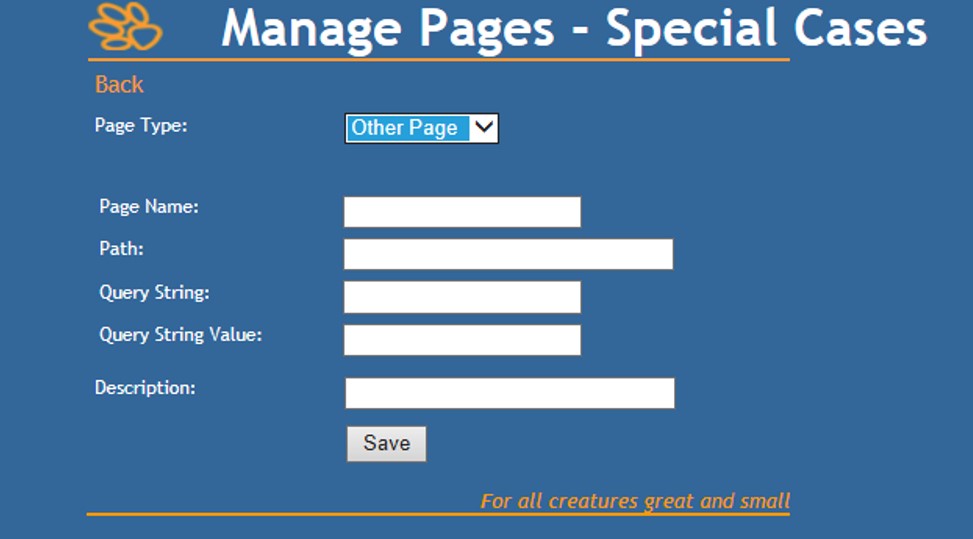
Manage Pages - Special Cases: Manage special cases allows you to override other access settings, restrict report groups or individual pages for persons or animals. These can be tricky to set up, so please contact support@shelterbuddy.com for advice. To set up:
- Click New Page link
- The drop-down at the top allows you to select if the page to be restricted is a Person page, an Animal page, a Report group or a different type of page (Other). Select the appropriate option from the drop-down.
- Animal or Person: If either of these is selected, the ID text box beneath the drop-down will remain. You would enter the AID or PID number of the file to be restricted into this box to set up.
- Report: If report is selected, the ID text box will change to a drop-down containing each of the available standard report groups. Select a group from this drop down to set the restriction.
- Other: this option allows you to restrict other items, such as the ability to upload or delete photos, the ability to add, edit, delete or view notes and more. If Other is selected, the ID box will be replaced with a series of text boxes:
- Page Name: this is the heading of the page
- Path: the url address minus the main address of your site and the task e.g.: /person/advsearch.asp
- Querystring: this is the information that appears before the first "=" in the query string. Examples would be job or view
- Querystring Value: This is the bit after the first "=". For example, personAgencyLink

Manage Fields: Manage field access. Fields are usually specific sections within a page that can be locked. The field group is static – they cannot be added to or deleted.
However, they can be Activated, meaning restrictions will apply to that field. Once Activated, the field will then be able to be Edited or Inactivated.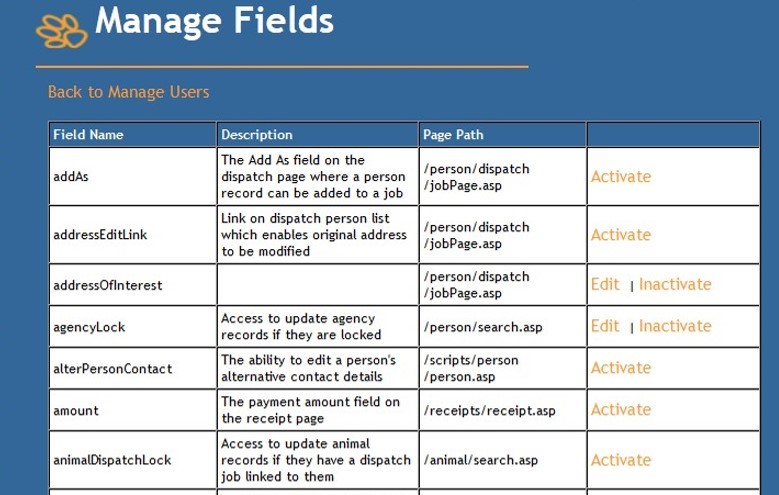
Use the Edit link to add users or user groups and set their access levels.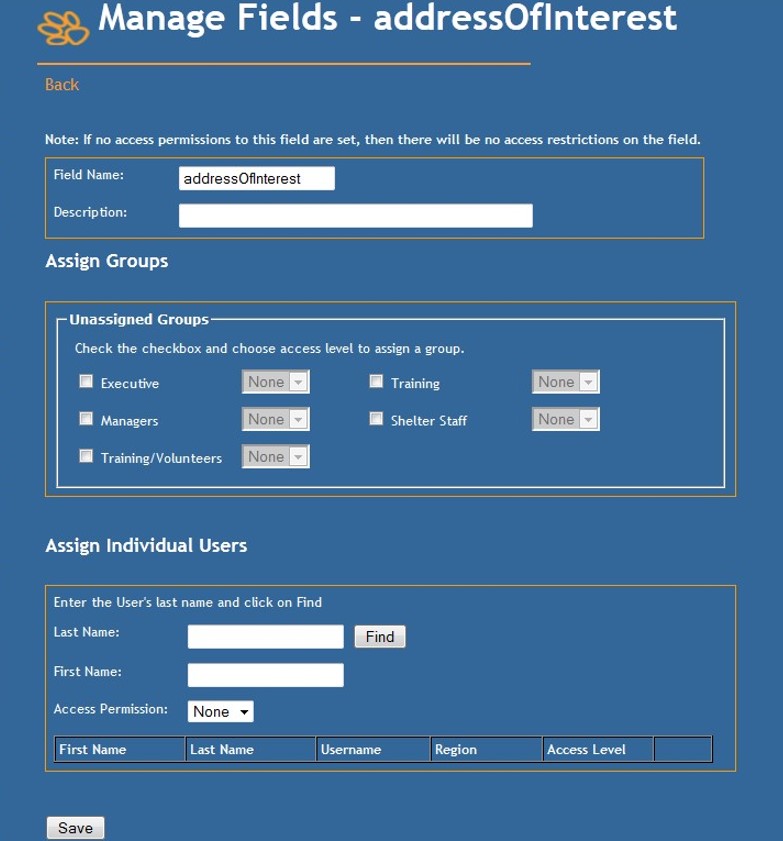
This section works exactly the same as any page settings: simply use the checkboxes to add a group or assign an individual user by finding the Last Name in the search box, set the access level.
Click Save to save your changes.
NOTE: you cannot Inactivate a field unless no users or user groups are assigned to it.
Manage Groups: User Groups are the easiest and most effective way to control user access restrictions; particularly if many restrictions need to be set. Creating groups allows an administrator to manage the access levels of new users, or existing users who have been authorized a change of security level, by simply adding them to a group rather than searching for each page they need access to and adding them individually to set their access levels. Adding individual users to individual pages heightens the possibility of pages or settings being overlooked, while a group will always work the same way for all users assigned to it.
To add a new Group, select the Manage Group link, then choose Add New Group: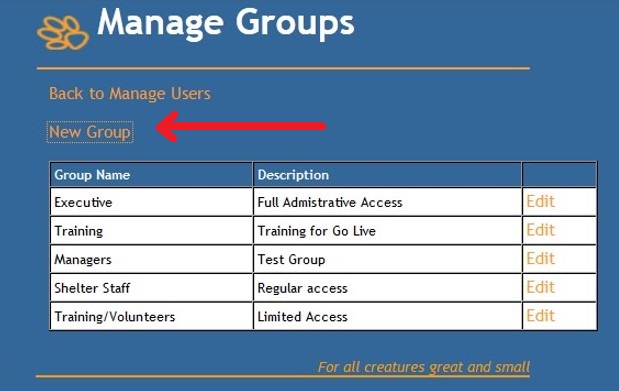
The Edit link at the end of the group list above will take you to the same page as New Group, save that the details for the group selected will appear in the Group Name and Group Description text boxes pictured below. To edit, simply click into one of the boxes and make your corrections.
For new groups, simply issue the group a name, then add a description that indicates how the group is to be used: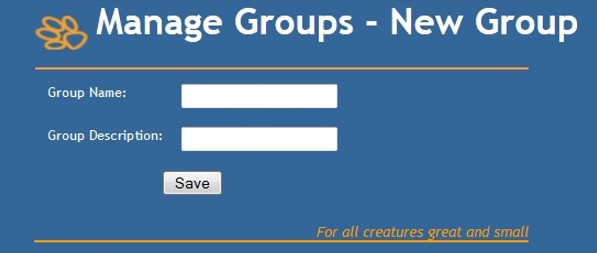
NOTE: Users can be added to multiple user groups via the Edit feature in Manage Groups. This can help manage user access in situations where user primarily has the same access levels as the main group, but certain members of that group have the ability to do one or two things above that access level. For example, they may be able to undo adoptions and returns, but no other administrative feature. Rather than setting up a group that covers everything the main group does plus these two functions, you can create a group that just allows the additional access and add the users to both groups.
Manage Sections: Manage which users and groups can access Sections.Sections are a group of links with a specific commonality E.g. you may want to manage just Administration links or links found via Edit Drop Down Lists.
Pages must exist in Manage Pages before they can be assigned to a section.
First, you need to create a Section by clicking the New Section link and in the text boxes provided, give your section a name and describe its purpose. Once this has been set up, Edit your section to Assign Pages. There will be two boxes with arrows pointing back and forth between the two. The box on the right will represent unassigned pages – a page must be set up in Manage Pages to appear here. The box on the left represents pages assigned to the Section. Move pages back and forth using the >> or << arrows.
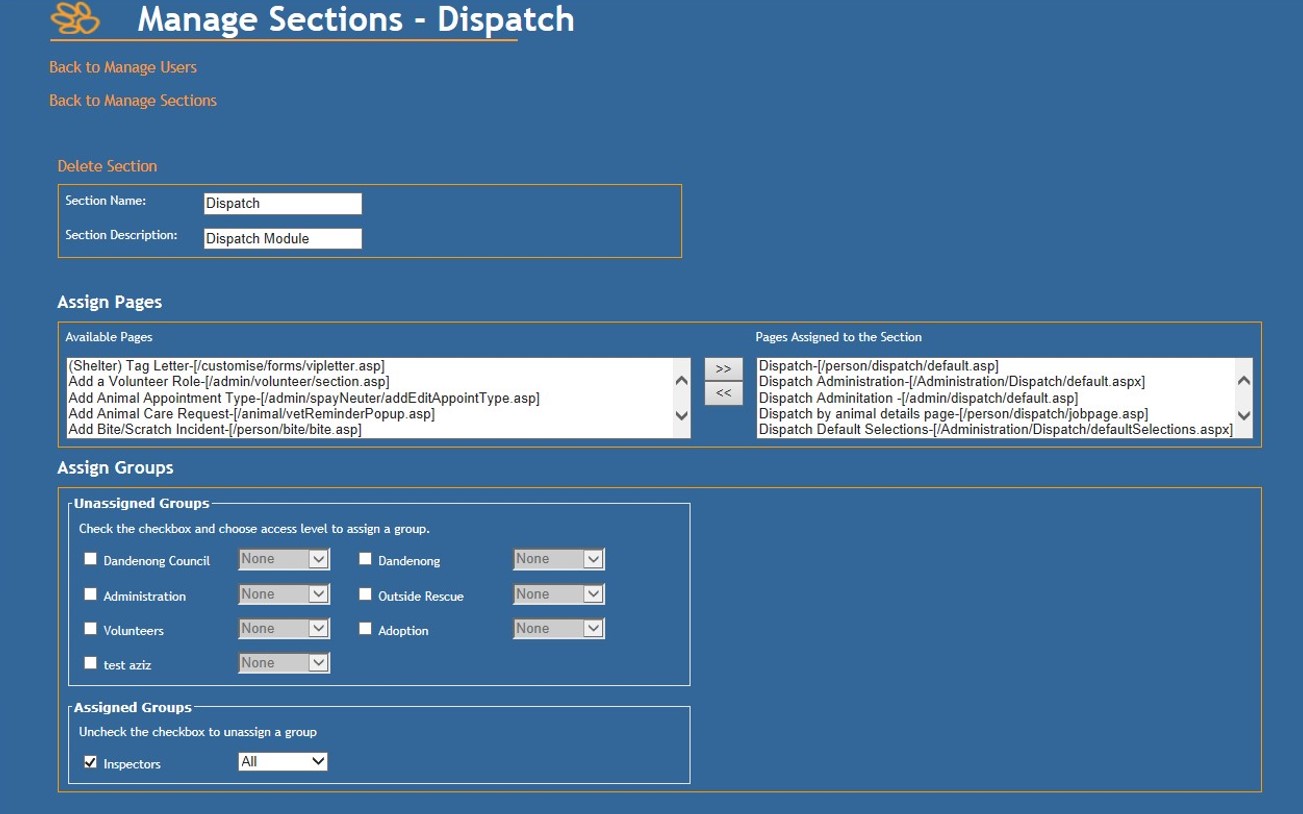
Once your pages are assigned, scroll down to assign users or groups the same way as you have for other pages above. Click Save to save your changes and your Section will be functional.
We recommend you contact support@shelterbuddy.com if you have any questions or difficulties with this feature.
Add User: adds a new user to the website. We recommend you use Find User to make certain that the user does not already exist before adding a new one. Each username may only be assigned once per system and it will block you from adding additional logins if you attempt to create a user with a duplicate username.
To add a new user:
- Click the Add User link to arrive at the Create User page
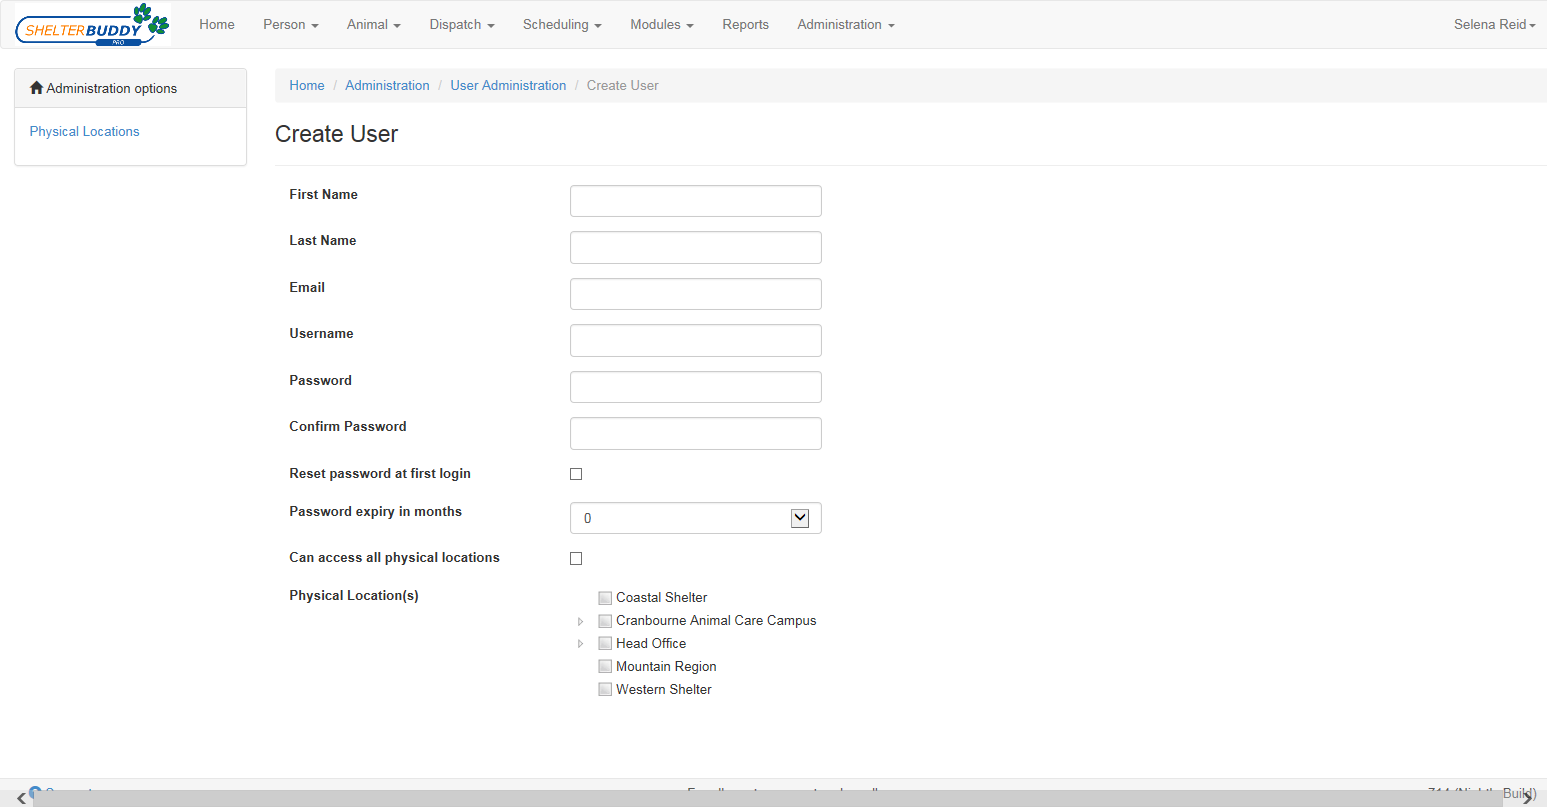
- Enter the name the user would like displayed, as they would like it displayed, as appropriate into the First Name and Last Name text boxes: e.g. Dr John Smith, John Smith, john smith esq.
- Email: enter the user's email address so they can reset their login if required. This is not a mandatory field but is very helpful for user maintenance.
- Enter a user name – this is the name the user will use to login: e.g. jsmith
NB: usernames are case sensitive and cannot be issued more than once. - Enter a password: This must be at least 3 letters and 3 numerals, but not exceeding 15 characters in total. These are also case sensitive. Re-enter exactly the same text in the Confirm Password field: if the two fields do not match, the profile will be rejected.
- Reset password at first login: Click this box if you would like your user to be prompted to select a new password the first time they log in.
- If applied, the first time the user logs into your site, they will be taken directly from the login page to this screen (once their original user name and password are successfully entered):

- Once they successfully select a new password and click the Save Password button, they will return to the login screen which will show a notification that their password was successfully updated:

- From here, they re-login using their new password and proceed as normal.

- Note: users can manually select a new password at any time by clicking the User Settings link in the top right of any Shelter Buddy screen (once logged in).

- Clicking either the words User Settings or the icon beside it will take the user to the Change Password page.

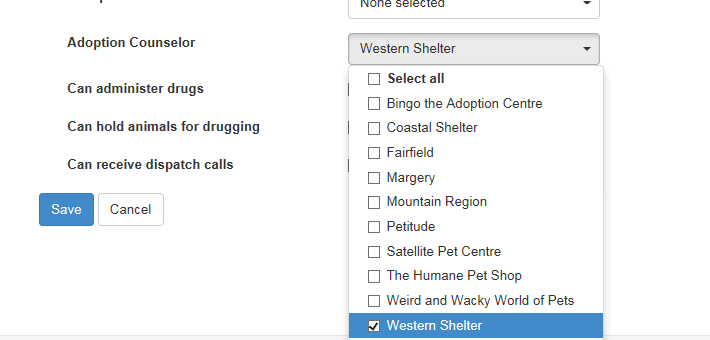
- Note: this is different to the list of people who can be assigned to a dispatch job. That list is maintained only in Dispatch Admin.
Once completed to your satisfaction, click Add User to complete. The finished page should look something like this: 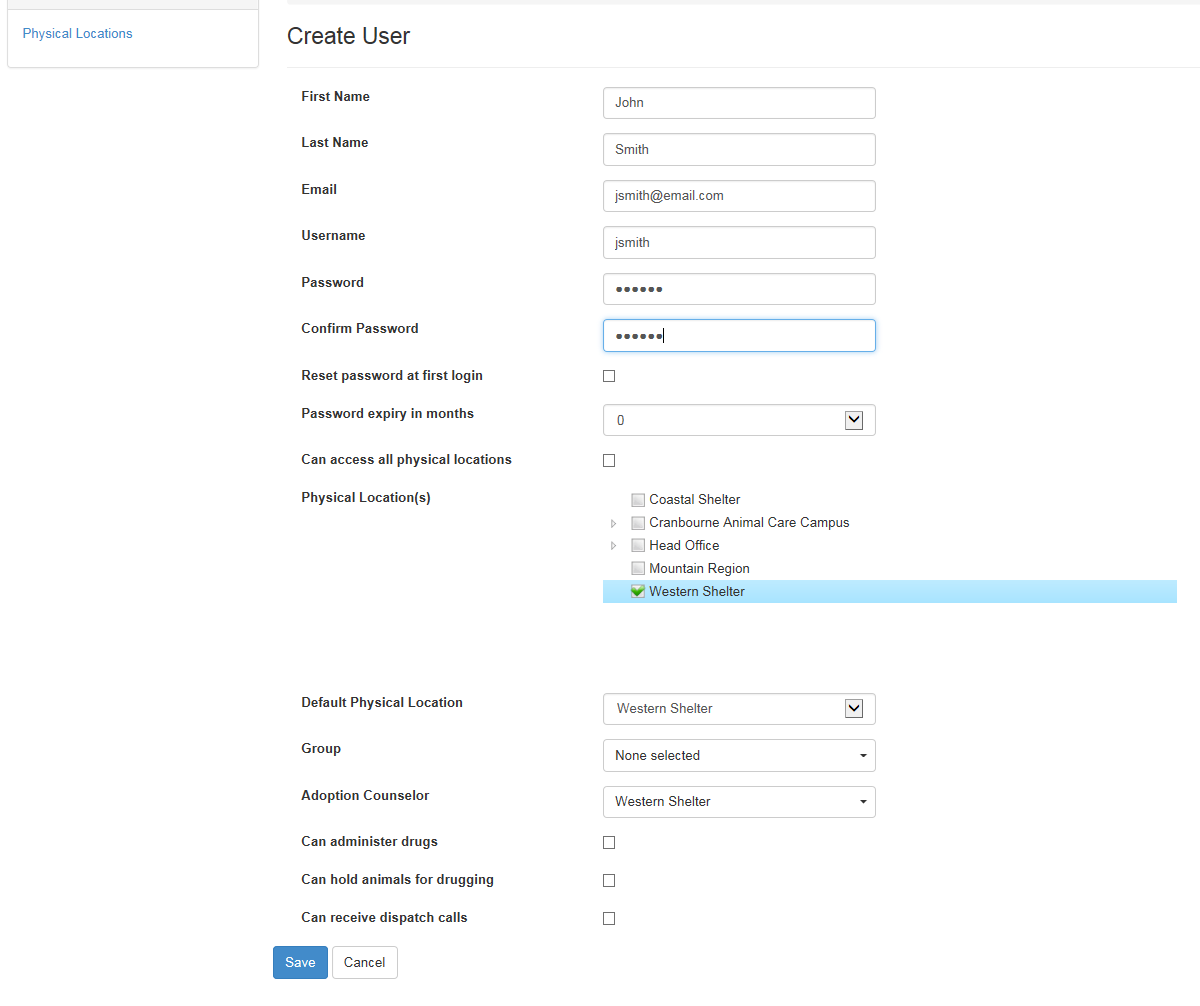
Manage Drop Down List Security: this feature actually enables you to manage which users and groups can access various different types of note category from the Person Detail Page. It does not, at this stage, control any other drop downs.
When you initially open this link, it will present a list of drop-down lists that can be secured via this option. Currently, since there is only one, you will see a single line: Person Note Types. Click the link to manage person note drop down types: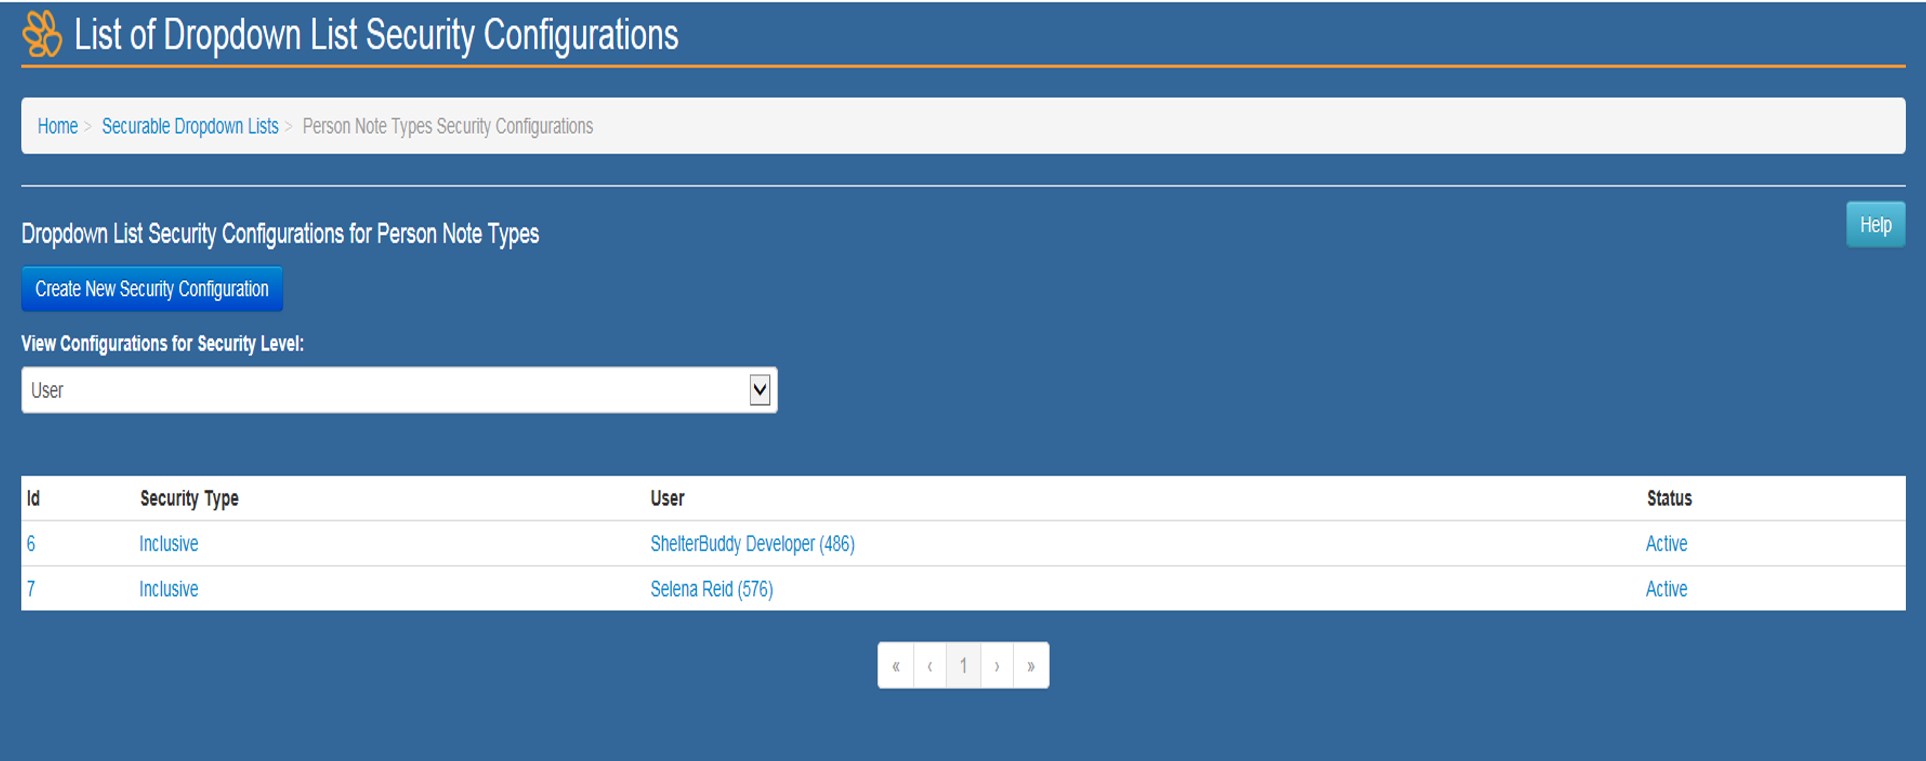
At the top of the page is a button to Create New Security Configuration. Click the button to create a security setting.
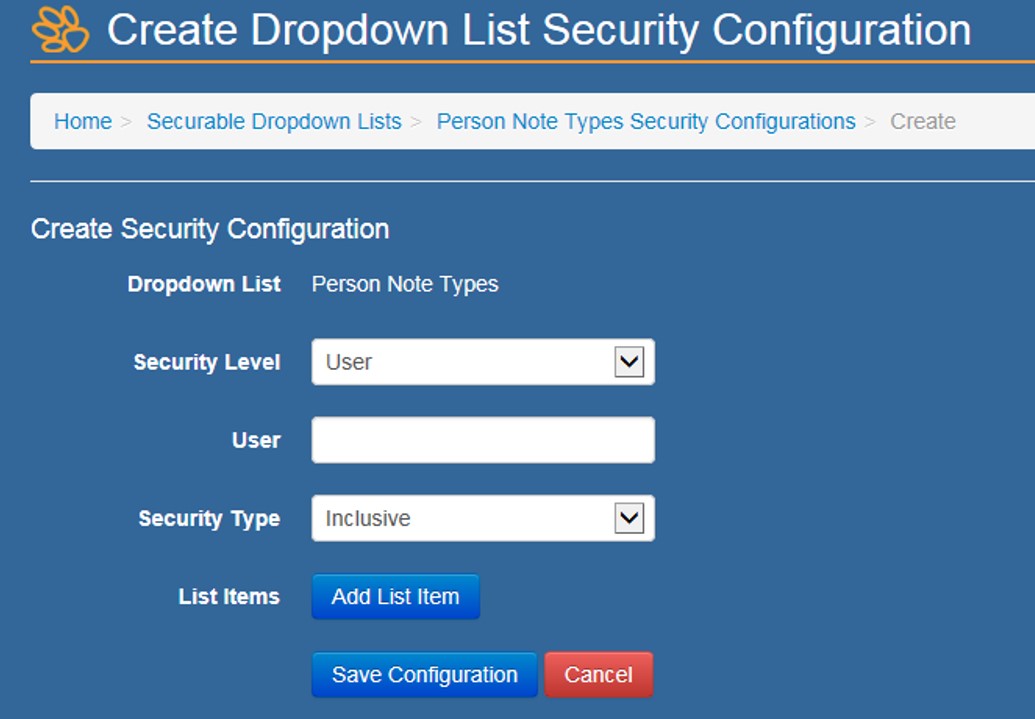
- Security Level: This drop-down offers a choice of options that help define the role of this security setting and load the next drop down.
- Default is used if the setting applies to ALL users and user groups. Selecting this option will cause the next set to disappear, so skip to step #3
- Group is used if the setting applies to all users within the selected group
- Person is used if it applied only to specific users.
Once a list is created, you can click on it to edit any of the settings, and make it active or inactive by clicking the relevant tick box: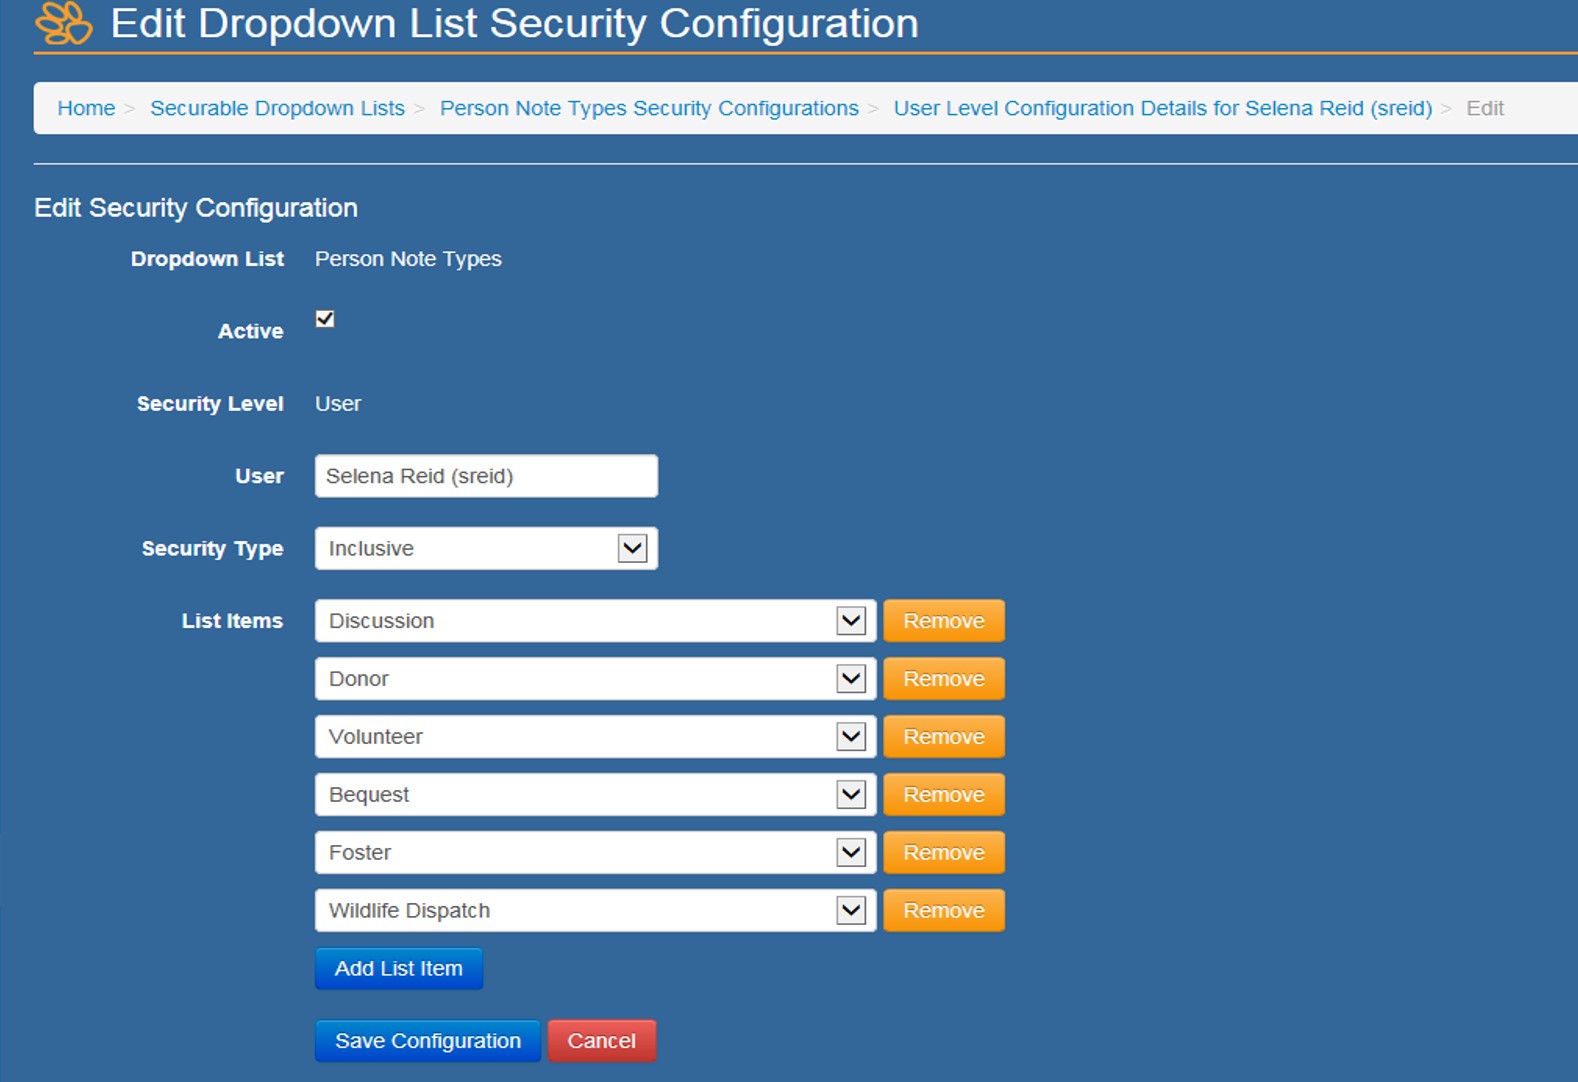
Find User: finds any users already entered into the database. You can search by First Name, Last Name, Region, Active/Inactive/All or for Volunteer Logins Only. Once a user file is located, the details can be edited, passwords changed, regions updated or the user can be flagged as “inactive”, which will prevent them from logging in.
Don’t forget to:
- Check the Blocked Users area for the same user.
- Check the Failed Logins area for the same user.
Comments