
All animals which are involved in a dispatch request need to be entered, even those not brought into the shelter. For example; an animal which is seized but redeemed by the owner on the spot needs to be entered as a seized animal and then redeemed using the Redemption (offsite) status. Even animals only involved in citations will be entered with a status of Information.
This process is to attach animals that are new to your database and do not have existing files. It applies to Ambulance, Animal Control Officer (ACO) and Cruelty Case jobs.
- Search for the Dispatch Job:
- In the orange menu on the left hand side of the page, find and click on the Dispatch Search link.
- If known, enter the Dispatch Job Number into the relevant search box and click Search.
- If the job number is not known, use one of the other search fields to locate the relevant job.
- Once the Edit Job # page opens, locate the Add Animal for (Agency Name) link beneath the person information area if you need the animal to be linked to the agency directly. If you require the animal remains linked to the actual owner, use the Add New Animal link on the right hand side of the person's name.

- For either choice, a pop up will deploy offering options to proceed, depending on whether you have one or more animals to enter and if they are taken into custody or information only. Select the appropriate option to continue.
- Complete the following:
- Source: click on the down arrow to select the appropriate source.
- The source can be used to differentiate between animals that were Owner Surrender, Wildlife, Seized animals, DOA animals, and Euthanasia Requests just by selecting the appropriate source from the drop down - e.g. Humane Officer - Seized or Ambulance - Owner Surrender.
- The source will default to the most relevant/common setting e.g. Humane Officer Seized or Ambulance.
- If you opted for an information only animal, the source will default to Dispatch Information. This is the only option for information animals.
- Status: click on the down arrow to select the appropriate status for the animal.
- If you opted for an information only animal, the status will default to Information. This is the only option for information only animals.
- If the animal has any Identification on it should be filled in at this time if possible.
- There is an area for the confirmation of Microchip numbers as to their existence in the animal or not under Identification Confirmation details. This is the light blue area just under the Identification area on the system
- If the animal is DOA and to be treated as a stray or held for further investigation, Awaiting Final Disposition is a recommended status. This allows the animal to be tracked in care for the time it needs to be held and allows users to exit the animal either through an outgoing status like DOA later or return the remains to the owner using DOA Returned to Owner. For cases where the animal does not need to be held, DOA can be applied immediately.
- If relevant, sub-statuses may be available. Update as applicable to your normal processes.
- Shelter Tag / Band Number: enter the internal shelter ID number if required.
- Animal Description: Enter all the animal information known; e.g. name, type, breed(s), gender, colour(s), age etc.
- Circumstance: Select the appropriate option from the drop down.
- Distinguishing Features: This field is VERY important! Record any patterns on the animal, missing appendages, any scars, tattoos, pregnant, on heat, any injuries, shaved patches etc. Having no distinguishing features is a feature in itself so indicate this if that is the case. This can be particularly important for mass seizes.
- Council / Jurisdiction: click on the down arrow to select the appropriate council / jurisdiction.
- Shelter Location: the Physical Location field normally defaults to the user’s login location, but the Shelter Location will need to be updated manually.
- Add any further relevant details to describe the animal and its location in the shelter.
- Click Update Details.
- If you elected to add Multiple Animals initially, a pop up will deploy.
 From this pop-up, enter the following:
- Animal Quantity: This is the number of animals still to be entered (remember; you've already entered one so it should be one less than the total number required)
- Descriptors: fields like gender, primary/secondary colour and circumstance can be adjusted if different from the initial animal.
- If there are multiple animals being entered (i.e. more than just one additional animal), and their descriptions vary significantly, then uncheck the box marked Copy the above information to all new animals. This will deploy individual pop-ups for each new animal until the total number is reached.
- NB: Type will only allow you to toggle between baby and adult types (e.g. from cat to kitten). It will not allow you to change species (e.g. from kitten to dog).
- Source: click on the down arrow to select the appropriate source.
- Once all animals have been updated, you will be offered options to create a receipt for the animal or proceed with no receipt, which will take you directly back to the Dispatch Job page.
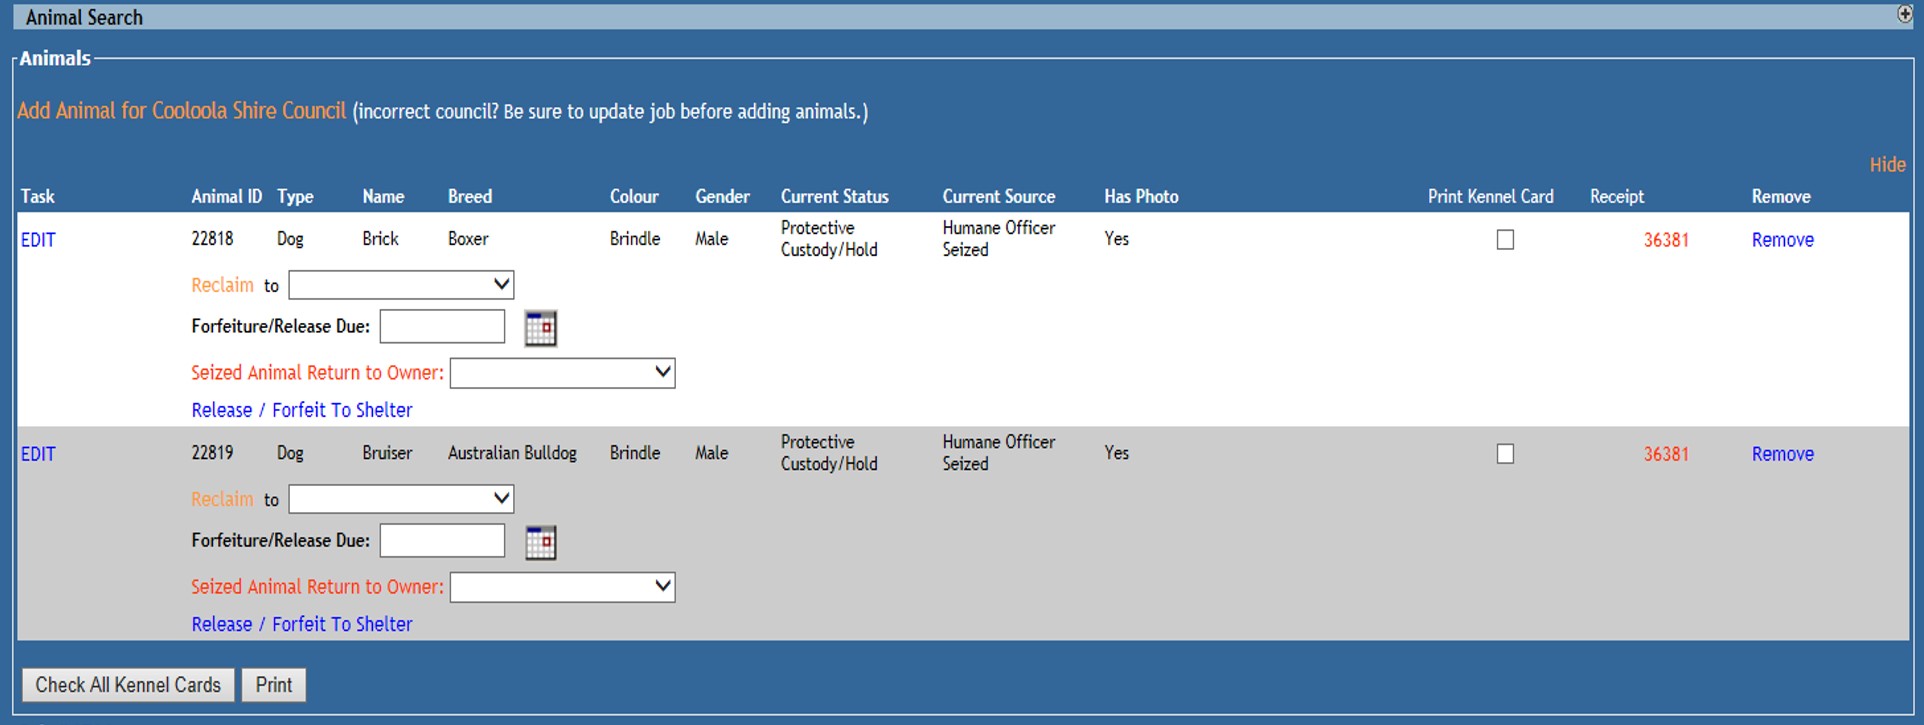
- Kennel Cards can be printed directly from the Dispatch Job page.
Once the animal(s) has/have been linked to the job, options to Reclaim the animal to one of the persons linked to the job, nominate a Forfeiture/Release Due Date, process a Seized Animal Return to Owner (person must be linked to the job), or Release / Forfeit to Shelter to transfer the ownership of the animal to the shelter. Each of these options will mark both the Dispatch job and Animal Details Page in some way to record the information for future reference.
Comments