Click Add New Dispatch Job via the link in the left hand (orange) menu.
Search for the person who is requesting assistance for an animal.
Click on the (+) icon at the end of the Person Search bar to search for the person:
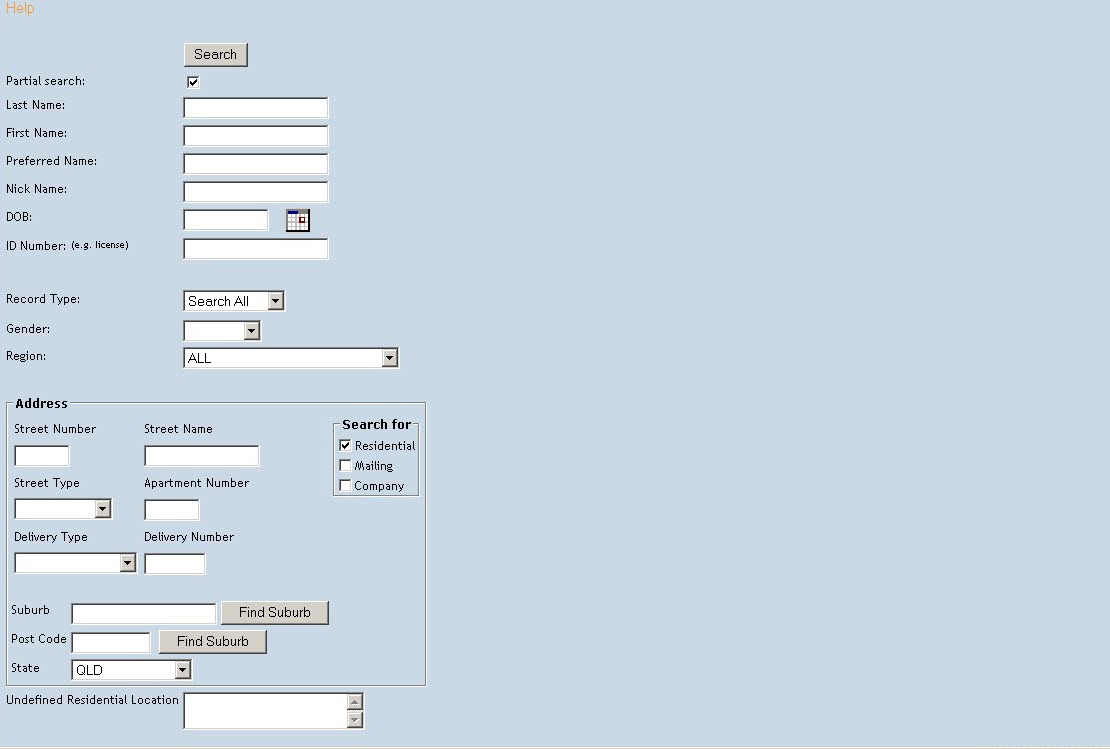
The following screen will open. You will notice that you are able to search in many different ways such as Peron ID number (if known), name, address, undefined residential location, telephone number, email or company.
Unless searching via the Person ID number, we recommend entering only partial information to have the greatest success of finding an existing record. For example, if you are searching for Joan Davis, you may find that someone else had accidentally spelt her surname as “Davies” or she may have been married and exist with a hyphenated surname like “Reece-Davis”. The best way to be sure and find it is to only enter part of the name, e.g. “Davi” – this will pick up each of these variations. Similarly, if searching for a company, if you enter “Zelda’s Pet Store” and someone else has entered the company name as “Zelda’s Pet Shop” you won’t find it. You would be better to simply search for “Zelda” as this will pick up any variation that might be there.
You can search for an anonymous person this way too: most sites have a standard file for Anonymous Person.
If no results are found using this search method, you can add new person details as an Unconfirmed Person (i.e. one who is missing pertinent details, but has some information available, e.g. you may know their name is “Don” and you can reach them on a particular number, but no other information is available). Anonymous Persons can also be added as unconfirmed Persons, depending on your site’s protocols:
Once you have searched for a person, found no result and decide Unconfirmed Person is the appropriate form of entry, you can add them to the job referenced by their relation to it; e.g. as the caller, the person of interest, a witness etc:
Once this is done, click Add Person to add the existing person to a job.
If the person is not found, and you have the full information on the person you were searching for, you can add a new person using the Add Confirmed Person Details link in the Search Results box:
Fill in the relevant blanks on the resulting page. Mandatory fields: first name, last name, residential address, mailing address if different than residential, telephone number, and gender. Depending on your organisation you may be required to confirm identification and/or add an email address. This will create an active Person Details file on ShelterBuddy for this person/company. You will also need to select how the person relates to the job e.g. Caller, Person of Interest, Witness etc.
Click Update Details.
In the box directly beneath the Person Details section, select what type of Dispatch job this is by clicking the spot next to the relevant label here: This will automatically open the bar marked Dispatch Codes which will then load the options relevant to the job type you selected, as set up for your site.
Select the relevant options from the codes that present themselves. This is a multi-select field, so you can select as many as apply to the job you are entering by checking the box beside the relevant code/s. You can also relate this job to another job (either active or finalised) using the link just below it if you know there is another job for this person, business or location that may be relevant to the details of this one.
Directly beneath the dispatch codes is an area where you can load the details of how the report was taken, by whom, and who it was assigned to. This section also tracks the progress of the job in as much detail as your site’s protocols require. Here is an overview of the section in question:
At the top of this section is a Time and Date stamp. These will auto-populate to the time and date the New Dispatch Job link was clicked but can be manually adjusted by the user at this point if the job was taken on paperwork at an earlier time. Additionally, there is a check-box to mark if the job was taken and dealt with Afterhours. This is for statistical purposes and can be reported on.
Beneath the time and date are (usually) mandatory fields highlighted in yellow: the Source which relates to who passed the details on to your organization (e.g. public, police, vet clinic, another stakeholder) and the Method by which it was received (e.g. telephone, email, fax, text, standard mail). Both Source and Method can be amended using the Dispatch Administration link in the Administration Menu.
The Council drop-down is somewhat of a misnomer. It is populated by the same entries as in the Agency/Council drop down from the Welcome/Search page: This represents the organization that is responsible for making sure the job is acted upon and if it does ultimately go to court, they would be the umbrella organization responsible for the prosecution and the welfare of any animals seized as a result of this job.
Inspector Region: Most organisations separate the area they cover into zones or regions, with each zone or region covered by an individual or team as appropriate to your protocols. These are recorded on the dispatch job page as Inspector Regions and can be maintained in the Dispatch Administration > Humane Officer Region functions.
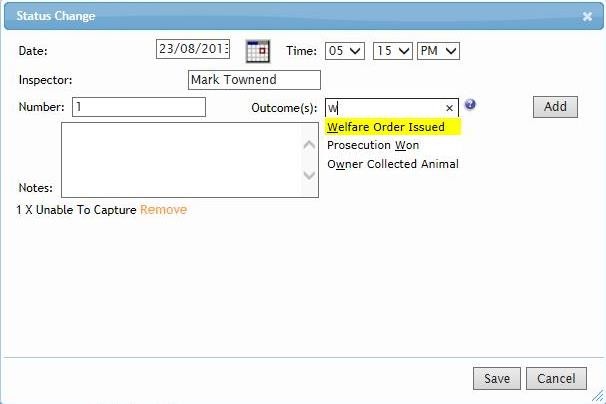
Status (H): The status field represents the progression of the job, from the initial “Awaiting Assignment” stage which indicates no one has yet been assigned to follow up on the job details all the way through to “Finalised” which will close the job off as no longer active. Options for Status can be loaded in the Dispatch Administration> Dispatch Status functions. Each time a status change is made, a pop-up will deploy. This pop-up allows the user to record important information such as the time and date the status change was applied (defaults to current but can be amended if required at this time), the Inspector or Officer assigned to the case, the outcome attached to that status change and any notes that go along with it. NB: both the Inspector/Officer box and the Outcome box have anticipatory text, so you just need to type in a single letter and the page will begin to load available options which can then be selected from or narrowed down by further typing: It is also important to note that more than one outcome can be added to any status amendment. Outcomes are loaded in the Dispatch Administration > Dispatch Request Outcome functions. The Status field keeps a history of each change to status, Inspector, outcome and notes attached to it. The history can be seen via the (H) link next to the Status header.
Inspector/Humane Officer/Ambulance Officer/Animal Control Officer (ACO) (H): This drop-down selects the individual or (in some cases) outside agency assigned to this particular case and is mandatory once the status changes from “Awaiting Assignment”. This field also retains history via the (H) link at the end of the field header. Available options can be managed using the Dispatch Administration > Animal Protection Officer, Ambulance and Animal Control officers functions. The Inspector/Officer field looks like a free text field but in fact, there are only two ways of entering information into this field:
By clicking on the Change link at the end of it and selecting an option via the pop up that deploys OR
By changing the Status and amending the assigned person/s that way.
Assisting Inspector(H): This list also pulls from the same table as the previous field but in this case, you are presented with a multi-select drop down of all available officers who might have assisted with the case. To multi-select from this field, hold down the Ctrl key on your keyboard and use the mouse to left-click on each representative you would like to select for this job. You can see the history of who has been assigned to assist by clicking the (H) link at the end of the field header.
Urgency(H): Not surprisingly, perhaps, this field represents the urgency of the job. Urgency codes are set by each individual site to their own protocols and are managed and maintained using the Dispatch Administration > Dispatch Request Urgency functions. You can also use colour to help distinguish the urgency and make jobs that require immediate attention stand out on the Dispatch Summary page (see Dispatch Summary link in the orange left-hand menu). Once more, a history of any changes to the urgency of a job can be tracked by clicking the (H) link at the end of the field header. It will indicate how many history changes have been made by adding a number after the H and will record the time, date and user that changed the urgency.
Received By: This field records the organisation representative that took the dispatch job (usually, but not necessarily the one who entered it onto the system). Only ShelterBuddy users can appear in this list and they can be added/removed by going into Administration in the orange left-hand menu > Edit User Access > Find User, searching for their details and marking or un-marking the checkbox User can receive dispatch calls just above the “Update User” button on their user profile page.
Police Case Number: For sites that work closely with local police, this free text field allows them a place to record a corresponding case number for police reference. This field is searchable via the Dispatch Search page.
Beneath this section is a blue bar labelled “Establishments”. This can be used to gather statistics on particular business types or establishments you may need to keep tabs on, such as circuses, zoos, pet shops or puppy farms etc. Click on the (+) symbol at the end of the blue bar to expand it and see all options: This is a multi-select section, so check as many as apply for this job.
After the Establishments bar is a section to record violence alerts and job details:
Is anyone at the address likely to be violent?*: this will default to Unknown. If this is incorrect, click on the down arrow to select Yes or No.
Potential Violence Details: if Yes was selected in the above field, enter an explanation in this field, EX has a physically violent past, attacked the person making the request, etc.
Verbally Abusive?*: this will default to Unknown. If this is incorrect, click on the down arrow to select Yes or No.
For the fields marked with an asterisk* above, if "Yes" is selected this will trigger a warning pop-up to display both on the Dispatch job and the Person page every time that job or person is opened/reloaded.
Job Details: This free text box is where the details of the complaint are recorded. Once the job is saved, the box will clear both for security reasons and for quick updating later, and the (H) link next to the heading will show a number to denote how many entries are saved there. Click the (H) to view previous entries. (limit 5000 characters)
NB: notes into this field can be edited, but not deleted.
Old Job # / Date Import #: This free text field is only relevant for clients who previously used another system and had information relating to this job stored on that system.
Address: This field relates to the animal’s current location, i.e. the address the officer must attend to view the animal. This may or may not be the same as one of the people attached above.
If the address is the same as one of the attached Person use the Select from attached persons link to skip back to the top of the page. Beneath each person’s address is a Use Address link. Click this link to apply those details to the animal’s address fields.
If the animal is located somewhere other than the person or persons attached to the job, e.g. if the animal is a guard animal at a business property or an empty lot, or in a car located away from its residential address, the location of the animal can be hand-entered.
There is a field for Nearest Cross Street – this is to aid the officer in locating the address but is an optional field.
Map Reference: A map reference can be added to help the officer locate the address
Vehicle Registration: if the animal is trapped in a vehicle and the VIN or registration number is known, enter it here.
Vehicle Description: if the animal is trapped in a vehicle, enter the vehicle’s description here.
Directions to Property: if the caller/witness has given specific instructions on how to find the address or location of a vehicle, enter it here.
Notes: any additional information pertaining to the animal’s location or directions on how to find the address can be entered here.
Beneath the Address information, but contained within the same area, are options that relate to previous investigations at the same or similar addresses to the animal’s address:
WARNING – This address is listed as an address of interest: this will display if the address has been set as an “address of interest”, i.e. one that has had multiple investigations.
Details: Any information pertaining to the “Address of interest” setting will appear here.
Jobs on the same street (*): This will display a number in brackets to identify if any jobs have previously been issued on the same street. Click the (+) at the end of the bar to expand and see details.
Jobs at the same address (*): This will display a number in brackets to identify if any jobs have previously been issued for this address before. This works independently of the “address of interest” setting. Click the (+) at the end of the bar to expand and see details.
Animals Registered / Licensed at this address (*): if your organisation licenses/registers animals on behalf of a government agency, then any animals that have been licensed or registered to this particular address will be indicated by a number in brackets here. Click the (+) at the end of the bar to expand and see details.
Animal Details: Note: It is assumed that when a job is initially taken, you may not have enough information to create a complete animal record, so only animals added in this section at the bottom of the job will appear on the Dispatch Summary. Animals linked via an Animal Details page do not display on the Dispatch Summary page. Click the (+) to expand to record rough information of animals the investigating officer should specifically look for. Complete the following:
Commercial Livestock: Check this box if the job relates to animals kept as part of rural industry.
Complainant Observed Animals: Check this box to confirm the person lodging the complaint saw the animal(s) themselves, or leave unmarked if they haven’t been able to actually view the animal (e.g. if it is locked inside a house).
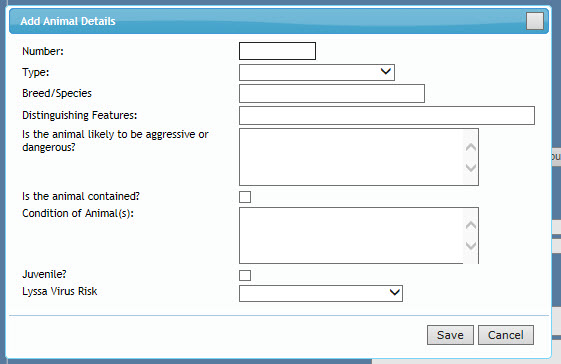
Add Animal Details: Click this link to deploy a pop-up that enables you to describe the animals pertaining to this job.
Number of Animals: enter the number of animals that are the same animal type.
Type: click on the down arrow to select the type of animal.
Breed: If the animal is a mixed breed, select the breed the animal primarily looks like. Type in the first few letters of the animal’s primary breed then click Find Breed/Species. This will display a pop-up menu that will display all breeds for that type of animal beginning with and containing one to four letters in the order typed or a breed will automatically default. If this is the incorrect breed, only type in the first letter of the desired breed to start the pop-up
Distinguishing Features: enter a brief description of identifying features such as why the animal needs ambulance assistance.
Condition of Animal(s): enter a more detailed description of the animal(s) the request is for.
Click Save to continue.
If there is more than one type of animal for this job, click the Add Animal Details link again to deploy another pop-up and repeat for another animal type. Repeat as often as required. Each group of animals will be recorded separately, for easy reference.
Click Submit. This saves the job details.
Depending on your local protocols, other options are now available in the Dispatch Menu on the right-hand side, including:
Wildlife Search: use this link to search for allocated wildlife rescuer/carers for this city/suburb/area and animal type.
Edit Details: This will take you to the questions set up previously for any given code type. They may not be relevant to your process.
Add Legal Proceeding
Administrative Hearing
Print Inspection / Follow up Details
Cruelty Complaint Summary: Click this link to display a print-friendly summary of the job you have just taken. If turned on for your site, a mini-summary will appear at the bottom that is appropriate to copy and paste into a computer-to-phone SMS program.
Upload / View Investigation Files: Document manager where documents or images relating to this job can be stored.
Add Dispatch Job from These Details: if another job needs to be created as a result of this job (e.g. an ambulance job to rescue a stray animal becomes a cruelty complaint), use this link to copy some of the information and link the two jobs.
Ongoing Dispatch Notes (H - *): Free text notes with history where investigators can store their own notes.
Complete Dispatch History: Opens a report detailing status changes, details of changes, Dates, user information and the date/time the job was added (in case it's different to the date/time the job displays).


 This will automatically open the bar marked Dispatch Codes which will then load the options relevant to the job type you selected, as set up for your site.
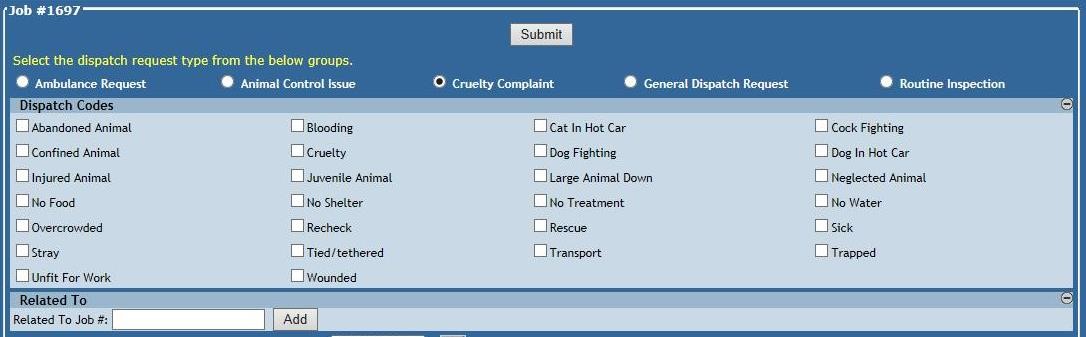 You can also relate this job to another job (either active or finalised) using the link just below it if you know there is another job for this person, business or location that may be relevant to the details of this one.
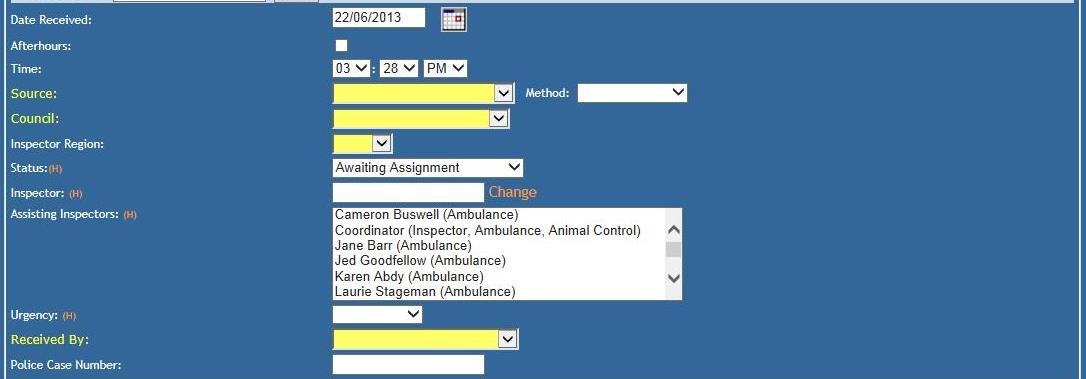
 This represents the organization that is responsible for making sure the job is acted upon and if it does ultimately go to court, they would be the umbrella organization responsible for the prosecution and the welfare of any animals seized as a result of this job.
 This is a multi-select section, so check as many as apply for this job.


Comments