
Configuring Your Region’s Clinic
- Login to Shelter Buddy using a username with administrative privileges who belongs to the same region as the clinic that is to be configured.
- Click the Administration link in the main menu in the orange bar at the left-hand side of the screen after you log in.
- Click the link Spay Neuter Scheduling in the administration menu that appears.
After these three steps, four menu options will be presented:
- Make Scheduling Adjustment
Clicking this menu option will show the scheduling adjustment screen, where you can restrict the type of animal and the amount of time available for the clinic on a given day. You can make adjustments for a single date, the same day every week, or the same day every month. - Remove Scheduling Adjustment
This menu option allows you to remove any scheduling adjustments that have been created and are no longer needed. - Cancel an Appointment
You can cancel any appointment made for any animal. This menu leads to a screen that displays all appointments in a given date range and allows you to remove any of these appointments. - Configure Surgery Schedule
Before appointments can be booked, the clinic in the region needs to be configured. Configuration items are the number of vets in the clinic, the number of hours the clinic is open per day, and the number of ferals that can be processed by the clinic per day. Ferals are not included in normal scheduling and an additional x number of ferals per day is allowed for, depending on the configuration.
Animal Appointments
Making a Spay/Neuter Clinic Appointment for an Animal
After the clinic has been initially configured, you can now schedule clinic appointments for animals. This can be done on the Vet Notes page, following the steps below.
- Search for an animal by whatever identifying criteria you need, and bring up the Animal Details page.
- On the Animal Details page, there is a Vet Notes link in the “Animal Menu” at the top on the right-hand side of the page. Click this link to go to the Vet Notes page.
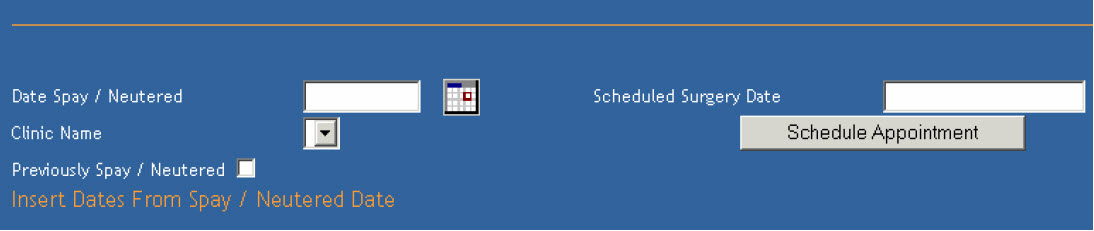
- On the Vet Notes page, there is a field called “Scheduled Surgery Date” and a button beneath it labelled “Schedule Appointment”. If the animal currently has an appointment for surgery at the clinic, the date of the appointment will be displayed in the “Scheduled Surgery Date” field.
- Click the “Schedule Appointment” button to schedule a new appointment for the animal. A smaller window will pop-up that allows you to select the type of procedure to be scheduled, and the date the appointment is for.
- The window that pops up is a wizard-style series of pages that ask you the type of procedure that needs to be done, finds the next available date for that procedure and animal type and allows you to select a different date if you wish.

- If the animal’s details as entered on the Animal Details page aren’t sufficient to decide how long the procedure might take, a page like the following will be shown:
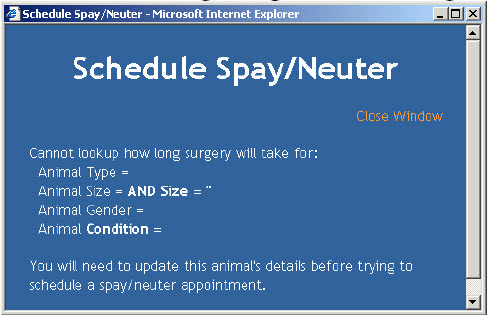
Any empty or NULL fields need to be filled out. In this case, the animal’s Type, Size, Gender and Condition have not been entered. Shelter Buddy needs this information to be able to work out how long the procedure will take, so at this point, you must close this window and go back to the animal details page to enter the information in, then repeat the steps from Step 3 to 6.
Be sure to press the Update Details button on the Animal Details page to save the information into the database before continuing. - The next screen presents the next available date for the procedure and animal type that you have specified, by starting at tomorrow’s date and checking until there is a day with enough free time in the clinic. This takes into account all other animal appointments and whether there is enough time left on each given day, as well as restrictions made by scheduling adjustments done in the administration section.
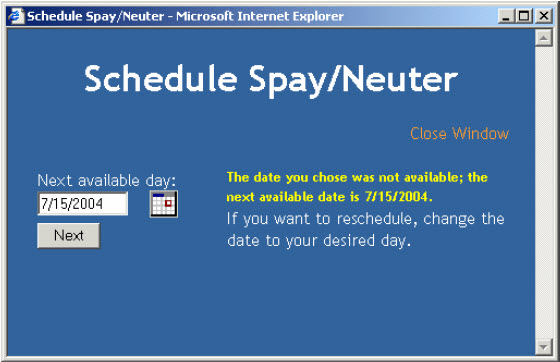
You can also change the date to specify any possible date. After you request a date, Shelter Buddy checks to see if the procedure can be done on that date according to restrictions and other animals scheduled for that date. If the date cannot be used, a message will be shown in yellow text to inform you that the date you have requested is unavailable. The next available day will be used instead. - When you are satisfied with the date that has been selected, click Next to confirm the appointment. A message will be displayed confirming that the appointment has been scheduled.
Vet Report – Scheduled Surgery Report
The spay/neuter clinic’s vet can see which animals have appointments for any given day by viewing the Scheduled Surgery Report, found in Reports, Vet Reports. The first screen shown is below: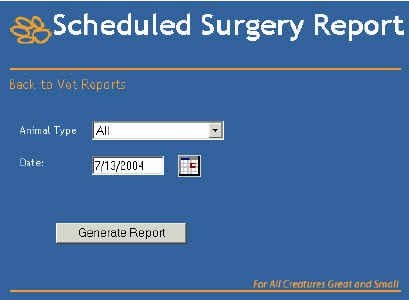
Select an animal type and desired date, and click Generate Report. The default for each field is today’s date and all animal types.
When you click Generate Report, a list of animals with appointments in the clinic will be displayed. Any animals that were admitted for their appointment on a previous day but did not have surgery will be carried over to today’s list of appointments, and will be marked as such, with “Carried Over” beneath the appointment date on the report results, as below: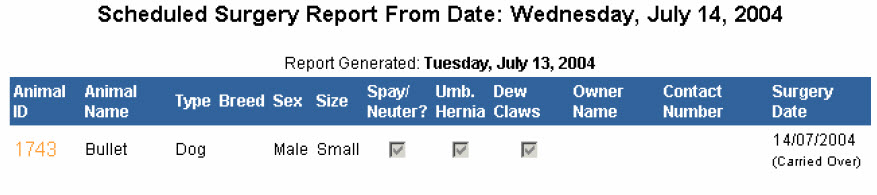
The animal ID field links directly to the Vet Notes page for each animal, and the Owner
Name field links to the person details page for that owner.
Admitting an Animal to the Clinic
To admit an animal to the clinic, you must go to the Vet Notes page for that animal, then click Add Clinic Consultation. The animal’s appointment details will be listed at the top of the page. Select the procedure to be carried out and any additional conditions. To admit the animal and print a disclaimer for the animal’s owner, click Update + Disclaimer at the bottom of the page.
Note: For the animal to be marked as admitted to the clinic, the Update + Disclaimer button MUST be clicked. Only if the disclaimer has been displayed will the animal’s appointment be marked admitted and thus be carried-over to the next day if the surgery is not carried out.
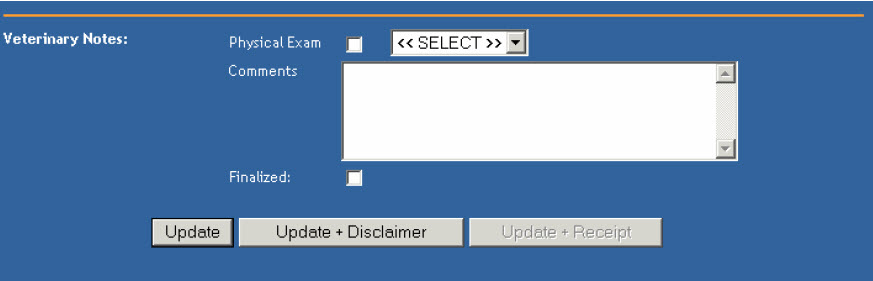
Finalising an Animal When Surgery is Complete
Once the animal’s surgery has been carried out, tick the Finalized checkbox near the bottom of the Clinic Consultation page. This will mark the appointment as finalized, and also update the Desex Date and Desexed fields of the animal. Note: For the animal’s appointment to be marked as Finalized, the Finalized checkbox MUST be ticked and then one of the Update buttons clicked. If this does not happen, the animal’s appointment will be carried over to the next day, as if surgery had not taken place.
Comments