

You may wish to customise the options available in some of the drop downs in this section of the Animal Details page:

There are different methods to approach this, depending on the drop-down in question. The following instructions have been grouped by similar admin features.
You will need access to the Administration menu to perform these tasks.
Ear Type & Tail Type
These two features describe the physical attributes of these body parts so they can be more consistently described and therefore provide helpful information in identifying individuals, especially for Lost and Found purposes.
To Add, Edit or Remove an Ear or Tail Type from your list:
- From the Welcome/Search page, click on the Administration link in the orange left-hand menu.
- Find and click on the option Edit Drop Down Lists
- In the upper section of the resulting page, find the option Animal Ear Type or Animal Tail Type as required.
- Click the Edit link adjacent to the option you need to manage.
- A "quick entry" page will display, showing the existing options in your list.
- To Add a new entry, simply follow these steps:
- Place your cursor into the text box at the bottom
- Type the option exactly as you would like it to appear on your list (no auto-case exists here)
- Press the Enter key on your keyboard to save. Simple as that.
- To Edit an existing entry:
- Hover your mouse cursor over the item you wish to edit until a small icon shaped like a pencil appears on the left:
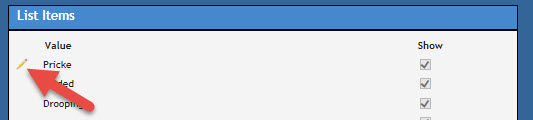
- Click on the pencil icon and the item will open into a text box and the Show column will activate:

- Enter your cursor into the Value text box and make whatever change you require.
- If you do not wish the item to show on your list at all, click the box in the Show column to remove the tick/checkmark.
- When you have made all the adjustments required, click the green spot with the white tick/checkmark to save. OR
- Click the red spot with the white cross to reject changes and return to the start without saving.
- Hover your mouse cursor over the item you wish to edit until a small icon shaped like a pencil appears on the left:
- Items in this list cannot be deleted completely, but they can be disabled by removing the tick/checkmark in the Show column as described above.
Collar Type
Collar Type describes the physical quality of a collar: it might be a style or special type of collar (e.g. anti-barking or martingale collar) or it may refer to whatever the collar is made from (e.g. leather).
To Add, Edit or Remove a Collar Type from your list:
- From the Welcome/Search page, click on the Administration link in the orange left-hand menu.
- Find and click on the option Edit Drop Down Lists
- In the upper section of the resulting page, find the option Collar Type.
- Click the Edit link adjacent to the option you need to manage.
- A "quick entry" page will display, showing the existing options in your list.
- To Add a new entry, simply follow these steps:
- Place your cursor into the text box at the bottom
- Type the option exactly as you would like it to appear on your list (no auto-case exists here)
- Press the Enter key on your keyboard to save. Simple as that.
- To Edit an existing entry:
- Hover your mouse cursor over the item you wish to edit until a small icon shaped like a pencil appears on the left:

- Click on the pencil icon and the item will open into a text box and the Show column will activate:

- Enter your cursor into the Value text box and make whatever change you require.
- If you do not wish the item to show on your list at all, click the box in the Show column to remove the tick/checkmark.
- When you have made all the adjustments required, click the green spot with the white tick/checkmark to save. OR
- Click the red spot with the white cross to reject changes and return to the start without saving.
- Hover your mouse cursor over the item you wish to edit until a small icon shaped like a pencil appears on the left:
- Items in this list cannot be deleted completely, but they can be disabled by removing the tick/checkmark in the Show column as described above.
Collar Description
Collar Description is used to identify colours or patterns the collar may come in. This is a common marker for an individual animal and having it in a drop-down can save your users time by simply clicking and selecting rather than having to type it out every time.
To Add, Edit or Remove an Ear or Tail Type from your list:
- From the Welcome/Search page, click on the Administration link in the orange left-hand menu.
- Find and click on the option Edit Drop Down Lists
- Scroll down on the resulting page, find the option Collar Description / colourName.
- To Add a new entry, follow these steps:
- Click the Add link option
- A pop-up will appear with a free text field.
- Place your cursor into the text fields and type the option exactly as you would like it to appear on your list (no auto-case exists here)
- Click the Add Description button and the pop-up will save and close.
- Click Close Window to discard your changes and close the pop-up.
- To Edit an existing entry:
- Click the Edit link option
- A pop-up will appear.
- Click the down arrow to select the item you wish to change from the drop-down box.
- Place your cursor into the text fields and type the option exactly as you would like it to appear on your list (no auto-case exists here)
- Click the Edit Description button and the pop-up will save and close.
- Click Close Window to discard your changes and close the pop-up.
- To Delete an existing entry:
- Click the Delete link option
- A pop-up will appear.
- Click the down arrow to select the item you wish to remove from the drop-down box.
- Click the Delete Description button and the pop-up will save and close.
- Click Close Window to discard your changes and close the pop-up.
- NOTE: Deleting items from this list is permanent. They can't be re-enabled and must be re-entered. However, any records they were assigned to previously will continue to display removed items until such a time as the page is updated and the field manually changed.
Coat Type & Coat Length
Coat type and length are used in conjunction to describe an animal's fur or hair. "Type" usually refers to texture, e.g. "thick", "curly", "smooth" etc. This is to help identify individuals, particularly in mixed breed animals. For example, a Maltese/Poodle mix might have either curly fur like the Poodle or smooth, straight fur like the Maltese - or something in between. It might be long or clipped short. You can help to identify this individual by describing these coat qualities in a consistent way.
To Add, Edit or Remove Coat Type or Coat Length from your list:
- From the Welcome/Search page, click on the Administration link in the orange left-hand menu.
- Find and click on the option Edit Drop Down Lists
- Scroll down to find the option Euthanasia Reasons / Animal Features.
- Click Maintain.
- The Euthanasia Reasons list will display by default.
- Click the down arrow on the Animal Feature box to select the item you require:
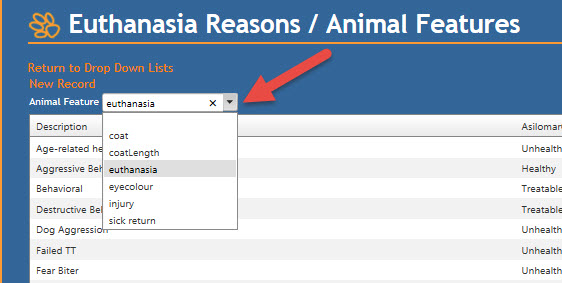
NOTE: "coat" is for Coat Type, "coatLength" refers to the Coat Length drop down. - Click on the item to select it and the relevant list of options will load.
- To Add a new item:
- Click the New Record link at the top of the page, just above the Animal Feature heading.
- Place your cursor into the resulting text box and type the item exactly as you wish it to appear. There is not auto-case here.
- Click the Save button to keep your entry or Cancel to return to the list page without saving.
- To Edit an existing item:
- From the list page, find the item you wish to edit and click the Edit link on the right side on the same row.
- Place your cursor into the resulting text box and type the item exactly as you wish it to appear. There is not auto-case here.
- Click the Save button to keep your entry or Cancel to return to the list page without saving.
- To Delete an existing item:
- From the list page, find the item you wish to edit and click the Delete link on the right side on the same row.
- You will receive a popup asking you to confirm you would like to delete the item.
- Click "Yes" to confirm or "No" to cancel and return to the page.
- Once deleted, the item will still appear in the list, but there will be no Edit link visible and the Delete link will now show Undelete.
- If you change your mind and would like to reinstate the item at any time, click the Undelete link to return it to the visible drop-down list.
Eye Colour/Color
Eye colour is recorded as a drop-down because it is often the only distinguishing feature the animal may have (in a room full of black cats, sometimes the only obvious physical difference is the colour of their eyes, for example).
To Add, Edit or Remove an Eye Colour from your list:
- From the Welcome/Search page, click on the Administration link in the orange left-hand menu.
- Find and click on the option Edit Drop Down Lists
- Scroll down to find the option Euthanasia Reasons / Animal Features.
- Click Maintain.
- The Euthanasia Reasons list will display by default.
- Click the down arrow on the Animal Feature box to select the "eyecolour" option:
- Click on the item to select it and the relevant list of options will load.
- To Add a new item:
- Click the New Record link at the top of the page, just above the Animal Feature heading.
- Place your cursor into the resulting text box and type the item exactly as you wish it to appear. There is not auto-case here.
- Click the Save button to keep your entry or Cancel to return to the list page without saving.
- To Edit an existing item:
- From the list page, find the item you wish to edit and click the Edit link on the right side on the same row.
- Place your cursor into the resulting text box and type the item exactly as you wish it to appear. There is not auto-case here.
- Click the Save button to keep your entry or Cancel to return to the list page without saving.
- To Delete an existing item:
- From the list page, find the item you wish to edit and click the Delete link on the right side on the same row.
- You will receive a popup asking you to confirm you would like to delete the item.
- Click "Yes" to confirm or "No" to cancel and return to the page.
- Once deleted, the item will still appear in the list, but there will be no Edit link visible and the Delete link will now show Undelete.
- If you change your mind and would like to reinstate the item at any time, click the Undelete link to return it to the visible drop-down list.
Comments